Posts: 102
Threads: 5
Joined: Jan 2014
Location: USA
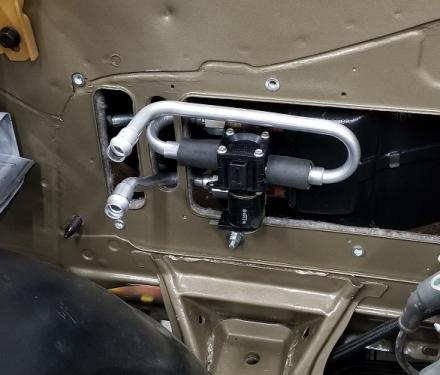
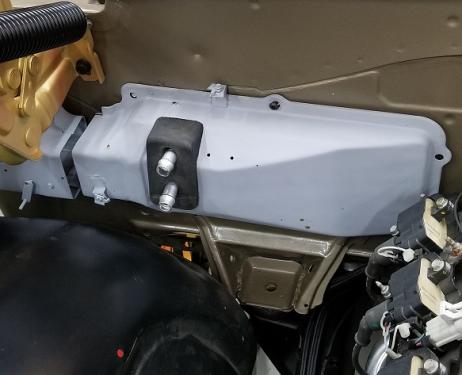
Here are the heater tubes I bent with the 3D printed die posted earlier.
Adding Vintage Air A/C in my 61 Impala. Since the heater core is now part of the underdash unit, their solution was to eliminate the heater box in the engine compartment and replace it with a really crappy plastic flat block-off plate with even uglier grommets for the heat and air lines to get inside. and then to bolt the new electric heater control valve to the inner fender. Didn't like that at all. So bent up these lines to use the original heater core cover, hide the new valve inside (there is all kinds of room because the heater core is no longer taking up that space). That cover is free to be taken on and off with no parts attached to it, so service should be covered. Well, except that the heater core is sealed into the glued together VA underdash unit. so replacement means taking out the entire unit from under the dash anyway.
Retired old guy finally living the dream and enjoying life to the fullest!!!
Posts: 102
Threads: 5
Joined: Jan 2014
Location: USA
The following 3 users Like rubes's post:
rleete (05-29-2024), EdK (05-30-2024), JScott (05-30-2024)
Cut some metric threads with my imperial Hardinge lathe.
needed a -6 AN to M12x1.75. That arrangement with 1.75 thread is hard to find (1.5 thread is everywhere). Found one at Amazon for $10 and $10 shipping. No thanx. I almost gave in and was gonna use a brass fitting with hose barb. Then I remembered that about 10 years ago a bought a set of custom gears for the Hardinge to do metric, and have never used them. I had a fitting with M16 threads I whittled down and re-threaded...presto changeo.
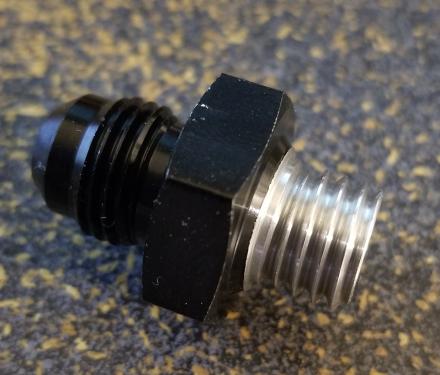
By the way...its for an LS engine pre-luber. Cant just use a drill down the distributor hole to spin the oil pump like an old small or big block chevy. So, I had a "spare" big block chevy oil pump on the shelf, and a bucket. But like everything with me, it got way complicated and CNC is now involved in making other parts too. I'll share when I get it done.
Retired old guy finally living the dream and enjoying life to the fullest!!!
Posts: 798
Threads: 52
Joined: Mar 2012
Location: Rochester, NY
Custom car parts. I like it.
Full of ideas, but slow to produce parts
Posts: 798
Threads: 52
Joined: Mar 2012
Location: Rochester, NY
The following 6 users Like rleete's post:
JScott (06-02-2024), rubes (06-02-2024), EdK (06-02-2024), Hawkeye (06-02-2024), Vinny (06-03-2024), f350ca (06-04-2024)
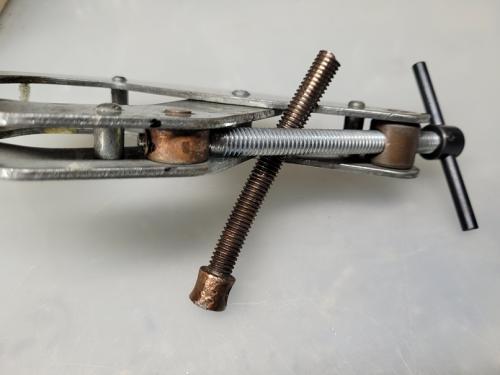
Someone at work attempted to tighten a couple of Kant-twist clamps with a pair of vise grips. In both cases, the screw was bent, and the clamps were quietly discarded. I fished them out of the scrap bin to repair. One, I was able to straighten the screw using a block of wood and judicious hammer blows. Works just fine. The other, while trying the same fix, ended up worse than before, and I had to cut the screw to get it out. It has been sitting waiting to be fixed for many months.
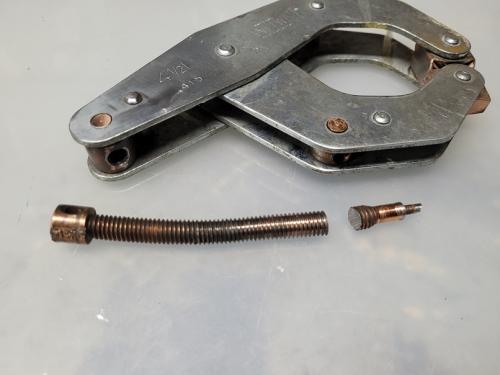
Lucky for me, they are expanding our building. Aside from the fact that I get a huge new office all to myself, complete with all new furniture, the construction workers are throwing out all sorts of useful stuff. Among the finds was several pieces of 3/8-16 threaded rod. Perfect for the new screw. Steel end is pinned to the threaded rod for extra secure fit. Not shown is the tiny groove for the snap ring I had to file by hand. No way I was going to replicate the original staked end. Naturally, I had to blue it.
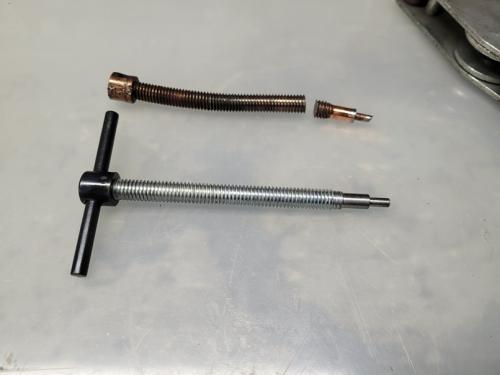
And here she is all fixed. It will be reserved a place of honor on my welding cart.
Full of ideas, but slow to produce parts
Posts: 102
Threads: 5
Joined: Jan 2014
Location: USA
one of the few things...hmmm, make that the ONLY thing, I miss about working...I used to get tons of stuff from there.
Retired old guy finally living the dream and enjoying life to the fullest!!!
Posts: 102
Threads: 5
Joined: Jan 2014
Location: USA
The following 5 users Like rubes's post:
EdK (06-07-2024), Vinny (06-07-2024), rleete (06-08-2024), arvidj (06-10-2024), JScott (06-21-2024)
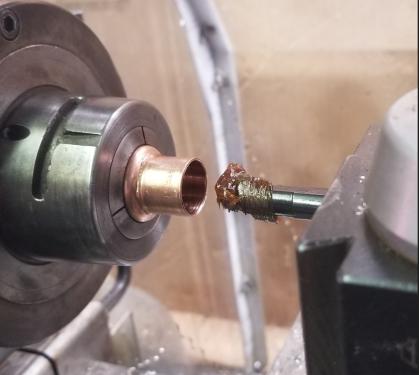
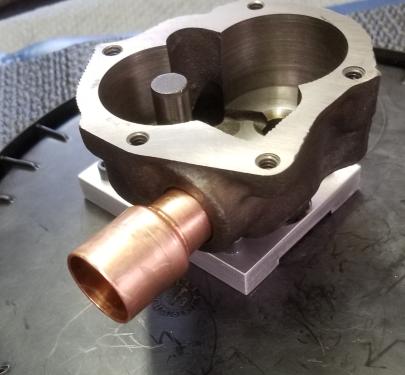
Swaged a copper fitting to increase the OD so I can press it into my oil pump pickup for my pre-luber.
Needing a pump pickup tube to reach the bottom of my bucket, I found a copper reducer fitting was "just" a bit to small to press into the hole on the pump. So I chucked it up in the lathe... spun a boring bar around backwards in the tool holder...rotated the tool post slightly so I had a "point contact" on the ID of the fitting...greased it up and rode the tool out while the fitting rotated at slowish RPM. Basically a metal spinning operation in miniature.
Grew the OD just enough to be a press fit into the pump pickup hole. Few more pieces still needed to extend to the bottom of the bucket.
I hope it has enough suck to lift the oil 
Retired old guy finally living the dream and enjoying life to the fullest!!!
Posts: 798
Threads: 52
Joined: Mar 2012
Location: Rochester, NY
Creative solution.
Full of ideas, but slow to produce parts
Posts: 798
Threads: 52
Joined: Mar 2012
Location: Rochester, NY
The following 5 users Like rleete's post:
Vinny (06-19-2024), arvidj (06-19-2024), EdK (06-20-2024), f350ca (06-20-2024), JScott (06-21-2024)
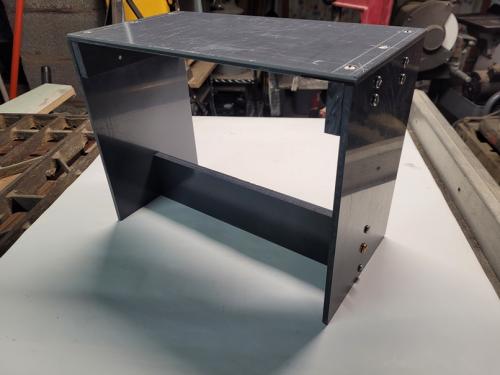
Okay, so this isn't metalworking, but I whipped it up inside 2.5 hours, and it involved tapping lots of holes. The plastic was salvaged from the scrap bin, and the screws are discards from the electroforming department. Total cost to me was time spent.
I got to move into my huge new office yesterday. Today was spent getting all my stuff put away and setting up the new computer. This new one is a mini tower, and to keep cord clutter to a minimum, I put it under my fancy new desk. But that means I have to reach way underneath to hit the power button or get on my knees. At my age, that doesn't seem like a very good option. So, I built this riser to get the box up off the floor and puts the power button within reach.
I may have gone a bit overboard with the screws, but I didn't want to use any cement, so overkill it is.
Full of ideas, but slow to produce parts
Posts: 798
Threads: 52
Joined: Mar 2012
Location: Rochester, NY
06-22-2024, 06:21 PM
(This post was last modified: 06-22-2024, 06:23 PM by rleete.)
Back to some machining. Tiny stuff this time, and I fear the day I can't see to do this kind of thing.
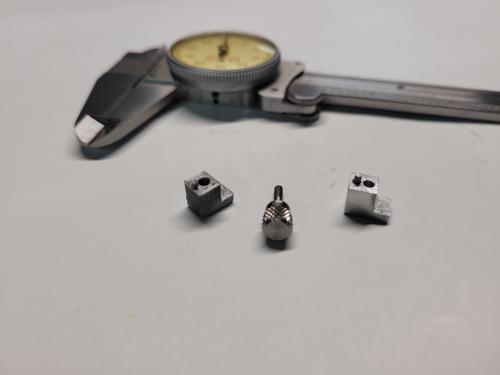
A while back I posted a vintage Starrett caliper I got (and not one "you suck!). When I got it, it was missing the dial clamp but no big deal. Starrett sells them. Unfortunately, their shipping and handling is outrageous. Not a problem, Thingiverse has one, so I'll just print it. But that bugged me, putting a cheap plastic part on my calipers, even though the original is also plastic (ABS) for many years now.
But in my stubbornness, I had to re-make it in metal. For reference, that screw is #2-56, and the pin is 1/16" diameter.
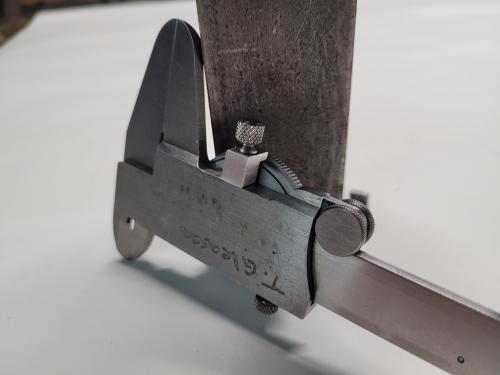
And here it is in its forever home. Ironically, the dial stays zeroed even with the clamp missing, but I am happy that it is now complete.
Full of ideas, but slow to produce parts
Posts: 8,891
Threads: 320
Joined: Feb 2012
Location: Arizona/Minnesota
The following 1 user Likes EdK's post:
rleete (06-23-2024)
(06-22-2024, 06:21 PM)rleete Wrote: Back to some machining. Tiny stuff this time, and I fear the day I can't see to do this kind of thing.
A while back I posted a vintage Starrett caliper I got (and not one "you suck!). When I got it, it was missing the dial clamp but no big deal. Starrett sells them. Unfortunately, their shipping and handling is outrageous. Not a problem, Thingiverse has one, so I'll just print it. But that bugged me, putting a cheap plastic part on my calipers, even though the original is also plastic (ABS) for many years now.
But in my stubbornness, I had to re-make it in metal. For reference, that screw is #2-56, and the pin is 1/16" diameter.
And here it is in its forever home. Ironically, the dial stays zeroed even with the clamp missing, but I am happy that it is now complete.


Ed
|


