Todays Project - What did you do today?
I believe the prints are for the C. W. Woodson Vertical Steam engine with reverse, from Popular Science, April, 1947. I'm currently building that very engine... Not very well, I might add.

Chuck
Micromark 7x14 Lathe, X2 Mill , old Green 4x6 bandsaw
The difficult takes me a while, the impossible takes a little longer.
Reply
Thanks given by:
prints are actually laying there cause I'm trying to draw them up in Solidworks, which I need to get back too scribbling with.
dallen, proud to be a member of MetalworkingFun Forum since Apr 2012.

If life seems normal, your not going fast enough! Tongue
Reply
Thanks given by:
I've been avoiding the inevitable trying to deny the fact that winter is around the corner, but today I lit the boiler and have heat in the shop and house. The shaper project may slow down now, I won't have to work as hard just to keep warm.
Free advice is worth exactly what you payed for it.
Greg
Reply
Thanks given by:
Finally got the gearbox back together after cleaning up that one gear with the hob. Had to clean the chinese goo out of the rotary table first. Yeach! Grayish, brownish, blackish, yellowish nasty stuff.

So here's the completed gearbox. Sorry I forgot to take the pic till after the lithium grease was on. I'm going to wait till tomorrow to put it back on the lathe. Took 10 mins to get it apart. 2+ hours to put it back together. Note to self: use a marker on the gear teeth to indicate where the keyway is.

[Image: gearbox.jpg]
Logan 200, Index 40H Mill, Boyer-Shultz 612 Surface Grinder, HF 4x6 Bandsaw, a shear with no name, ...
the nobucks boutique etsy shop  |  the nobucks boutique
Reply
Thanks given by:
Ok, not today but last Sunday, but that's close enough.

This has been one of the finest Minnesota falls I can remember. It was high 70's to low 80s. Decided it was time to get the bike ready for winter. Mine is not as tolerant of inclement weather as Ken's. Even rain in the summer is a show stopper.


Got it all cleaned up ...


... then covered with the battery charger attached. Just push the the lift and bike into the garage and we're done. But a little bad news, but also some good news.


The bad news is that the dolly handle for the lift broke.

The good news is that it broke after the lift and bike were in the garage and within inches of where I wanted it anyway so no need to panic.

Further good news is that I have a model ... thought somewhat distorted ... from which I can get the dimensions to make a better one.

And the ultimate good news is that I am still able to get the bike on and off the lift without any problems. Therefore I see many opportunities for the procrastination that will be required in my future to not make a new handle until I absolutely have to, maybe mid-summer of 2016!!

Isn't life wonderful!!
Reply
Thanks given by:
You got that right Arvid. It's been a great fall so far.

Ed
Reply
Thanks given by:
(10-16-2015, 04:20 PM)arvidj Wrote: Therefore I see many opportunities for the procrastination that will be required in my future to not make a new handle until I absolutely have to, maybe mid-summer of 2016!!

Isn't life wonderful!!

Attaboy Arvid! You fit right in with the rest of us! Big Grin Thumbsup
Willie
Reply
Thanks given by:
Several weeks ago I was welding some stuff [Project #1, or P#1, pictures when its done] and decided it would be better if I removed the rust for painting BEFORE I did the welding as it would be a pain after it was together. I grabbed the 4.5 inch grinders, some flap disks and had at it.

A few minutes into the dirty process I thought "there has to be an easier way" and followed that with a "you know you do have a blast cabinet in the basement".

"Yes, you have had a blast cabinet in the basement for several years but have never gotten around to setting is up."

To paraphrase Darth Vader ... "The procrastination is strong in this one".

"Well then this is the project that will provide the incentive!!" was my reply to myself. So P#1 was put on hold and Tangent Project #2 [TP#2] was started.

"But you do know you will need to extend the copper air line in the floor truss over to where the cabinet is and put in a drop?". So TP#2 was put on hold and TP#3 was started. "And as long as you have all the copper stuff out you should put in part of the tubing to get to the other side of the basement where the lathe and mill are". TP#3 on hold, TP#4 started.

As one might expect TP#4 took longer than expected because there were several 2x10's in the way and I did not have a 1.25 inch bit readily available to make a hole large enough to get the 3/4 copper tubing thru. Amazon was nice enough to send me a 10 piece SpeedBor set in a couple of days. That made some nice holes and I actually managed to not burn the house down while soldering the couplings within a few inches of the floor above. As long as I was at it I actually put in a drop and a drain valve for the hose reel that had been put in between the floor trusses several years ago but never connected.

TP#4 done, back to TP#3, the line to the blast cabinet along with a drop.

Finished that up and back to TP#2, hooking up the blast cabinet. But that meant that I had to build a bracket for the air regulator and filter. TP#2 on hold, TP#2.1 was a regulator bracket by TIG'ing and drilling some scrap bin aluminum into something that looked like a regulator bracket. Then mount it on the side of the cabinet. TP#2.1 so TP#2.2 started by installing the electrical boxes, lights and switches in and on the cabinet. TP#2.2 done, TP#2.3 was wire it all up, replace the incandescent flood lights with LED lights, plug it in, turn stuff on and off without having to call the fire department and we're back to TP#2.

Hook the cabinet to the air drop ...
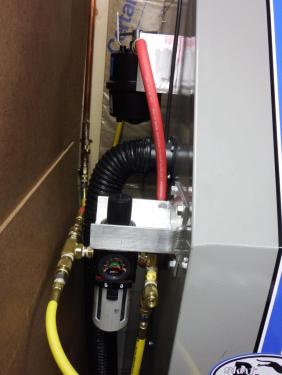
   
... push it back against the wall, and we're done.
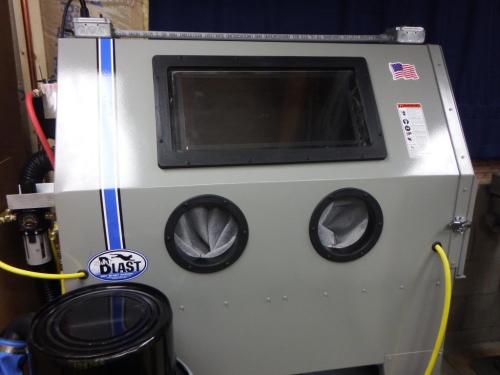
   

Done as long as I don't actually try to use it.

The black canister in the lower left of the picture above is the vacuum for the blast cabinet. It removes the dust from the cabinet allowing me to see what I'm doing and also captures the dust in a filter. There is 3.75 inch hole in the upper right hand corner of the back of the cabinet that allows "makeup air" for the vacuum into the cabinet. As it turns out it will let the curtain that is hanging on the window behind the blast cabinet in also.
   

A quick trip to Menards was required to see if they had an Anti Curtain Sucker Upper [ACSU]. I was able to find one in the plumbing department though some fine tuning and assembly was required. Note that I spent the extra money for the two-tone model.
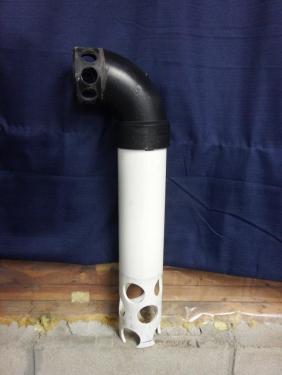
   

The ACSU did not come with installation instructions but I was able to figure it out.
   

The ACSU and blast cabinet seem to work well so I declared TP#2 done and can return to P#1 [the original intent was "to drain the swamp" seems to apply here] and begin blasting the rust off the pieces.

Arvid
Reply
Thanks given by:
Wow Arvid. And here I thought I was the only one to go through that. Big Grin

Tangent projects seem to come by the dozen around here. Bash

I had to move several unopened packages this weekend that were piled up in front of my shop press in order to get to it. All different shipments of raw material for projects I had completely forgotten about. Now I have to try and remember what it was that I ordered it for! Blush
Willie
Reply
Thanks given by:
I write the project on the box, Willie. Doesn't mean I'll find the box when I go to do the project, but it's written on the box!
Logan 200, Index 40H Mill, Boyer-Shultz 612 Surface Grinder, HF 4x6 Bandsaw, a shear with no name, ...
the nobucks boutique etsy shop  |  the nobucks boutique
Reply
Thanks given by:


Users browsing this thread: 65 Guest(s)