Posts: 125
Threads: 18
Joined: May 2014
Location: IN
(09-03-2014, 03:41 PM)EdK Wrote: Another part checked off of the list. The end mill was getting kind of dull so the finish on the flats looks kind of crappy but I can't feel any ridges. That surface is for a bolt head so it's good enough for what it'll be used for.
Ed
Good job Ed, thanks for showing your great work.
tackit, proud to be a member of MetalworkingFun Forum since May 2014.
Posts: 175
Threads: 4
Joined: Sep 2012
Location: Dorset, UK
Looks fine to me Ed. I often sandblast items though, it hides a lot of machine marks!
Arbalest, proud to be a member of MetalworkingFun since Sep 2012.
Posts: 205
Threads: 3
Joined: Jul 2014
Location: Vermont
09-04-2014, 08:01 AM
(This post was last modified: 09-04-2014, 08:02 AM by vtsteam.)
You call that crappy? I knew posting that pic of my tractor repair was a bad idea. But Pixman made me do it...
Nice part!

Posts: 8,890
Threads: 320
Joined: Feb 2012
Location: Arizona/Minnesota
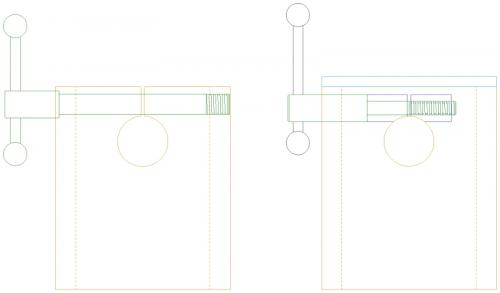
Finally getting some time in the shop. I've decided to change the way the center is clamped in the body. The original plans call for slitting the body and using a threaded rod to squeeze the two halves together to clamp the center. I'm going to use a cotter clamp system instead. I think it will work better than trying to squeeze the slit on two 3/8" thick walls.
Ed

Posts: 3,003
Threads: 51
Joined: Apr 2012
Location: Ontario
A far more elegant way to do it Ed. A split cotter has amazing clamping properties.
Free advice is worth exactly what you payed for it.
Greg
Yer much better way Ed
Rob
Posts: 8,890
Threads: 320
Joined: Feb 2012
Location: Arizona/Minnesota
(10-11-2014, 12:27 PM)f350ca Wrote: A far more elegant way to do it Ed. A split cotter has amazing flaming properties.
Greg,
What does "amazing flaming properties" mean.

My best guess is you meant "amazing clamping properties".
Ed


