Posts: 3,798
Threads: 184
Joined: Jun 2012
Location: Farmington Hills, Michigan
(06-30-2017, 01:05 PM)Roadracer_Al Wrote: Tom, first off, nice work!
I apologize and hope this doesn't sound like criticism, it's not. Just sharing knowledge with the group.
The wood to use for outdoor applications is white oak, not red oak. Red oak soaks up water and will rot quickly if not covered in a film-forming finish.
https://www.youtube.com/watch?v=L6t2AZubF8U
Yes Al, White Oak is preferable to Red Oak for outdoor applications, but in this case it doesn't matter. The only time the truck will see the great outdoors is an occasional pleasure drive if the weather is nice and the three coats of exterior polyurethane should keep it looking nice for that. I was going more for looks here than function and it's hard to beat the look of Red Oak.
Tom
![[Image: 20170629_143051_1.jpg]](http://photos.imageevent.com/tomgriffin/generalstuff/large/20170629_143051_1.jpg)
Posts: 4,683
Threads: 93
Joined: Feb 2012
Location: Perth, Australia
The following 6 users Like Mayhem's post:
f350ca (07-05-2017), EdK (07-05-2017), DaveH (07-05-2017), Mike E. (07-05-2017), SteveG (07-06-2017), TomG (07-08-2017)
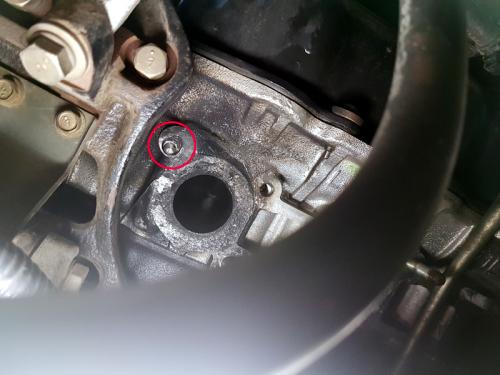
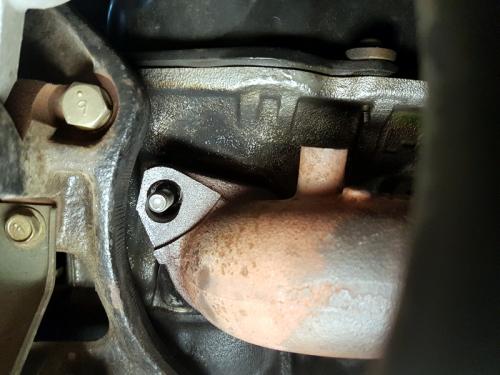
What took a big chunk of time today was repairing a major cock-up that the previous owner of my ute (or their mechanic) had left behind. One of the studs had been broken and then in their attempt to drill it out they had slipped off and drilled into the head. They then tried to compensate with some creative stupidity, leaving one stepped and ragged hole  .
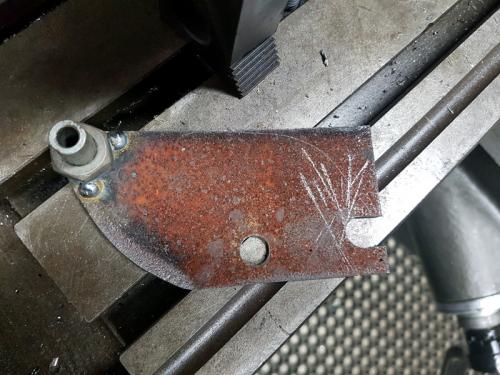
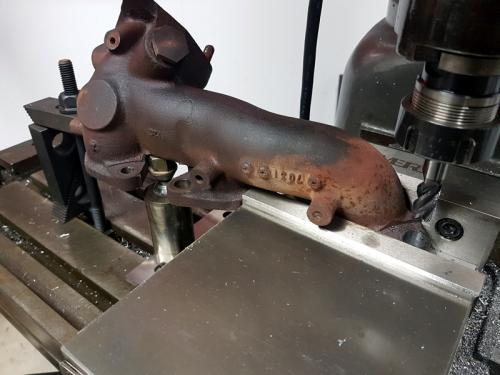
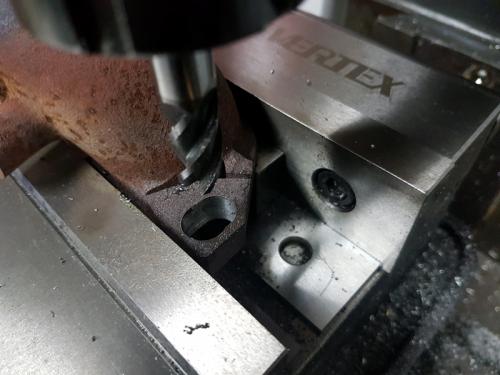
Like most V-6 vehicles, there is next to no room to get any tooling in to work, and I had wanted to get lined up on the broken stud and also perpendicular to the manifold face. So, I made up a plate to bolt on and allow me to line up on the hole and then use a drill bush to drill out the stud. Nice and easy - yeah, right. After fighting my 90° air drill I removed the plate to find that what I thought was the stud wasn't and that I had drilled parallel to it. So, I switched to a 6.8mm drill bit and then tapped for M8 x 1.25. I then had to modify the manifold and have installed the stud with a generous application of high strength Loc-Tite. I still have to put the gearbox back in (new clutch, thrust bearing and pilot bush), so the exhaust will go on last. That stud should be rock solid by the time I tighten up the nut that goes on it.
Tomorrow, I will attack the matching broken stud on the other side. At least that one they didn't bother trying to fix, so I shouldn't have as much trouble!
Some pics:
Hunting American dentists since 2015.
Posts: 3,003
Threads: 51
Joined: Apr 2012
Location: Ontario
Certainly not done today but a followup. Finished the cabinets and got them installed. Then was talked into tiling the floor. Then framing for the washrooms. Then plumbing for the coffee maker.
![[Image: T_cVoTztzvJJpSS6eKLZ-VgQxp4b0EjUENxmwEvF...2-h1276-no]](https://lh3.googleusercontent.com/T_cVoTztzvJJpSS6eKLZ-VgQxp4b0EjUENxmwEvFzHmKyZy4EvAqWkySzdI_ddS-1DiJTZwYq2nQOTmfFMQey9tC76RxC6-wk6O8ZKWOxhg2TtCouESTmMxbxFggl1xQuz1_BebBOMDSbeoqsY0H_SKinCsV80AZWd23DFt9ToaMpvJ5vQ261f0BprfG6d5ldoOts-sNWznl4EqzFc7qkFjmFrajyhaHUg1u7v_3d09kyfLss9uLhzRSQMeqZOazfs4h23sxnQ2RQNP4dX4fSgVnFdyAcZlk_k5bgny3YXEEfqXsjcJhMnWToMFajYP2yOq9d8XJCxqO1U3RLA9zWNGSw0_qHItdxXThSLEfEju595gAzFFbZanMHNtafdzBQXdtjeXuKrVvvSgRUy74MRjpAJwImyX92C1vE2o6Dd5aFpgIYaKHMXQe4QAI-3w9flWTy8ajlzzBk-cqcd-vTEsw5lDrM-M1YRmYsJf_AX2EOgTfSJoDygU-yh6XlF76OuBvNFb7Ygjblon3z_a4UK4VxYMg8SeU3FqA8WNHD3fdo1UcK_a8lCNlDxXBs2PrQ3nDf5eJmgXwTxBajOdJtl4iSw5PK0FXMEtwpMDgxVdYPTNdOSfr9hYk=w1702-h1276-no)
Free advice is worth exactly what you payed for it.
Greg
Posts: 8,854
Threads: 318
Joined: Feb 2012
Location: Arizona/Minnesota
The following 1 user Likes EdK's post:
Roadracer_Al (07-15-2017)
Damn you got some skills Greg. 
Ed
Posts: 4,683
Threads: 93
Joined: Feb 2012
Location: Perth, Australia
What Ed said!
Hunting American dentists since 2015.
Posts: 968
Threads: 67
Joined: Apr 2015
Location: Australia
I ended up with a short offcut of toolholder stock when I sawed up the piece of forklift tyne I had dovetailed in the shaper. Too small to have any rigidity on the toolpost so today I made an indicator holder out of it. About the only thing I think I have got any good at in this machining caper is indicating stock in the 4-jaw chuck as my 3-jaw has about a yard of runout thus never gets used.

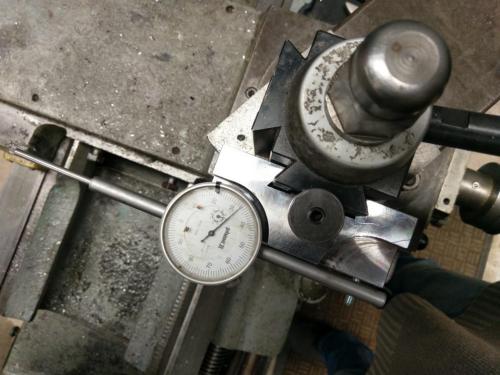
Double-ended for face indicating.
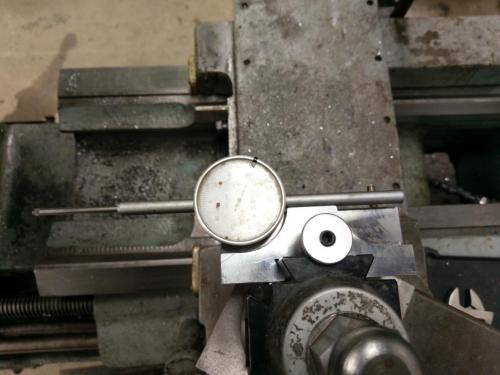
Had to put the locknut under the height-adjusting nut to get the indicator down near centre height.
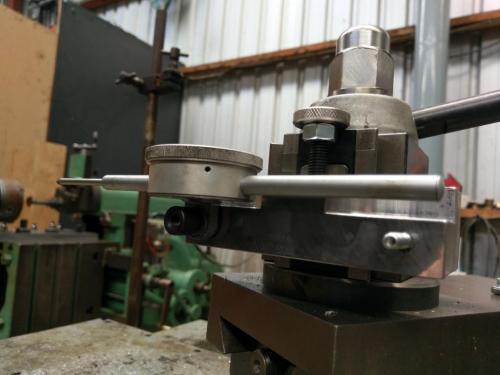
This frees up a good holder that the indicator has been occupying as well as giving me 2-way indicating with just a thumb nut to swap between the two positions. I have to remove the bezel lock screw to use the indicator in the facing position but as I have never used it, I don't see this as a great loss.
Lathe (n); a machine tool used in the production of milling machine components.
Milling Machine (n); a machine tool used in the production of lathe components.
Posts: 3,003
Threads: 51
Joined: Apr 2012
Location: Ontario
The following 7 users Like f350ca's post:
EdK (07-20-2017), TomG (07-20-2017), Dr Stan (07-20-2017), Pete O (07-21-2017), Mike E. (07-21-2017), Mayhem (07-21-2017), aRM (07-30-2017)
I took the time to play with some metal just in case people thought I'd closed the machine shop.
To better use the gage blocks I bough I made a dial bore gauge setter. With a stack of blocks between the bottom and moveable anvil it should be a breeze to adjust the bore gauge. Seen to do a fair bit of bushing work and setting the gauge with a micrometer is a pain.
The base and anvil are cast iron, does that ever grind nice. The top anvil has a spring love it to hold pressure on the gauge blocks. The rod locks with a small split cotter.
![[Image: fjm__isyYFOVDEr6BQ77a0_nwOaFeBWEB3OtIlSp...7-h1276-no]](https://lh3.googleusercontent.com/fjm__isyYFOVDEr6BQ77a0_nwOaFeBWEB3OtIlSpEiGED5QqIgjGU4Odcov-kbRE613if6Um68RmJzY6CuCe3KvffxBvu5x9Nr2j5vofbuoVb7lI-3uwzeBfE8oNTuI1PXLLgLzFgcl9alY4YpQ1a_2MNGo7xJNowNiNmJKTkFbyj1XiJFZ7Z03RP30mxi-BuTVFl5ckbgEwRSPVVVYW_AnWqVdFb5hh856WglZP-2KSmc8Xxd7rZE3l7MkK3q3X7X3EKUKg5BN75e0P6d-32HOgFZjTyxw2G3k-9jrcblyS3P2pyooYa8uyfZ5uJnk6i4gz_LUzIeBXO5L3jSSBpOsvgn__EzVgzsbsyl__JIhhj1V3ADA01Gl3Ss9ccCgAZs-EzWqGmFuCAj8b8Tfyy0IqzGr-15FA15nTmmvDe0luN_ctxDfHwk8ZkVS5jLmhrUXYEMWCEL9NCUn-8c8sdc6C1ynjYYtrEPXJrDvGkiCdu9yBT2T4cDn70S0TPxlA01ydWjGeKn1jAN18lbJZDNPFDa3AB1IWH3sJlr-RWfQgQ-8hPcgEV3obkI2dQaiXP704Ay4ee0P0pfEEJMuMDYF-2XMNqBYLUgSPUkYiZi4xBvJZAH2G8_Oj=w957-h1276-no)
Free advice is worth exactly what you payed for it.
Greg
Posts: 8,854
Threads: 318
Joined: Feb 2012
Location: Arizona/Minnesota
Posts: 3,798
Threads: 184
Joined: Jun 2012
Location: Farmington Hills, Michigan
Nice job Greg.
I haven't even been in my shop this summer. Pretty much spent the whole thing outdoors.
Tom
Posts: 2,328
Threads: 271
Joined: Jun 2014
Location: La Libertad, Philippines
(07-20-2017, 07:28 PM)f350ca Wrote: I took the time to play with some metal just in case people thought I'd closed the machine shop.
To better use the gage blocks I bough I made a dial bore gauge setter. With a stack of blocks between the bottom and moveable anvil it should be a breeze to adjust the bore gauge. Seen to do a fair bit of bushing work and setting the gauge with a micrometer is a pain.
The base and anvil are cast iron, does that ever grind nice. The top anvil has a spring love it to hold pressure on the gauge blocks. The rod locks with a small split cotter.
Any chance of some prints?
|
![[Image: 20170629_143051_1.jpg]](http://photos.imageevent.com/tomgriffin/generalstuff/large/20170629_143051_1.jpg)


![[Image: TomsTechLogo-Profile.png]](http://tomstechniques.com/wp-content/uploads/2013/11/TomsTechLogo-Profile.png)
 .
. 