Hello All,
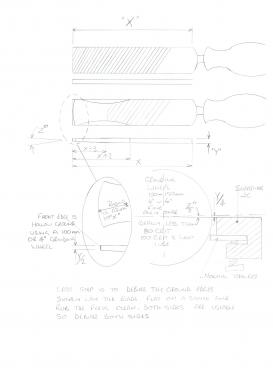
Please see attached sketches, the first shows the process of converting an old file into a flat scraper.

The dimension "X" is the file/scraper lengthand while a bought scraper will have no teeth on the faces when I make one from a file I usually just dull the teeth off on a belt sander as the pattern actually makes it easier to control when oily.
The edges are necked in as can be seen in the second image on the scraper sketch as this allows scraping close to a stepped edge,
The front is radiused so that the corners never dig into the work piece,
The front 1/3rd of the tool is tapered to half of the original file thickness as this helps controlability, if the front edge is too thick it is difficult to see the scraping in progress,
Grinding the cutting edge is critical there is no "bevel" but the edge is hollow ground on a 4"-6" ally oxide wheel, I do it by eye nowadays but was taught to use a jig as drawn, the scraper should point directly at the axis of the wheel which will give an edge that is just less than 90 degrees on both sides of the scraper, and it is best to leave the grinding marks as these aid in starting a "Scrape",
To finish sharpening the tool, lap the top and bottom faces either on a stone or diamond lap, do not use wet and dry paper as this blunts the edge, some people hold the scraper at 90 degrees to the stone and polish the hollow ground edge, but I find that this reduces tool life and grooves the stone badly which ends up rounding the edges badly which means a blunt scraper.
The second attachment

is the sketch of my deburring tool that I often fit on top of my turning tool in a lathe, as the top face of many tools is at centre height by putting this piece of file on top and upside down the cutting edge is automatically at centre height and can be used on the back side of a job without stopping and reversing the lathe, simply swing the toolpost around and you can deburr or add a champher to the bore or OD of most jobs,
1, standard file,
2, file with teeth removed, showing cut lines,
3, showing how it sits on a normal tipped tool,
4, same as 3,
5, how it is used,
As an apprentice we were trained to always fit a shim on top of indexble tipped tools to prevent scarring of what were then very expensive tools, most folks don't bother nowadays, this idea was a variation on a shim made from an old file and sharpened, when you get used to something like this it is really handy, if you've never tried it you'll never miss it, it is particularly handy in a single place tool post, not so much when using a four place post, or a quick change.
There is another version that clamps under the first and second clamping screws and while is upside down, so used on the back of the job but instead of hanging out the back this one sticks out from the side of the main tool so can be used without moving the toolpost orientation which is useful when you need to retain the calibration of the main tool but still want to deburr or champher a job with a tool in the lathe rather than as a post machining operation. This method limits how close you can work to chuck jaws or large shoulders.
One very important thing to remember when modifying files for use as cutting tools is to keep them cold during grinding processes, Many machinists do not realise just how fragile the hardness of a file is, with some grades of Carbon steel losing some of their hardness if the metal exceeds 120 degrees C, so that means if it goes Psst when quenching you've already ruined the hardness. Most folks think that a colour change is required, it isn't, if the colour does change it really is all over though.
Best regards
Rick
Whatever it is, do it today, Tomorrow may not be an option and regret outlasts fatigue.


 I'm now trying to remember which champhering tool that was, was it the freehand one or the one I clamp into my toolpost.
 , three square scrapers are the triangular file equivalent of the flat scraper, with three cutting edges running along the length of the tip of the tool in a triangular shape, used for deburring and scraping inside holes and other concave shapes.