Posts: 2,344
Threads: 53
Joined: Feb 2012
Location: Spencer MA USA
The following 3 users Like PixMan's post:
EdK (06-17-2014), Mayhem (06-17-2014), DaveH (06-18-2014)
Just a couple more hours today, don't know if I'll be able to get more time before the weekend.
Finished milling as much as I could on this side, finished the Ø 14mm bore and its chamfer. I hope it's to the H7 size limits (-0 to +0,012mm), as my gauging tools for bores is limited to Starrett No.S229 telescopic gauges in that size range. The Mitutoyo digital electronic calipers are measuring about .001" small, but repeated measurements with the telescopic gauge and measuring over it with my Mitutoyo 293-344 digital electronic micrometer yielded a consistent 14.005 size.
![[Image: IMG_20140617_194826792_zpsjjdnpzxz.jpg]](http://img.photobucket.com/albums/v466/kenm10759/Dads%20shop/IMG_20140617_194826792_zpsjjdnpzxz.jpg)
I truly hope to finish this weekend because I don't want a pickle, I just want to ride on my motorsickle. 
Posts: 4,683
Threads: 93
Joined: Feb 2012
Location: Perth, Australia
The following 1 user Likes Mayhem's post:
PixMan (06-17-2014)
Looking good Ken. Isn't riding your bike from your house to your shop enough? What if you took the scenic route 
Hunting American dentists since 2015.
Posts: 2,344
Threads: 53
Joined: Feb 2012
Location: Spencer MA USA
(06-17-2014, 08:51 PM)Mayhem Wrote: Looking good Ken. Isn't riding your bike from your house to your shop enough? What if you took the scenic route 
Not practical. I won't ride to the corner store without full leather riding gear, and with my shop just 7-1/2 miles away it's not worth the bother. Nice thought though. I have, on the other hand, taken long rides and made a stop at the shop be the "bio break" that a man of my age so often needs. ;)
Posts: 2,344
Threads: 53
Joined: Feb 2012
Location: Spencer MA USA
The following 1 user Likes PixMan's post:
EdK (06-18-2014)
Well, as I half-expected I'll be starting on Version 2.0 soon. :(
I flipped it over today to counterbore the holes for the M6 socket head cap screws and something seemed wrong. I figured the depth and did the counterbores by setting the tool at the parallels it was sitting on, then dropped the table by the amount of stock that should remain. No problem. Then I stated milling the top side away. Oops, I think I went too deep, because the counterbores look a little shallow.
Doing some mathematics with the print in hand and converting millimeters to the inch readout, I discovered my error. Overall thickness WRONG. I thought I could use 1-1/4" thick stock, turns out I need at least 36mm.
Have I mentioned how I hate converting metric prints drawn in third angle projection and dimensioned using multiple datums? Oh well, at least 10 hours and a chuck of 1018 down the tubes. Not too depressed, I learned a lot about my machine's control so V2.0 done in higher quality stock will be done in half that time.
Anyone need an ugly paperweight?
Posts: 4,683
Threads: 93
Joined: Feb 2012
Location: Perth, Australia
Sorry to hear that Ken. Not for me but for you. You have put a lot of time and effort into this (and other parts for me).
Hunting American dentists since 2015.
Posts: 2,344
Threads: 53
Joined: Feb 2012
Location: Spencer MA USA
Yeah, it sucks. I'll try to get the right stock early next week, just too busy with work right now to get it. On the plus side, things at work are going very well, my boss is quite pleased with my performance.
Posts: 4,683
Threads: 93
Joined: Feb 2012
Location: Perth, Australia
No worries Ken. You know I'm in no rush and whenever you get around to it is fine by me.
Glad to hear your work is going good. Another plate this year as well perhaps?
Hunting American dentists since 2015.
Posts: 4,463
Threads: 184
Joined: Feb 2012
Location: Missouri, USA
06-18-2014, 09:53 PM
(This post was last modified: 06-18-2014, 09:58 PM by Highpower.)
(06-17-2014, 07:33 PM)PixMan Wrote: I truly hope to finish this weekend because I don't want a pickle, I just want to ride on my motorsickle. 
Just be careful of those mountain roads... and yield signs. 
Willie
Posts: 2,685
Threads: 29
Joined: Feb 2012
Location: Nova Scotia, Canada
(06-18-2014, 07:48 PM)PixMan Wrote: I discovered my error. Overall thickness WRONG. I thought I could use 1-1/4" thick stock, turns out I need at least 36mm.
Ken, I rely heavily on Josh Madison's "Convert" program.
Convert
I keep it on my toolbar and bring it up whenever needed.
Busy Bee 12-36 lathe, Busy Bee Mill drill, Busy Bee 4x6 bandsaw, Homemade 9x17 bandsaw, Ad infinitum.
Posts: 97
Threads: 5
Joined: Jun 2014
Location: las vegas burbs

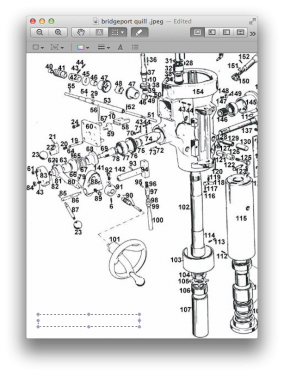
This is a quill assembly for a Bridgeport mill , if it helps you I will get the rest of the information
kenne, proud to be a member of MetalworkingFun Forum since Jun 2014.
|
![[Image: IMG_20140617_194826792_zpsjjdnpzxz.jpg]](http://img.photobucket.com/albums/v466/kenm10759/Dads%20shop/IMG_20140617_194826792_zpsjjdnpzxz.jpg)

![[Image: IMG_20140617_194826792_zpsjjdnpzxz.jpg]](http://img.photobucket.com/albums/v466/kenm10759/Dads%20shop/IMG_20140617_194826792_zpsjjdnpzxz.jpg)


