Posts: 32
Threads: 2
Joined: Mar 2018
Location: Vienna, Austria
The following 3 users Like Nikon1975's post:
TomG (04-11-2018), f350ca (04-11-2018), ScrapMetal (04-27-2018)
So first chips were produced. I was mostly trying to do some cuts to test the feeling and see how I could improve my work position. I learned few things:
1) don't leave your coffee next to the mill
2) The first think I needed was a better vacuum cleaner
3) Bigger cutters are better :-)
4) Cut and feeds calculator gives useful information. On this latter I noticed that all my setup (Mill + table) tent to suffer of vibrations mostly at low RPM, while handle better higher RPM. Eventually I will have a separate table for the machine.
One thing that I tried successfully (and I am wondering why it is not a common practice), is to have the mouth of the vacuum cleaner right at the cutting point. I see that like this there is a flow of air at the cutting point and the area is always mostly clean. I cannot use coolant to clean around. The machine is in an apartment, it would make a mess.
D.
Posts: 3,799
Threads: 184
Joined: Jun 2012
Location: Farmington Hills, Michigan
Now you are hooked. 
It sounds like you need a sturdier table for the mill.
Tom
Posts: 32
Threads: 2
Joined: Mar 2018
Location: Vienna, Austria
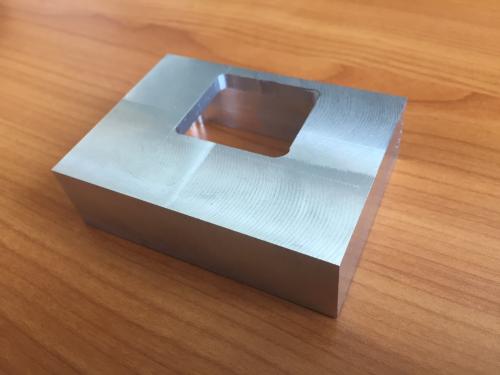
So, yesterday I had finally time to make something beside chips. I tried to make a pair of parallels, square a block, and make a pocket. I am still trying to understand mostly how to optimize things in the workshop, what I need and what I do not need. Here are my observations.
1) I am a bit lost without a DRO. It's kind of difficult for me even to read the scale I have, as it is most of the time covered by the vice.
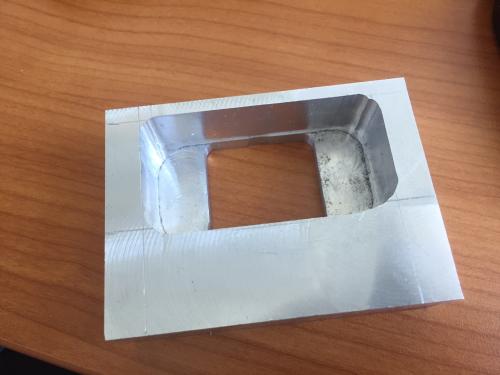
2) I made a pocket 63x40mm 20mm deep. For using this I made plunge milling using a 16mm endmill. I was using a 300rpm. This operation created strong vibrations. It managed to move the head out of the axes and I think also the vice. The table was shaking. I was not brave enough to check if pushing the RPM would make things better. I understood I need to move the machine on a new table and this must be heavy. I am not sure if this can be optimized changing the overlap strategy.
3) I am using Feed and Speed from the CNCCookbook. I am a bit puzzled by the results, as most of the time it tells me to go at the maximum of the RPM and feed. This does not really match with what I see, even if I set up the software with the most conservative configuration.
4) I tried a 50mm face mill and it works OK, the surface it's not 100% mirror, I can still see the cutting circles, but it's acceptable.
5) One thing I feel it's missing is the boring head.
6) One thing I learned is to cut bigger pieces, as my parallels are too short, after I cut out the part I used for holding them.
I would appreciate your comments, as most of you have probably been there.
Regards,
Davide
Posts: 3,799
Threads: 184
Joined: Jun 2012
Location: Farmington Hills, Michigan
The following 1 user Likes TomG's post:
EdK (04-26-2018)
Let's see if I can address a few of your issues:
1) The scale is just for a rough location, most mills don't even have one. You need to learn how to use the dials. A DRO would be a nice addition, but not a necessity.
2) A 16mm end mill is getting on the large side for a light bench mill, especially for milling deep pockets. Chatter is going to be a continuous issue with that light of a machine, but the solution is the same as for any machine. Keep setups as rigid as possible with minimum overhang on the tools and workpieces. Also, don't concern yourself with feeds. If the cutter is resisiting, slow down the feed or reduce the size of the cut. Basically just listen to the machine and adjust accordingly. 300 rpm is way too slow for a 16mm end mill. It should be around 650 for steel and 3000 for aluminum. Watch my video on cutting speed to get a better understanding of what rpm to use. The formula I provide is in Imperial units, but you can convert your diameters or find a similar formula for metric applications. BTW, plunge cutting is the proper method of roughing out a pocket, but you may need to greatly reduce the size of the cut or switch to a smaller end mill to reduce the chatter.
3) Watch my cutting speed video.
4) A circular pattern is normal for a face mill.
5) A boring head is useful, but you should learn the basics and your machine before getting one.
6) Not sure I understand this one. 
Tom
![[Image: TomsTechLogo-Profile.png]](http://tomstechniques.com/wp-content/uploads/2013/11/TomsTechLogo-Profile.png)
Posts: 8,888
Threads: 320
Joined: Feb 2012
Location: Arizona/Minnesota
(04-26-2018, 09:03 AM)TomG Wrote: 6) Not sure I understand this one.
I think he's referring to how much waste material to include in his rough-cut dimensions.
Ed
Posts: 8,888
Threads: 320
Joined: Feb 2012
Location: Arizona/Minnesota
(04-26-2018, 04:03 AM)Nikon1975 Wrote: 6) One thing I learned is to cut bigger pieces, as my parallels are too short, after I cut out the part I used for holding them.
Post a sketch of the part and we can tell you all of the ways you can hold it for machining.
Ed
Posts: 32
Threads: 2
Joined: Mar 2018
Location: Vienna, Austria
They were just parallel, I just used the hold down to fix them on the table and worked side milling. I wanted to have 120 mm parallels and I cut 130 mm bars. It turned out that the usable length of my parallels is more 100 mm and they fall in the hall of the vice. So next time I'll cut 160mm to get 120mm, to be on the safe side.
Attached a picture of the other part.


The bumps on the side are because it still does not come natural to get the right direction to turn the dials, I have 50% possibility and I get it wrong sometime.
D.
Posts: 3,799
Threads: 184
Joined: Jun 2012
Location: Farmington Hills, Michigan
Don't feel bad. I've been doing this for 50 years and still get the occasional "bump". 
Tom
Posts: 2,328
Threads: 271
Joined: Jun 2014
Location: La Libertad, Philippines
I expect there is a company similar to Harbor Freight or Shars in your area. If so it's cheaper to buy a set of parallels.
As to plunging with an end mill make sure you are using a center cutting 2 flute end mill for the task. It's also a good idea to drill a pilot hole slightly smaller than the end mill to give you a spot to start the milling.
Posts: 2,629
Threads: 101
Joined: Dec 2014
Location: Michigan
The following 1 user Likes Vinny's post:
Highpower (04-27-2018)
I still get the bumps too. Just did it two days ago too. If it's something non-critical you can just make the opening a little larger (been there, done that) but when it is critical about the only thing you can do is swear at it, blame the mill for not knowing what you wanted to do and move on. :)
|


![[Image: TomsTechLogo-Profile.png]](http://tomstechniques.com/wp-content/uploads/2013/11/TomsTechLogo-Profile.png)

