10-16-2017, 06:26 PM
Another primitive tool from which it can be deduced that I have very low standards 
I used to freehand-grind lathe tools but that’s no longer practical because my hands have become very shaky. So I made something that helps maintain consistent angles when grinding cutting tools.
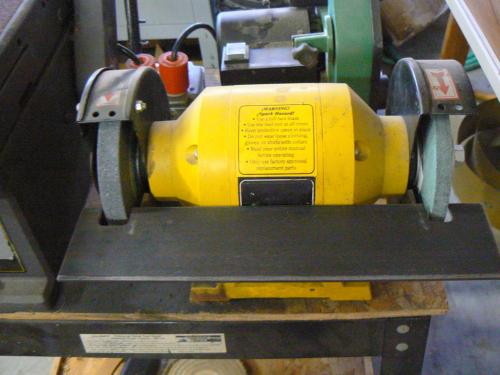
Below is a 3/16 thick steel table with a couple of brackets welded on the underside (HAZ is visible in the photo) that bolt it to the grinder where the tool rests formerly mounted. The table can be adjusted for angularity but not for the individual wheels (the green wheel on the right is for carbide, of course),
Note that this Rube Goldberg sharpening device was not designed, it sort of took shape as I pulled out discards from the scrap pile. I doubt that the entire project took more than ninety minutes and a do-over would result in something considerably different.
Next was making a sliding tool holder, shown below. The idea was to pass a HSS tool back and forth against the grinding wheel, held at a constant angle until the required shape was obtained. The process ideally would be repeatable so that minimal time would be required for re-sharpening.
The steel arm pivots at the point where the black knob is located . The little knurled knob attached to the arm is turned to a small diameter at the far end. The entire piece is captured and spring loaded. Lifting the knob retracts the locating "pin" and the arm can then be rotated freely.
Releasing the knurled knob allows the pin to drop into one of the holes in the sliding holder. Note the tack welded steel strip at the bottom of the tool holder plate. The purpose of the strip is to guide the tool holder repeatably along the steel grinding table.
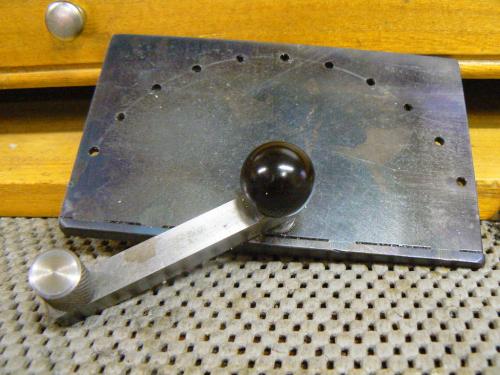
The tack welds discolored the HAZ so I heated the whole plate with a torch to produce the blue color. Just because.
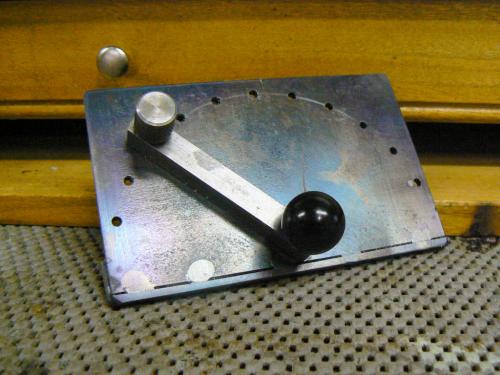
In the above photo, the arm has been adjusted to an angle forty-five degrees from vertical. In the photo below, a HSS blank has been secured to the arm with a small C-clamp. (The blank would be clamped on the other side of the arm when using the green wheel.)
The guiding strip is at the rear of the tool holder so that the holder is pushed away from the grinding wheel not into the grinding wheel if the HSS tool is fed too agessively.
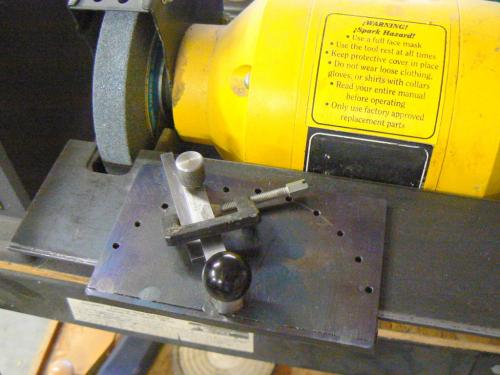
Sliding the tool holder plate back and forth along the table, shapes the desired angle (using the two knobs of course). At first, the sliding tool holder doesn’t even contact the table at the rear and the angle of the holder is simply adjusted by eye as the holder is moved. As material is removed from the HSS blank, the sliding tool holder gradually comes into contact with the table.
After the preliminary roughing is complete, the clamp is loosened, the tool moved forward very, very slightly and then re-clamped. The same back-and-forth process is used but at this point, only a small amount of material needs to be removed to obtain the finish shape.
At this point, the cutting tool is removed and carefully lapped with carbide paper taped to a pane of glass. The lapping process is mandatory for best surface finishes - even single-pointed threads have a nice finish, like the piece below.
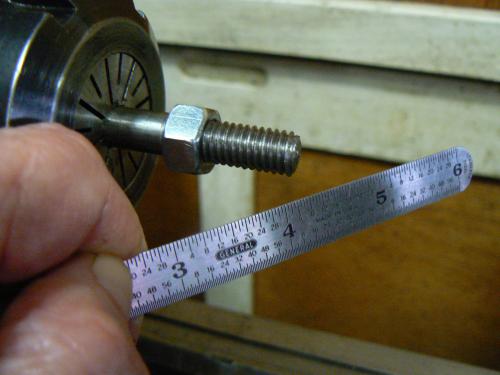
I keep meaning to make a bracket to attach a vacuum hose on the underside of the grinding table. In the meantime, I manually clear grit from the table and the sliding tool holder often.
This contraption is mounted on a rolling table that includes a belt/disc sander and a knife sharpening sander. (There is a shop vac parked under the table top connected to the belt/disc sander.) I keep the “dirty” operations together and, if necessary, even roll the whole thing outside for operation if grit becomes an issue in the shop.
BTW I don’t like to dunk the cutting tool in water and in this case it would be a real PITA – the entire holder would have to be dunked or the tool unclamped and removed ! I prefer to use compressed air for cooling. It works fine and doesn’t stress the tool as much as suddenly dipping in water.
The three (sometimes only two) angled cutting faces are produced by rotating the blank in the fixture and re-setting the angle. In order to obtain a compound angle, I place a small object underneath one edge of the sliding table, whatever fits conveniently and can be secured.
In this case, a small “bulldog” clip is used – scraps of material, even cardboard can be packed under the sliding table and secured by the clip to increase the angle by lifting the sliding holder.
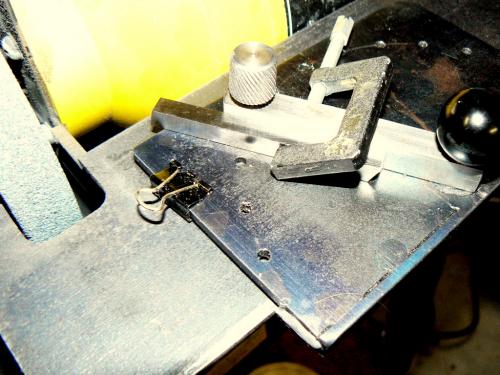
Hey, I said it wasn’t designed, right, I just cobbled the thing together. If I’d spent time thinking about it, I would have included a more practical means of angular adjustment, ha-ha-ha. I also would have made two independently adjustable tables.

I used to freehand-grind lathe tools but that’s no longer practical because my hands have become very shaky. So I made something that helps maintain consistent angles when grinding cutting tools.
Below is a 3/16 thick steel table with a couple of brackets welded on the underside (HAZ is visible in the photo) that bolt it to the grinder where the tool rests formerly mounted. The table can be adjusted for angularity but not for the individual wheels (the green wheel on the right is for carbide, of course),
Note that this Rube Goldberg sharpening device was not designed, it sort of took shape as I pulled out discards from the scrap pile. I doubt that the entire project took more than ninety minutes and a do-over would result in something considerably different.
Next was making a sliding tool holder, shown below. The idea was to pass a HSS tool back and forth against the grinding wheel, held at a constant angle until the required shape was obtained. The process ideally would be repeatable so that minimal time would be required for re-sharpening.
The steel arm pivots at the point where the black knob is located . The little knurled knob attached to the arm is turned to a small diameter at the far end. The entire piece is captured and spring loaded. Lifting the knob retracts the locating "pin" and the arm can then be rotated freely.
Releasing the knurled knob allows the pin to drop into one of the holes in the sliding holder. Note the tack welded steel strip at the bottom of the tool holder plate. The purpose of the strip is to guide the tool holder repeatably along the steel grinding table.
The tack welds discolored the HAZ so I heated the whole plate with a torch to produce the blue color. Just because.
In the above photo, the arm has been adjusted to an angle forty-five degrees from vertical. In the photo below, a HSS blank has been secured to the arm with a small C-clamp. (The blank would be clamped on the other side of the arm when using the green wheel.)
The guiding strip is at the rear of the tool holder so that the holder is pushed away from the grinding wheel not into the grinding wheel if the HSS tool is fed too agessively.
Sliding the tool holder plate back and forth along the table, shapes the desired angle (using the two knobs of course). At first, the sliding tool holder doesn’t even contact the table at the rear and the angle of the holder is simply adjusted by eye as the holder is moved. As material is removed from the HSS blank, the sliding tool holder gradually comes into contact with the table.
After the preliminary roughing is complete, the clamp is loosened, the tool moved forward very, very slightly and then re-clamped. The same back-and-forth process is used but at this point, only a small amount of material needs to be removed to obtain the finish shape.
At this point, the cutting tool is removed and carefully lapped with carbide paper taped to a pane of glass. The lapping process is mandatory for best surface finishes - even single-pointed threads have a nice finish, like the piece below.
I keep meaning to make a bracket to attach a vacuum hose on the underside of the grinding table. In the meantime, I manually clear grit from the table and the sliding tool holder often.
This contraption is mounted on a rolling table that includes a belt/disc sander and a knife sharpening sander. (There is a shop vac parked under the table top connected to the belt/disc sander.) I keep the “dirty” operations together and, if necessary, even roll the whole thing outside for operation if grit becomes an issue in the shop.
BTW I don’t like to dunk the cutting tool in water and in this case it would be a real PITA – the entire holder would have to be dunked or the tool unclamped and removed ! I prefer to use compressed air for cooling. It works fine and doesn’t stress the tool as much as suddenly dipping in water.
The three (sometimes only two) angled cutting faces are produced by rotating the blank in the fixture and re-setting the angle. In order to obtain a compound angle, I place a small object underneath one edge of the sliding table, whatever fits conveniently and can be secured.
In this case, a small “bulldog” clip is used – scraps of material, even cardboard can be packed under the sliding table and secured by the clip to increase the angle by lifting the sliding holder.
Hey, I said it wasn’t designed, right, I just cobbled the thing together. If I’d spent time thinking about it, I would have included a more practical means of angular adjustment, ha-ha-ha. I also would have made two independently adjustable tables.


