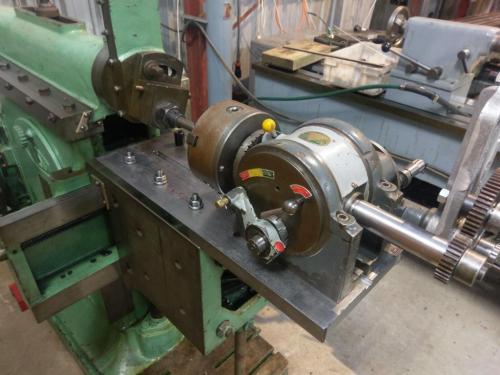
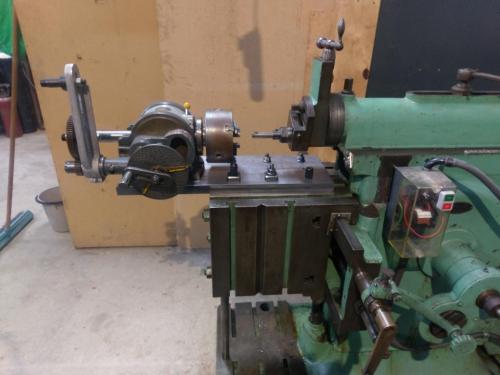
Shaper table extension
#21
Amen, brother! I had the same feeling the first time I power tapped with a spiral point, too!  Worthy <Tom>
Mike

SB 10K (1976) Rockwell vertical mill (1967) Rockwell 17" drill press (1946) Me (1949)
Reply
Thanks given by:
#22
The machinists at work use the spiral taps for putting holes in the copper we use as substrates. If you've ever worked with copper, you know it's gummy, and your tools have to be razor sharp. Because of this, they go through taps like chicklets, and I take the "used" ones home. They work fine for anything I do, and because they are free, I'll never go back to regular taps.
Full of ideas, but slow to produce parts
Reply
Thanks given by:
#23
Glad it worked!
(Don't worry, if you could pick it up it's plenty cool enough.)

It's all simple TLAR
if it's dull red, it's hot enough.
If it's uncovered while cooling, cover it.
When you can pick it up, it's cool enough.
Also a lot easier to work with!
Reply
Thanks given by:
#24
Somewhere in this inferno are the shaper table extension and the rest of the piece of plate it was cut from. We'll see how the annealing works out.
   
   
The piece for the shaper was glowing red last time I saw it. The other chunk ended up in a not-quite-so-hot part of the pile, I tried piling more stuff around it but ny that stage it was hard to get close. Here's hoping.
Lathe (n); a machine tool used in the production of milling machine components.

Milling Machine (n); a machine tool used in the production of lathe components.
Reply
Thanks given by:
#25
Oh what did I start you doing .......... !
Andrew Mawson, proud to be a member of MetalworkingFun Forum since Oct 2013.
Reply
Thanks given by:
#26
Thats not an inferno Big Grin
Hunting American dentists since 2015.
Reply
Thanks given by:
#27
After a couple of weeks away I got some time to retrieve the pieces of plate from the ashes and do a little work on this project- I think I'll have to call it the 'Phoenix Shaper Extension'.
I needed to clean up the surfaces again of course to get rid of any warping but having already cut the excess off the ends, where I was clamping the plate down previously, this was a bit problematic. The shaper vice came to the rescue with it's 9 1/2" jaw opening, mounted to the mill table. I used a slab mill to tidy up both sides. I had to move the slab mill along the arbor between cuts rather than use the Y-axis due to fouling issues.
   
So far I've surfaced the top and bottom, cut the slot for the keys on the base of the dividing head, drilled and tapped the holes 1/2 unc where the div head will be clamped down and drilled a series of 9/16 holes to clamp the plate down to the shaper. Oh yes and snapped off a 6mm carbide twist drill right in the centre of the job. The mounting holes are spaced at 4 1/2" longitudinally as that's the distance between the mounting slots on the div head tailstock and I thought it might be useful to be able to mount that also.

Still need to mill a slot for the tailstock keys, clean up all of the sides so I can indicate off them and get the broken carbide drill bit out of there!
   
Lathe (n); a machine tool used in the production of milling machine components.

Milling Machine (n); a machine tool used in the production of lathe components.
Reply
Thanks given by:
#28
(05-04-2017, 07:52 AM)Mayhem Wrote: The magnet test has never worked for me, regardless of the size or thickness of the fridge magnets I have tried.  They all just melt and run off, and then burst into flames.

You need to use larger iron magnets, not the ones made from rubber.  One of these should work:  [Image: 5841kc2-j07l.png?ver=1402405470]

Take a class on fire walking before hand, bare footed walk out to the item in question and use the magnet to test the piece of steel then walk back to a safe place.   Big Grin


Make sure you have a liter of Swan lager on hand to celebrate your feat.  (pun intended) Smiley-eatdrink004
Reply
Thanks given by:
#29
(07-10-2017, 10:59 PM)Pete O Wrote: After a couple of weeks away I got some time to retrieve the pieces of plate from the ashes and do a little work on this project- I think I'll have to call it the 'Phoenix Shaper Extension'.
I needed to clean up the surfaces again of course to get rid of any warping but having already cut the excess off the ends, where I was clamping the plate down previously, this was a bit problematic. The shaper vice came to the rescue with it's 9 1/2" jaw opening, mounted to the mill table. I used a slab mill to tidy up both sides. I had to move the slab mill along the arbor between cuts rather than use the Y-axis due to fouling issues.

So far I've surfaced the top and bottom, cut the slot for the keys on the base of the dividing head, drilled and tapped the holes 1/2 unc where the div head will be clamped down and drilled a series of 9/16 holes to clamp the plate down to the shaper. Oh yes and snapped off a 6mm carbide twist drill right in the centre of the job. The mounting holes are spaced at 4 1/2" longitudinally as that's the distance between the mounting slots on the div head tailstock and I thought it might be useful to be able to mount that also.

Still need to mill a slot for the tailstock keys, clean up all of the sides so I can indicate off them and get the broken carbide drill bit out of there!

Good job.   Thumbsup
Reply
Thanks given by:
#30
Got this one finished today. Near enough to finished anyway- I still need to clean up the front and rear edges of the plate but the best way for me to do that will be with a face mill in the horizontal mill spindle, and I have some other stuff I want to do with the vertical attachment whilst it is on the mill so not going to remove it just yet.
I mounted the workpiece to a big angle plate and used a couple of improvised machine jacks to get the slot leveled (or at least parallel to the mill table) so I could mill the edges parallel with the slot and hole layout. It took all of the X axis movement my mill has to offer to pass a 25" long edge under a 2 1/2" cutter. Not much Z-room left either.
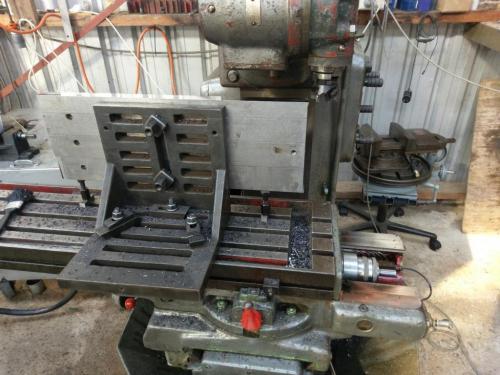
   
With both the long edges milled parallel, I set the thing up to drill from the underside where the broken carbide drill was living, drilled a 3/8 hole until I came to the broken bit, used a 3/8 end mill to make the bottom of the hole flat and then used a nail punch over the tip of the broken drill to knock it out. No problemo. Glad it was a through-hole.
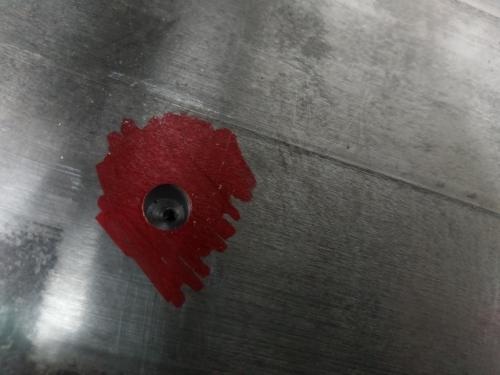
   
Manhandled the thing over to the drill press to put a little countersink on all of the holes, then over to the shaper to see if it fits.
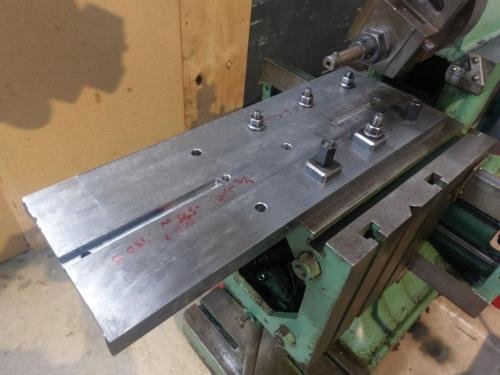
   
I'm running short of hold-down hardware, have 2 incomplete sets that both seem to be some odd chinese thread size; kind-of 1/2 whit but not really, and the threads are different between the two sets. I think I'll make up some long T-nut strips with the holes 4 1/2" apart for this thing and get some bolts of the appropriate length. For a test fit though, just enough hardware to get by.
The dividing head got a lift from the gantry to get over here.
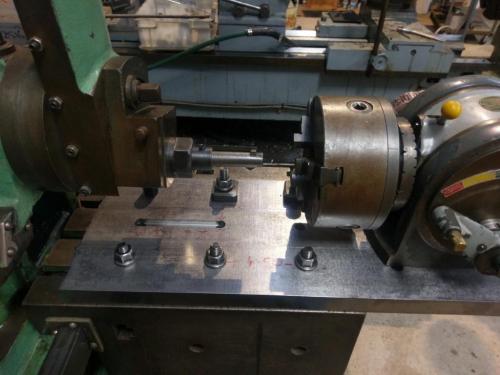


Will be interesting to see how much the plate flexes when taking a cut- I think light cuts will be the order of the day when using this thing.
I'm probably the only bloke in my street set up to cut internal splines in prime numbers. Big Grin
Lathe (n); a machine tool used in the production of milling machine components.

Milling Machine (n); a machine tool used in the production of lathe components.
Reply
Thanks given by:


Users browsing this thread: 14 Guest(s)