Stock racks...what do you use?
#61
Dave - since you are using a front rail for your shelf, you really wont see the gap. The front rail is welded to the diagonal and the shelf support sits below the front rail and is welded from behind. When you look at it front on you will be able to see that the shelf support is not welded to the diagonal but given that the front rail is, it won't look odd at all.

I have to go out to the shop where the stock rack is and I'll take some pictures. I think you are over-thinking it Big Grin
Hunting American dentists since 2015.
Reply
Thanks given by:
#62
If some of you are wondering about the odd square tube sizes - I do as well Cool 

The angle iron is now fully metric ie 40mm x 40mm x 3mm is exactly that.
Now square tubing 30 x 30 x 2mm is actually more like 32 x 32 x2 mm is actually 1.25 x 1.25 x 0.080"  bloody confusing.

I have some 40 x 40 x 3 angle iron, I also have some 40x 40 x2 square tubing - now one would think they would fit together nicely - well they don't, the 40 x 40 square tubing  is 38 x 38mm or really 1.5 x 1.5". What a mess Cool 
Smiley-eatdrink004 
DaveH
Reply
Thanks given by:
#63
(04-30-2015, 06:41 PM)Mayhem Wrote: I have to go out to the shop where the stock rack is and I'll take some pictures.  I think you are over-thinking it Big Grin

Yes please I like pics Thumbsup

I don't like making something that I know is skew, every time I walk past it I will think I should not have done it that way. It will bug me.
The frame is sorted and is not skew. The shelf arms (the outer ones) I will notch so they will not be skew.
I just hope my welding won't mess it all up. Rotfl
It's just me Darren I would not be happy knowing some parts of it were skew, I have even worked out how much skew it is, it's less than 0.1 degree. Now bear in mind when I build it I'll be lucky if all the right angles are with in 0.5 degree it does seem some what silly - but it is just me that's all.
I'm not a perfectionist - I will gladly work to tolerances and I certainly don't work to tenths of a thou' if I don't think it is necessary.

It is just my way of doing things, I just have to feel right about what I am doing. That doesn't mean it is right - just that I feel it is right.
Smiley-eatdrink004
DaveH


Reply
Thanks given by:
#64
(04-30-2015, 06:41 PM)Mayhem Wrote:   When you look at it front on you will be able to see that the shelf support is not welded to the diagonal but given that the front rail is, it won't look odd at all.

I thought it was welded to the diagonal 17428
Smiley-eatdrink004
DaveH
Reply
Thanks given by:
#65
(04-30-2015, 07:34 PM)DaveH Wrote:
(04-30-2015, 06:41 PM)Mayhem Wrote:   When you look at it front on you will be able to see that the shelf support is not welded to the diagonal but given that the front rail is, it won't look odd at all.

I thought it was welded to the diagonal 17428
Smiley-eatdrink004
DaveH

It is if you notch it, which is what I plan on doing. Smile

Or I suppose you could weld across the gap to fill it in.

Ed
Reply
Thanks given by:
#66
(04-30-2015, 07:44 PM)EdK Wrote: It is if you notch it, which is what I plan on doing.  Smile

Or I suppose you could weld across the gap to fill it in.

Ed

When I've welded gaps, looks good 'till it cools and warps Rotfl
I haven't told you my good bit yet Smile
Smiley-eatdrink004
DaveH
Reply
Thanks given by:
#67
I don't know if this helps or confuses, but a couple of photos for you of my stock rack.

This one is from stand on the left side of the rack, looking forward. The vertical in the photo is the "inside" of the sloped front angle iron, and you can just see the edge of the heavy gauge sheet metal shelf. The heavy gauge shelf itself becomes the horizontal cross bar.

[Image: IMG_4030-r_zpsepsb1bxx.jpg]

This shot from the front, looking to the same spot I was in to take the previous photo.

[Image: IMG_4029-r_zpsqgeiyzhd.jpg]
Reply
Thanks given by: EdK
#68
I checked to see how far I had gotten with the welding of the shelf supports, as I wasn't sure if I had just spot welded them in place or had finished welding them.  I had actually finished welding them and I had welded them without notching the back or leaving a gap next to the diagonal.  The reason being (as I said earlier) that you cannot notice that they are not perfectly square and it isn't critical.

Some pics:

Top joint showing the top rail notched to join the vertical upright and the lap joint of the diagonal upright to the vertical upright.  You can see my 'uphill' welding isn't flash.  I should have just spot welded it like the notched joint.  I climbed on the frame and welded the top from above, which is why you can see the penetration.  I figured that I wasn't going to try and balance it on its pointy end to weld that up from the inside!
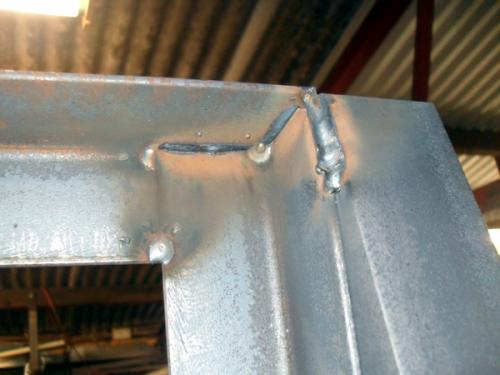
   

Here is the bottom right-hand rear corner showing the bottom rail notched to join to the vertical upright and the butt joint of the side rail.  These joints are just spot welded in this photo and once the rack was complete, I have since gone round and welded these up properly.  Its not a good picture - sorry.
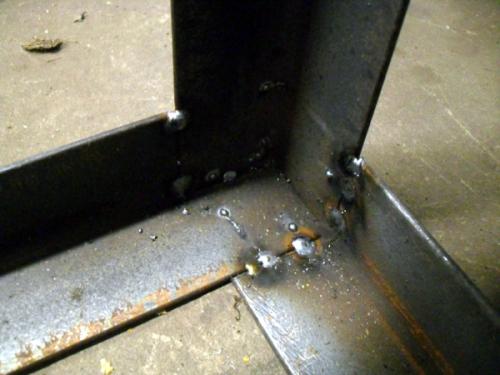
   

Here is the side rail from the picture above notched to join the front rail.  Again, this joint was spot welded (from the other side) when the rack was on its back and has since been finish welded.  You can see the bottom of the diagonal upright in the top left-hand corner.
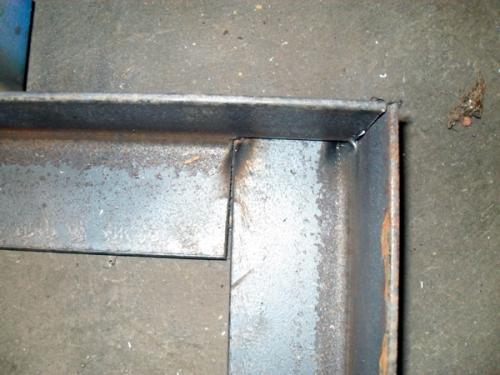
   

Here is one of the rear shelf horizontal rails, which has been notched to join the vertical upright.  The shelf support / divider is simply clamped to the underside of the horizontal rail and welded in place.
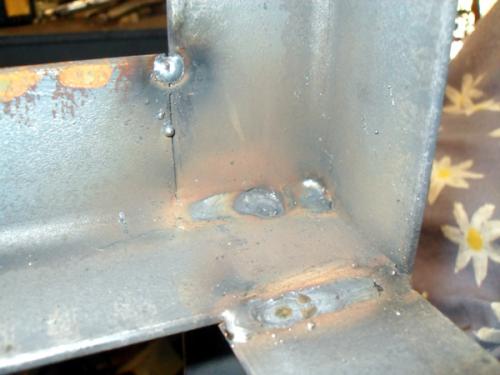
   

Here is a view from the rear side of one of the horizontal rails.  Gaps like this are good when welding parts inside a frame and will fill nicely when finished.
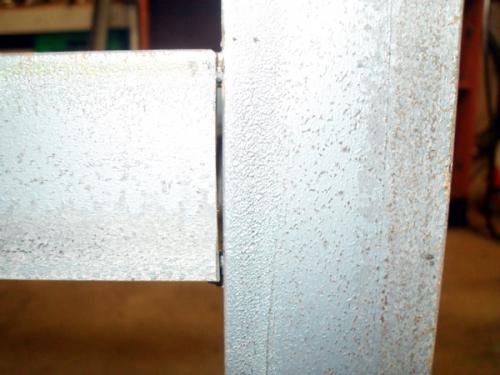
   

Back on the welding bench so that some of the joins can be finished.  Remember, you don't have to weld up every seam.  As long as you have a good weld between two pieces, it will not fall apart.  I look at my own access when welding.  The easier the position to get the torch into the more likely it is that I am going to run a bead there!  If I were making this for a client.  I would ensure as many of the welds were hidden as possible, such as those joining the shelf supports / dividers to the front shelf horizontal rails.  I would weld them on the inside of the shelf section.

This was actually how it started out, with the vertical uprights clamped to the welding bench and then the top and bottom rails welded in.  The side and front rails went on next and then it was stood upright.
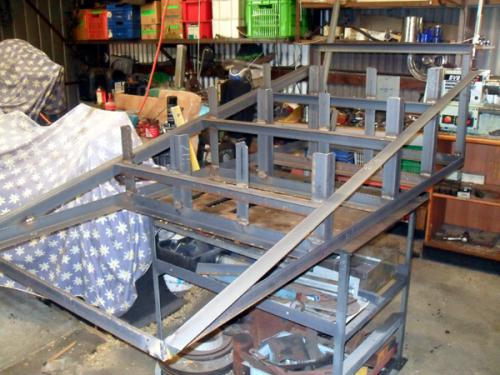
   

 It works!
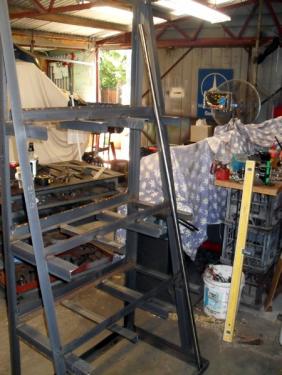
   

I still have a bottom rail to cut and drop in for the bottom shelf.  It probably doesn't need it but I think once the wood goes in it will finish it off nicely.  All it needs than is a coat of paint.
Hunting American dentists since 2015.
Reply
Thanks given by: EdK
#69
I really like the idea of the wood shelves. They'll have plenty of support and easier on the material in them. Going the short way would look cool...until the shelves are full!
Reply
Thanks given by:
#70
Thanks Ken, what a very clever design. 
When you first posted it and I looked at the pic I though ..... mmm nice, then I read 1-1/2 x 1-1/2" x 1/8" angle iron , only 1/8" thick seems at bit thin to me.
However after spending a bit (a lot actually) of time looking and examining it - it's fabrication and the use of the angle iron in conjunction with the metal shelves it comes over as a truly brilliant design. Thumbsup 

It's design is simple, very simple to the point of looking a little crude and it is precisely that why I think the design is brilliant.

Another point about the design is most of it could be bolted together and it will be just as strong as if it was welded.

Thanks Darren for your pics as well, if someone (besides me) wishes to build one your pics help a lot.

Smiley-eatdrink004 
DaveH
Reply
Thanks given by:


Users browsing this thread: 37 Guest(s)