Posts: 4,463
Threads: 184
Joined: Feb 2012
Location: Missouri, USA
The following 1 user Likes Highpower's post:
DaveH (02-09-2015)
Hi chanse, welcome to the forum.

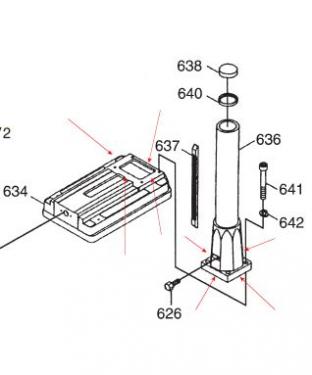
Have a look at this video (skip ahead to 22:30) to get the basic idea of how to use your indicator to check the alignment on your mill. You can ignore all of the adjustment procedures in the video because your mill doesn't have any of the movable adjustments shown. The only way to make changes on your round column mill is by installing pieces of shim stock between the mill base and the rear column flange. (The areas with the red arrows.)
From what I've read in the past, those Grizzly mills are usually close enough to not worry about, provided the contact surfaces are clean and all of the bolts are tightened properly.

Willie
Posts: 53
Threads: 4
Joined: Jan 2015
Location: Charleston, Il.
My mill drill was close from the factory.
I had to disassemble to move it into the shop though. This wrecked the factory shimming.
I mounted a dial indicator into a chuck, so that it would spin in an arc just as wide as the depth of the table and loosened the four bolts that hold the round post to the base.
By adding shims, I could get the head very close from front to back (checked by rotating the dial indicator around). The head of the mill is not balanced, and it will lean one way or the other when the bolts are loose, so tighten the bolts every time you check.
I then did the same for the left and right. After getting it close, I cranked the table both ways and checked again.
The factory shims are made of paper stock, but slipping metal shims in while adjusting is much easier.
The joint between the post and the table is often filled with Bondo, or some other kind of filler, and you will have to break this to adjust. I would suggest cutting a clean line through the filler with a hacksaw first, but I just knocked the filler out of the way with a chisel and scraper ( I wasn't going for looks).
It took me several tries to get it where I wanted it, but you only have to do it once (as long as I don't move the thing again).
Posts: 2,620
Threads: 100
Joined: Dec 2014
Location: Michigan
Take a look here:
http://www.gadgetbuilder.com/MillTram.html It's for a Homier Mill but contains some tips that should help.
Posts: 2,328
Threads: 271
Joined: Jun 2014
Location: La Libertad, Philippines
02-09-2015, 11:21 PM
(This post was last modified: 02-09-2015, 11:22 PM by Dr Stan.)
A couple general pieces of advise on mill traming:
1) take small steps as it is way too easy to go to far
2) smoothly pull on the wrench tightening the fasteners working back & forth between them. Don't yank on it.
3) sweep a circle as close in size as possible as the width of the table.
BTW, it gets easier with practice.
Posts: 2
Threads: 1
Joined: Oct 2014
Location: USA
thanks to all who replied to my request about aligning mill head. will look into your ideas, : chanse
Posts: 313
Threads: 34
Joined: Nov 2013
Location: Kamloops, BC, Canada
I bought a brake drum and use that to help align the head of my mini mill. The drum is ground and as flat as I can measure at least. Makes it easier to swing the dial around not having to deal with the t slots in the table.
Shawn, proud to be a member of MetalworkingFun Forum since Nov 2013.
Posts: 691
Threads: 14
Joined: Feb 2015
Location: Oakland, California
@Shawn - do you mean brake rotor/disk?
If you plan to use the rotor, use a tenths indicator to discover if the rotor faces are actually parallel. Move the rotor under a stationary indicator.
Used rotors are probably not going to be flat or parallel. A new one should be, a freshly-turned one might be.
Posts: 175
Threads: 4
Joined: Sep 2012
Location: Dorset, UK
Large bearing races are good if you can get one. Used is fine as long as it's not been damaged during removal. I'm still looking for one ...
Arbalest, proud to be a member of MetalworkingFun since Sep 2012.
Posts: 313
Threads: 34
Joined: Nov 2013
Location: Kamloops, BC, Canada
(02-19-2015, 02:08 AM)Roadracer_Al Wrote: @Shawn - do you mean brake rotor/disk?
If you plan to use the rotor, use a tenths indicator to discover if the rotor faces are actually parallel. Move the rotor under a stationary indicator.
Used rotors are probably not going to be flat or parallel. A new one should be, a freshly-turned one might be.
Yes, that's what I meant

not sure what I was thinking there. I bought a new one, they were pretty cheap.
Shawn, proud to be a member of MetalworkingFun Forum since Nov 2013.


 not sure what I was thinking there. I bought a new one, they were pretty cheap.