Posts: 2,685
Threads: 29
Joined: Feb 2012
Location: Nova Scotia, Canada
The following 1 user Likes stevec's post:
EdK (01-08-2014)
01-07-2014, 08:36 PM
(This post was last modified: 01-07-2014, 08:36 PM by stevec.)
Tom, I've come across some of those reverse ground bandsaw blades too.
They can be corrected , but use gloves! 
Busy Bee 12-36 lathe, Busy Bee Mill drill, Busy Bee 4x6 bandsaw, Homemade 9x17 bandsaw, Ad infinitum.
Posts: 139
Threads: 14
Joined: Apr 2012
Location: Nelson, BC, Canada
(01-06-2014, 07:27 PM)wrustle Wrote: It never ceases to amaze me the great lengths some people will go through to make their own tooling!
I certainly do not mean that in a bad way either......I quite honestly find this fascinating!! Great job!
Best Regards,
Russ
Russ
Does not matter what it is, but somebody, somewhere made it in the first place, and if they managed to make it, why can't we?
Many of us have shops that are better equipped than many of the early pioneers that first made these items, so why can't we make them?
In a lot of cases it is a matter of reverse engeneering the parts, and the possible learning curves required to make them. Take casting for instance. It takes a few duds, to finally realize just how much oversized, the right amount of draft to allow and proper temperatures etc which are required to get a consistent pour and a sound finished product. Not beyond home hobby shop though as many have accomplished it with minimal equipment, just as in the "olden" days.
Some of us, it is time. Life, families and other commitments can leave us with very little time left to "play" So rather than try to build it ourselves we take the easy route and let somebody else build it for us.
Then again there is the economy of scale. To make one item, often the raw material costs can be higher than it is to go and buy the item from XYZ widget factory that turns out thousands of an item per minute and gets their raw materials for a fraction of what we as a hobbyist can get them. This does not say that we can not make the item, just that somebody else with a more automated system can make them cheaper.
Then there is the environment side of things, many of the processes used can be very toxic, with chemicals like Arsenic, or radioactive components which we as a society have now learned are best only used in the hands of somebody that has the "proper" equipment to handly them, whereas yester-years lead, mercury, and arsenic were household items that did not command the respect they do these days.
Put in proper perspective all these can be overcome and like Hawkeye, we too can produce wonderful and useful works of art.
Walter
starlight_tools, proud to be a member of Metalworking Forum since Apr 2012.
Posts: 536
Threads: 39
Joined: Jan 2013
Location: Kelowna, BC, Canada
The following 2 users Like Hawkeye's post:
stevec (01-18-2014), EdK (01-18-2014)
I finally got the broken tap out of the first toolholder. It's amazing how a problem like that can take the wind out of your sails. I decided to use that piece for 1/2" tooling. The horizontal mill makes short work of cutting slots in one pass.
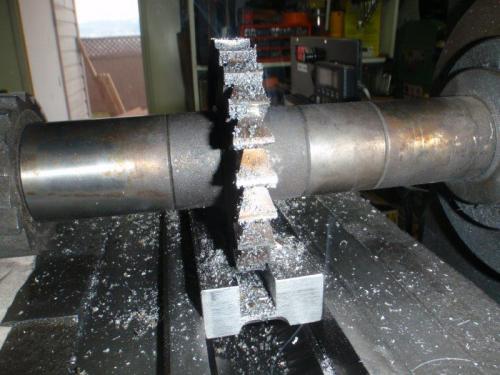
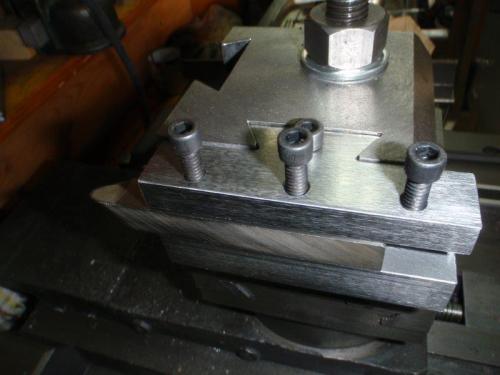
I decided to experiment with ways to speed up cutting dovetails. I drilled two holes through the blank in the notches of the dovetails to take out some of the waste and made a jig to get the spacing right on future blanks. Then I used two 4" x 3/4" stagger-tooth cutters that Shawn had sent me to gang-mill down to the 1/2" dovetail depth. I'm really getting to like the power of a horizontal mill.
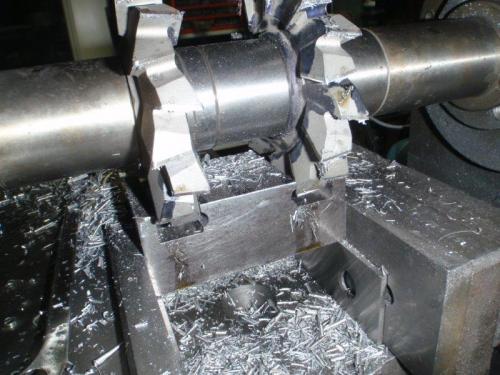
This toolholder was slated for the large tooling that came with the lathe, as well as the tangential toolholder I had made for it. This meant a 1 1/8" x 3/4" deep slot. Back to the 6" x 3/4" cutter. Two passes had the slot cut to size.
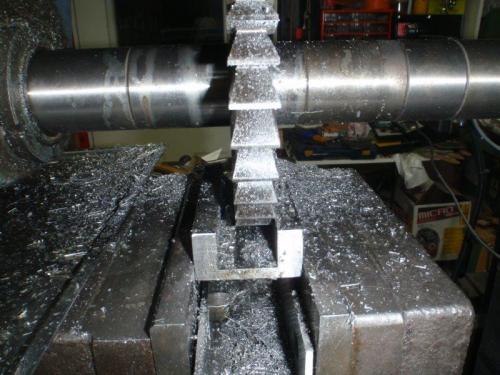
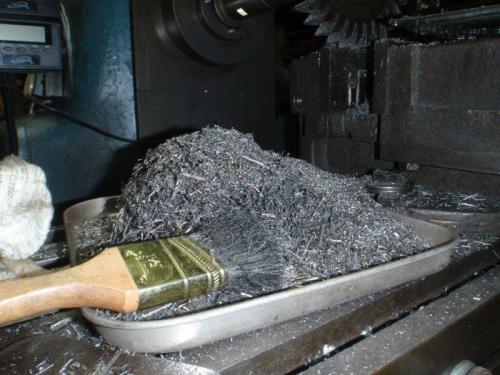
It's amazing how fast a pile of swarf can grow when you have the power.
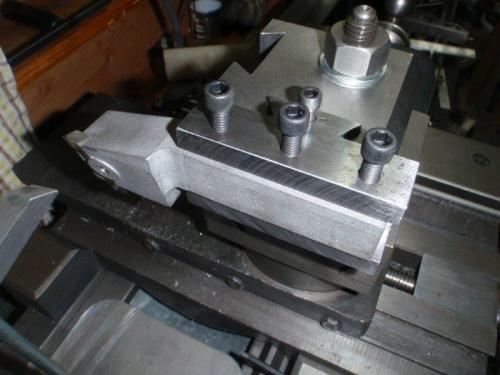
The finished toolholder. Only a dozen or so to go.
Mike
If you can't get one, make one.
Hawkeye, proud to be a member of MetalworkingFun Forum since Jan 2013.
Posts: 139
Threads: 14
Joined: Apr 2012
Location: Nelson, BC, Canada
OK so how did you get the tap removed? What worked best?
Nice looking tool holders.
Walter
starlight_tools, proud to be a member of Metalworking Forum since Apr 2012.
Posts: 4,683
Threads: 93
Joined: Feb 2012
Location: Perth, Australia
Nice job Mike - damn nice job.
Hunting American dentists since 2015.
Posts: 205
Threads: 27
Joined: Jan 2013
Location: Maryland USA
Hawkeye.
My compliments to you on the build you have done a smashing job.
Youre dead on right about ballsing up a part and it crushes the spirit, you done exactly the correct thing by concentrating on another part to numb the pain, also it gives you time to think of how youre going to correct it.
Horizontal mills are great for the gang milling thing you certainly can remove a ton of swarf quickly, I actually own one a small Atlas but it sits while I make up my mind on what to do with it.
I have given much thought over the years on making a jig for the milling table top to turn my milling machine into a crude horizontal machine.
Anthony.
ieezitin, proud to be a member of MetalworkingFun Forum since Jan 2013.
Posts: 536
Threads: 39
Joined: Jan 2013
Location: Kelowna, BC, Canada
Thanks, guys. I'm glad you're watching.
Walter, I fully intend to make a spark-erosion EDM, but this one I got out by shattering the tap with a punch. The first 1/4" went quickly enough, then it seemed to stop. I took a few whacks at it every time I went down to the shop. Finally, the last big piece dropped out. I wrecked two new taps trying to clean out the thread. There were lots of tiny bits of HSS stuck in the threads. The hole in question is for the height-adjustment screw, so there's never any real pressure on it.
Mike
If you can't get one, make one.
Hawkeye, proud to be a member of MetalworkingFun Forum since Jan 2013.
Posts: 313
Threads: 34
Joined: Nov 2013
Location: Kamloops, BC, Canada
That's a heck of a cut Mike, glad to see those cutters getting a workout rather than collecting dust in my shop.
Shawn, proud to be a member of MetalworkingFun Forum since Nov 2013.
Posts: 536
Threads: 39
Joined: Jan 2013
Location: Kelowna, BC, Canada
01-19-2014, 12:14 PM
(This post was last modified: 01-19-2014, 12:15 PM by Hawkeye.)
Shawn, thanks again for those cutters. They make the biggest, best chips of any I've used so far.
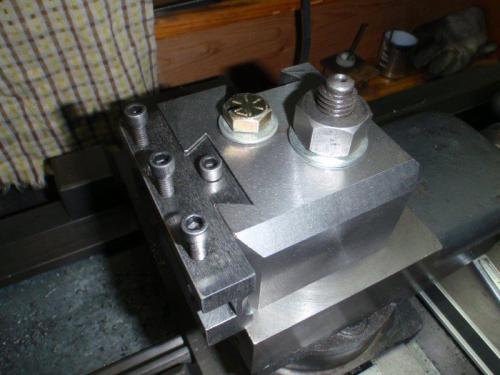
Once I had a couple of toolholders ready to use, it became apparent that I'd have to move on the phase 2 - adding the cam-lock to the holding clamp. Tightening the clamp meant taking the tool out of the holder to get the Allen key into the bolt. I had designed the clamp to do just that, at a later date.
All that was needed was to shorten the stem on the clamp, make a fitting for the cam to pull on, and modify a grade 8 bolt to make the cam.
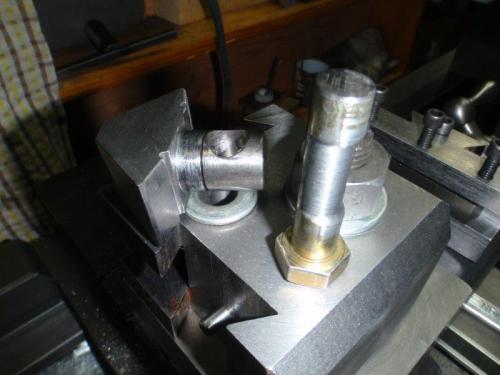
I know that some feel that you need to have the operating levers permanently attached on a QCTP. I prefer to have no obstructions where I'm working. It's no big thing, in a hobby environment, to reach for the wrench, which is always close at hand.
Mike
If you can't get one, make one.
Hawkeye, proud to be a member of MetalworkingFun Forum since Jan 2013.
Posts: 2,344
Threads: 53
Joined: Feb 2012
Location: Spencer MA USA
If it works like that for your needs and desires, that's all you need. To my liking, the whole point of a quick change toolpost is that lever making tool changes more "quick".
|


