Posts: 184
Threads: 21
Joined: Feb 2013
Location: north yorkshire n.e.england
The following 3 users Like the artfull-codger's post:
DaveH (09-17-2013), EdK (09-17-2013), oldgoaly (09-18-2013)
09-17-2013, 03:52 PM
(This post was last modified: 09-17-2013, 04:44 PM by DaveH.)

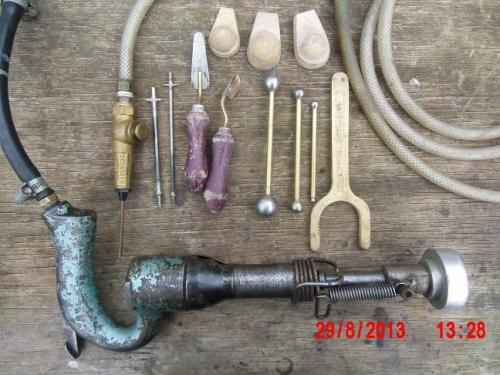
L to R. 1.co2 injector to run off ''pub gas'' from a modified blow gun with a hollow needle.
2.pattern removal screws.
3.&4. ingate cutters.
5. various ball bearings brazed to rods for smoothing the bottom of ingates/sprues,patterns etc.
6.fork[cast brass] for quick rapping patterns in conjunction with a spike.[would also make a good catty]slingshot to our cousins across the atlantic he he.
7.back.ingate patterns,put at the bottom of ingate.
Bottom. sand rammer with cast head pressed onto a cut down chisel bit from a modified air chisel.
the artfull-codger, proud to be a member of MetalworkingFun Forum since Feb 2013.
Posts: 375
Threads: 53
Joined: Jun 2013
Location: Jonesborough, TN
I can sus most of the tools, but what are the bog-flapper-like things at the top middle?
Chuck
Micromark 7x14 Lathe, X2 Mill , old Green 4x6 bandsaw
The difficult takes me a while, the impossible takes a little longer.
Posts: 1,827
Threads: 51
Joined: Apr 2012
Location: Oklahoma
nice set of tools you have there Graham, I like the air rammer but my compressor won't handle one, I did basically the same thing with a pistol type air hammers it worked but puts too much drain on my pancake air pump.
I just cut up a bearing to make a larger wax fillet tool as I have ordered some 3/8" radius wax.
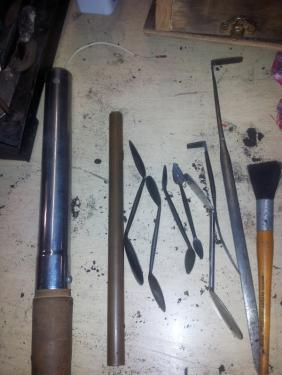
I use tin measuring spoons as gate and runner cutters, but any thin tin will make a cutter in a hurry. my pulling screws I just use 3 or 4 inch construction screws and what ever is handy to rap with.
My gas rig for cores is a large paint ball gun CO2 cylinder with a refill valve on it with some hose and a extra large hypo needle (actually its for basting turkeys) about 3 inchs long.
also have an assortment of artist pallet knifes that I use from time to time.
you make the ingate patterns?
Will have to drag it all out in the sun and take a photo of it.
DA
dallen, proud to be a member of MetalworkingFun Forum since Apr 2012.
If life seems normal, your not going fast enough! 
Posts: 251
Threads: 21
Joined: Jun 2013
Location: Shiloh, Il. USA
couple of repurposed items, riser cutter made from hard copper tube , 1/2" and 3/4" and my sprue cutter 1.5" brass sink tube extension with a wooden handle. The key to using this is never bang it on it sides hold in one hand hit the end with your palm, slides out nicely. The other small hand tools come from auctions, this area had many foundries at one time, old tools around at a fair price.

one thing I've noticed is you guys don't cut your riser all the way thru??? now It does let me know it's full when the metal comes up those risers,
Still can forget ti gate the part from time to time????
oldgoaly, proud to be a member of MetalworkingFun Forum since Jun 2013.
Posts: 184
Threads: 21
Joined: Feb 2013
Location: north yorkshire n.e.england
(09-17-2013, 03:54 PM)chucketn Wrote: (09-17-2013, 03:52 PM)the artfull-codger Wrote:
I can sus most of the tools, but what are the bog-flapper-like things at the top middle?
Chuck
Chuck, those bog-flapper things[ he he he] are just ingates with rounded bottoms, just put them in the drag with the pattern & your sprue sits on top of them in the cope then ram up,it just saves you cutting ingates[laziness really!!].
Graham.
the artfull-codger, proud to be a member of MetalworkingFun Forum since Feb 2013.
Posts: 375
Threads: 53
Joined: Jun 2013
Location: Jonesborough, TN
Thanks for clearing that up!
Chuck
Micromark 7x14 Lathe, X2 Mill , old Green 4x6 bandsaw
The difficult takes me a while, the impossible takes a little longer.
Posts: 251
Threads: 21
Joined: Jun 2013
Location: Shiloh, Il. USA
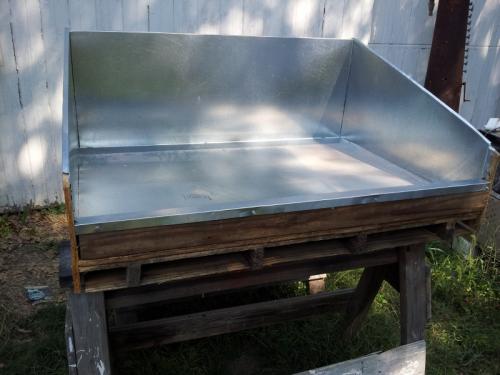
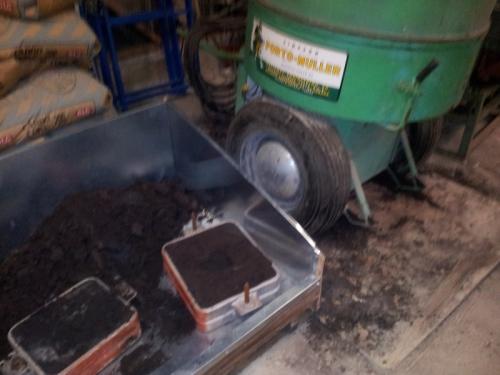
not exactly a tool but a break down box for molds after they are poured, metal lined to make it easier to shovel into the muller and not set the wood a fire, should hold the sand so one can ram up the flasks again and get them ready to pour. old one is going under the muller so when it empties it is easy to shovel into the molding bench. never ending cycle!


oldgoaly, proud to be a member of MetalworkingFun Forum since Jun 2013.
Posts: 184
Threads: 21
Joined: Feb 2013
Location: north yorkshire n.e.england
(09-27-2013, 02:02 PM)oldgoaly Wrote: not exactly a tool but a break down box for molds after they are poured, metal lined to make it easier to shovel into the muller and not set the wood a fire, should hold the sand so one can ram up the flasks again and get them ready to pour. old one is going under the muller so when it empties it is easy to shovel into the molding bench. never ending cycle!
Dead usefull that m8ey!! especially for someone like me who doesn't have a ''foundry shop'' & have to do all my molding outside, my brother in law gave me something along the lines of that [it's plastic] but whilst it's ''ok'' it's too flimsy so I might have to copy yours!!
Graham.
the artfull-codger, proud to be a member of MetalworkingFun Forum since Feb 2013.
Posts: 251
Threads: 21
Joined: Jun 2013
Location: Shiloh, Il. USA
Graham
is yours for mixing concrete? I've seen some like that, the idea of one on a pallet with a edge support has gone thru my mind. Only down side of one is if your like me, tend to break the molds while they are warm, the smell of melting plastic is not good! Which reminds me of our buddy Don Heap, he used epoxy like JB Weld in a sand mold for making a brass hammer oh did that stink! and it hung around for a year. If I was to see him, I'd have to kid him about that!
oldgoaly, proud to be a member of MetalworkingFun Forum since Jun 2013.
Posts: 251
Threads: 21
Joined: Jun 2013
Location: Shiloh, Il. USA
looks like it will be big enough! 1 mold broke down, one full, there is enough for twice that much! which would be about 1/4 the sand I have.
Now to make a good bin for catching what comes out of the muller!

oldgoaly, proud to be a member of MetalworkingFun Forum since Jun 2013.
|


