Building John "Doubleboost's" ER-32 collet chuck.
#1
After watching John "Doubleboost's" videos on making an ER-32 collet holder for his lathe, I was inspired to make one for mine. For those of you who haven't seen it I highly recommend watching it.
Here's a you tube link to the first one in the series;
http://www.youtube.com/watch?v=8SV7lDiSXto
So after practicing on some aluminum and getting comfortable with cutting internal threading I took the plunge last week and bought some 3" diameter cold rolled steel. Yesterday I cut off a 3"+ chunk
and got to work. Here's where I'm at.

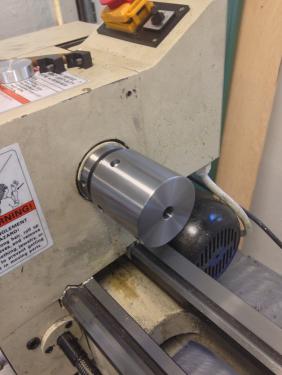


Current O.D. is 2.967", length is +- 3.2
This went quicker than I had planned so I'm kinda stuck. I'd like to continue but I haven't ordered the ER-32 collet set and the ER-32 Collet Nut yet. SWMBO informs me that they're not in the budget until next month.
I'd like to turn down the collet side a bit closer to the finished size since I've got time this weekend but I don't want to screw up and waste off too much. I haven't been able to find the specs on what the O.D. should be
so if somebody with better google-fu or has some suggestions I'd really appreciate it.

BTW. If you're not already a subscriber to John's channel, do yourself a favor and subscribe. Here's the link;
http://www.youtube.com/user/doubleboost

TIA,
Marfaguy
If it's crazy but it works, it's not crazy.
Reply
Thanks given by:
#2
GAHHH! OK if somebody can tell me how to rotate the above pictures 90 degrees clockwise please let me know.
If it's crazy but it works, it's not crazy.
Reply
Thanks given by:
#3
(09-07-2013, 06:56 PM)marfaguy Wrote: GAHHH! OK if somebody can tell me how to rotate the above pictures 90 degrees clockwise please let me know.

You could always turn your monitor on it's side. RotflRotfl

Technically, I should be able to do it, but I think I'll leave this one to Ed. Ed...Ed?
[Image: TomsTechLogo-Profile.png]
Reply
Thanks given by:
#4
Marfaguy,
A nice start Thumbsup
Smiley-eatdrink004
DaveH
Reply
Thanks given by:
#5
Its a shame you are in the states. This looks to be good value from the UK £6.80 for a ball bearing nut. Arc link
Arc always have good stuff as well :)
I am also a fan of the `twatstards` Rotfl channel and this is on my to do list. Good start you have made Smiley-signs107
Andy Popcorn

b4dyc, proud to be a member of MetalworkingFun Forum since Apr 2012. Oh yeah
Reply
Thanks given by:
#6
Here's a link to a build article that includes drawings that should have the dimensions you're looking for.

http://homews.co.uk/page130.html

Ed
Reply
Thanks given by:
#7
(09-08-2013, 09:00 AM)EdK Wrote: Here's a link to a build article that includes drawings that should have the dimensions you're looking for.

http://homews.co.uk/page130.html

Ed

Ed,
I didn't realize this was one of Harold Hall's projects. John may have mentioned it and I just missed it.
Anyway.... Thanks! that has just what I need.
If it's crazy but it works, it's not crazy.
Reply
Thanks given by:
#8
(09-07-2013, 06:56 PM)marfaguy Wrote: GAHHH! OK if somebody can tell me how to rotate the above pictures 90 degrees clockwise please let me know.

Rotate the original picture on your computer in your favorite paint/photo editing program. Delete the offending attachment from your post, and then upload your corrected photo and attach it to your post. If someone else has a better way, hopefully they will enlighten us. Blush
I took care of it for you this time. Smiley-eatdrink004

Nice job so far by the way. Thumbsup

I see you have one of the special "shiny cameras" that others have. I hope to be able to afford one someday... Big Grin
Willie
Reply
Thanks given by:
#9
Finally finished this project. After trying it in aluminum I continued on steel. After centering a piece of 1/2" drill rod in the 4 jaw I slide the 1/2" diameter ER32collet onto it. Taking John, Doubleboost's, advice I centered a dial indicator right at the Lathe's center line. Then started running the dial indicator on the compound back and forth until it the dial never moved.


After that I used a short boring bar to taper the inside bore. Once the opening was about 30mm I used a permanent marker on the 1/2" collet, stuck a piece of 1/2" drill rod in it and twisted in the bore. It showed a nice overall light scratch pattern on the collet.

Then I turned down the outside to 40mm for the closing nut. Turning the outside Metric thread was an interesting exercise.
It does take some extra care and thought since you can't dis-engage the threading half nut until the full thread was cut.
Anyway, it's done and works great.


Run out is less than .0005" (I think I currently don't have a DTI I trust). Here's a short video of it running with a dial indicator.
http://www.youtube.com/watch?v=SP2gxIxLmDI
If it's crazy but it works, it's not crazy.
Reply
Thanks given by:
#10
Smiley-signs107

You obviously took great care making it, which you should have and it shows both in appearance and lack of runout.

Congrats on a fine achievment. Thumbsup

Tom
[Image: TomsTechLogo-Profile.png]
Reply
Thanks given by:


Users browsing this thread: 1 Guest(s)