Posts: 2,685
Threads: 29
Joined: Feb 2012
Location: Nova Scotia, Canada
06-03-2013, 06:14 AM
(This post was last modified: 06-03-2013, 06:16 AM by stevec.)
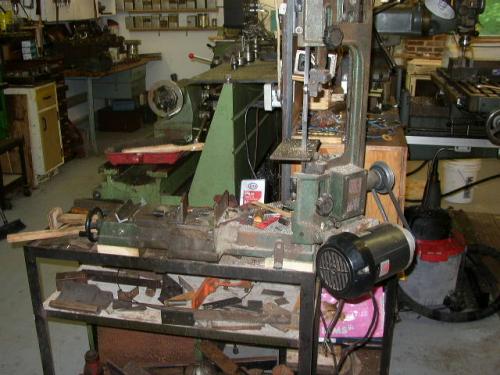
Here's a pic of my ancient 4 x 6 (1983?). It has long resided on the stout little angle iron bench that's just the right height for me.
I is sorta permanently in the upright position and is used whenever I'm in the shop for longer than taking a pic or two for this site.

I have had to replace the guide bearings, worm wheel and bearing and have had to make and attach a "ring" to the back of the drive wheel to replace the vestiges of the original "cast-in" ledge that suffered damage while the worm wheel and bearing wear went un-noticed.
That and a replacement motor are all I've had to do over the past 30 years to keep 'er runnin'.
Oh, you may notice that I practice similar "good housekeeping" and cleanliness as that of Greg. hey! it works for us. 
Busy Bee 12-36 lathe, Busy Bee Mill drill, Busy Bee 4x6 bandsaw, Homemade 9x17 bandsaw, Ad infinitum.
Posts: 825
Threads: 25
Joined: Jul 2012
Location: N. Bay Ontario
Got my 30 year old taiwan one in a trade, had to set it up as it was a mess, but runs great, (newer Canadian built motor,), a great machine, Hacksawing metal by hand is "Slavework!"
sasquatch, proud to be a member of MetalworkingFun since Jul 2012.
Posts: 2,685
Threads: 29
Joined: Feb 2012
Location: Nova Scotia, Canada
06-03-2013, 07:57 AM
(This post was last modified: 06-03-2013, 07:59 AM by stevec.)
Little story here, back in the early 70s I was also into tropical fish as well as doing minor machining with my 10" atlas flat bed.
I got into making my own aquaria and stands. the stand my 4x6 is on started life as an aquarium stand.
I had a few stands to make either for me or someone else, I can't remember, so I started cutting the 20' lengths of 1¼"X1¼"x3/16" angle iron by hand with a hack saw. After cutting the 4 legs I cut the 8 pcs to make the "trays" each piece had the bottom corners cut off at 45° this left a little gap in the corners which accommodated the radii of the inside corners of the uprights (legs). Before welding and while having a beer, I calculated how many inches of 3/16" steel I had cut. Just shy of 6 feet!
The other stands had to wait until I finished building my power hacksaw which served me well until it was replaced by the ubiquitous 4X6.
Busy Bee 12-36 lathe, Busy Bee Mill drill, Busy Bee 4x6 bandsaw, Homemade 9x17 bandsaw, Ad infinitum.
Posts: 8,888
Threads: 320
Joined: Feb 2012
Location: Arizona/Minnesota
(06-02-2013, 09:25 PM)Mayhem Wrote: Ed - yours looks like the exact same one I have, right down to the colour.
I won't get to play with it until next weekend but I suspect some of the issues with it cutting straight may be due to the speed at which the blade descends. As I said, I need to play a little more...
Darren,
That's not a picture of my saw. I posted that picture to show the stand which I made based on that wooden design. I didn't have a picture of mine handy so I posted that one which I had on my computer already.
Ed
Posts: 825
Threads: 25
Joined: Jul 2012
Location: N. Bay Ontario
Steve, wow, that is a lot of hacksawing!! You must have ended up with an arm like Popeye.
sasquatch, proud to be a member of MetalworkingFun since Jul 2012.
Posts: 2,685
Threads: 29
Joined: Feb 2012
Location: Nova Scotia, Canada
Sasq, remember that was back in the 70s I did have arms like Popeye, but I still made the power hacksaw. 
Busy Bee 12-36 lathe, Busy Bee Mill drill, Busy Bee 4x6 bandsaw, Homemade 9x17 bandsaw, Ad infinitum.
Posts: 3,003
Threads: 51
Joined: Apr 2012
Location: Ontario
"Oh, you may notice that I practice similar "good housekeeping" and cleanliness as that of Greg. hey! it works for us. "
Hey I resemble that remark.
Free advice is worth exactly what you payed for it.
Greg
Posts: 4,683
Threads: 93
Joined: Feb 2012
Location: Perth, Australia
The local too place only sells carbon blades for this size bandsaw, so I am going to have to source them from elsewhere.
I decided to drain the oil from the gearbox (transporting the saw started the process, I simply finished it). I then cleaned the factory paint from the rubber gasket and installed new oil. I left the saw in the upright position overnight and none of the oil escaped, so I can tick that job off.
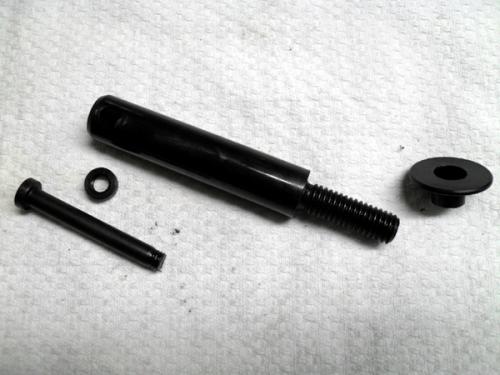
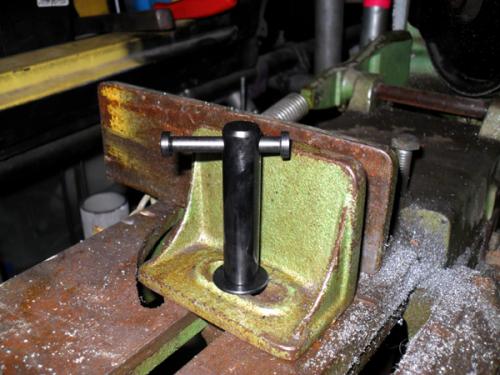
Next was to replace the stripped bolt that holds the movable jaw to the nut. It is a garden variety 3/8-16 bolt but the slot in the jaw has been machined oversize. I was originally just going to machine up a top hat to act as a washer and also take up the slop. However, I saw a mod on one of the ubiquitous 4x6 mod threads and decided to copy it. Essentially, it allows you to make the necessary adjustments without looking for a wrench. Here are a couple of pics:
First - the exploded diagram:

On the saw:

I think the tension spring has stretched, as I have adjusted it to within an inch or so of its travel and the saw still falls quite fast. I may have to move the anchoring point to increase the tension.
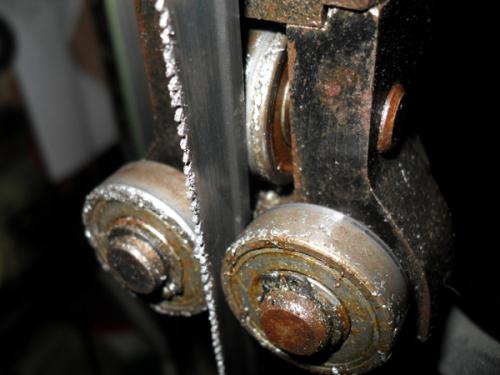
Finally - I took a pic of the guide rollers. One mod I will make is to add a brush to keep them clean, like Willie did on his bandsaw. I also plan to replace the thrust bearings, as you can see the grove that has worn into them.

Hunting American dentists since 2015.
Posts: 4,493
Threads: 187
Joined: Feb 2012
Location: Missouri, USA
06-10-2013, 07:18 AM
(This post was last modified: 06-10-2013, 07:20 AM by Highpower.)
(06-10-2013, 05:59 AM)Mayhem Wrote: I decided to drain the oil from the gearbox (transporting the saw started the process, I simply finished it). I then cleaned the factory paint from the rubber gasket and installed new oil. I left the saw in the upright position overnight and none of the oil escaped, so I can tick that job off.
--------<snip>--------
One mod I will make is to add a brush to keep them clean, like Willie did on his bandsaw.
Darren, it had to be someone else because my saw came with a factory installed wire wheel as standard equipment. (7x12) I did however add a second coolant line to my saw to help flush chips from the sides of the blade before they reached the second set of guide rollers. The wire wheel is located after the second set of rollers and is for cleaning chips out of the gullets of the teeth.
Good move on changing the gearbox oil. When I bought my saw one of the things the folks at Enco recommended to me, was to drain out the factory oil from the gearbox and fill it with ATF. They said run the saw (no load) for 30-60 minutes and then drain the gearbox again, then refill with the proper oil.
I'm glad I followed their advice because after "breaking in" the gearbox with ATF and draining the fluid, it looked like I had been panning for gold with all the tiny little brass shavings that came out in a slurry. 
I "flushed" the gearbox a second time and only a few flakes came out after that. Then I refilled the box with new oil. The saw actually seemed to run more quietly after that too. 
Nice job on the "no tools" jaw retainer bolt by the way! 
Are you going to do the same with the other jaw as well?
ps.
What are you using to blacken your parts? 
Willie
Posts: 4,683
Threads: 93
Joined: Feb 2012
Location: Perth, Australia
06-10-2013, 07:31 AM
(This post was last modified: 06-10-2013, 07:33 AM by Mayhem.)
Thanks Willie,
Heating them to a dull red and then dunking them in used diesel oil. I generally leave them to soak in the oil for a while and them clean them off with a rag. Sometimes I get good results first up. Other times I get sections where it flakes off. I'm wondering if it is the bubbles as the part boils up the oil as it goes in...
I may well do the fixed jaw as well. No - it was your saw I was thinking off, as I remembered that I asked about it. I just assumed it was a mod you made. Any chance you can take some pics of the set up?
Hunting American dentists since 2015.
|


