RobWilson
Unregistered
The following 3 users Like RobWilson's post:
EdK (11-19-2016), DaveH (11-19-2016), Mayhem (11-19-2016)
Evening Chaps , 
I found a place to mount the last two cabinets today , the location (sorry Ed )
![[Image: P1140332_zps2qgcvhsk.jpg]](http://i1066.photobucket.com/albums/u410/RobWilson100/P1140332_zps2qgcvhsk.jpg)
A bit of prep required ,remove air pipe ,socket and the crap lying about the area .
![[Image: P1140343_zpsiciy8ny9.jpg]](http://i1066.photobucket.com/albums/u410/RobWilson100/P1140343_zpsiciy8ny9.jpg)
![[Image: P1140341_zpshwzkn2h4.jpg]](http://i1066.photobucket.com/albums/u410/RobWilson100/P1140341_zpshwzkn2h4.jpg)
I had to cut a section out of one of them as it covers were the power and air comes in from the other shop , also the new three phase supply will come thought there as well .
![[Image: P1140344_zpstgdqk5jx.jpg]](http://i1066.photobucket.com/albums/u410/RobWilson100/P1140344_zpstgdqk5jx.jpg)
Still lots to do around the shop 
Cheers Rob
Posts: 8,891
Threads: 320
Joined: Feb 2012
Location: Arizona/Minnesota
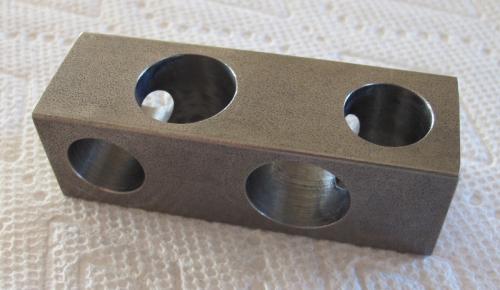
I finished the clamp block for the Kurt vise work stop. Well, not quite finished. I still need to add the chamfers.
Ed


Posts: 1,827
Threads: 51
Joined: Apr 2012
Location: Oklahoma
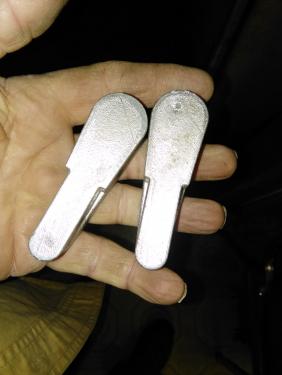
one of the shifter handles broke on my mill (bench top Square Column) so I printed up a pattern the other day and have been waiting on the weather to cooperate, which it did yesterday so I casted up a couple new shifter levers for the mill. I installed one of them to replace the broken on so I could quit using pliers to shift the mill with.

dallen, proud to be a member of MetalworkingFun Forum since Apr 2012.
If life seems normal, your not going fast enough! 
Posts: 482
Threads: 89
Joined: Oct 2012
Location: camillus (syracuse), ny
Good looking casting, How did you broach the casting for the shaft??
jack
Posts: 1,827
Threads: 51
Joined: Apr 2012
Location: Oklahoma
drilled the lever with a 1/4" bit, then counter bored it with a 11/16" endmill so I had a flat bottom hole, then I reamed it to 18 MM to fit the steel insert that was in the original lever. The original was pinned on to the shaft with a roll pin. I could of got away with not using the insert but didn't have a reamer to fit the shaft which is like 13 MM.
dallen, proud to be a member of MetalworkingFun Forum since Apr 2012.
If life seems normal, your not going fast enough! 
RobWilson
Unregistered
The following 4 users Like RobWilson's post:
Mayhem (11-21-2016), EdK (11-21-2016), Vinny (11-21-2016), aRM (11-21-2016)
Evening Lads 
Still allot to do around the shop  I would rather be machining ,but needs must . My three phase DB arrived today and having no room to store it thought I may as well stick it up on the wall .
The Feng shui meter says it looks good here .
![[Image: P1140349_zpsdu7crc6a.jpg]](http://i1066.photobucket.com/albums/u410/RobWilson100/P1140349_zpsdu7crc6a.jpg)
The panel still needs populating ,I only have the two 16 amp MCB's at the moment one for lathe and other for the new compressor .
I was planning on doing the wiring over the end of year holidays ,so that gives me a month to collect the rest of the gear .
![[Image: P1140351_zpszm8mif4a.jpg]](http://i1066.photobucket.com/albums/u410/RobWilson100/P1140351_zpszm8mif4a.jpg)
![[Image: P1140352_zpsbuzfukpu.jpg]](http://i1066.photobucket.com/albums/u410/RobWilson100/P1140352_zpsbuzfukpu.jpg)
I have mounted the panel about 30mm off the wall so I can drop cables down the back .
Rob 
Posts: 4,513
Threads: 139
Joined: Feb 2012
Location: Kempton Park. South Africa
That looks neatly done Rob, 

DaveH
a child of the 60's and 50's and a bit of the 40's 
Posts: 8,891
Threads: 320
Joined: Feb 2012
Location: Arizona/Minnesota
The following 3 users Like EdK's post:
f350ca (11-26-2016), arvidj (11-26-2016), DaveH (11-28-2016)
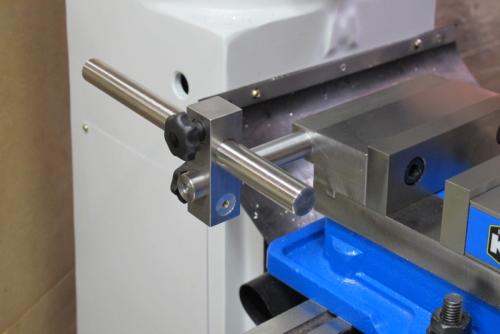
Almost done with this project. I used split collet clamps to clamp the block to the rods. I still need to chamfer the block and figure out what I want to use for the stop piece.
Ed

Posts: 4,683
Threads: 93
Joined: Feb 2012
Location: Perth, Australia
(11-26-2016, 04:47 PM)EdK Wrote: ...I still need to...
...replace the cheap plastic knob with something more appropriate.
Sorry Ed, I thought this was one of those 'fill in the blank' scenarios  The stop looks good but (IMHO) that knob cheapens the whole thing.
Personally, I'd make another block and then turn up a length with a small diameter contact at one end and leave the rest of the rod the same diameter. You'll appreciate the larger surface area when you have part with a radius that will bump up against the stop.
Hunting American dentists since 2015.
Posts: 536
Threads: 39
Joined: Jan 2013
Location: Kelowna, BC, Canada
The following 3 users Like Hawkeye's post:
aRM (11-29-2016), arvidj (11-29-2016), EdK (11-29-2016)
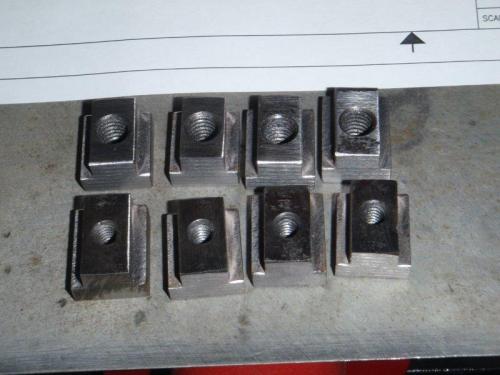
Since my X2 CNC mill is finally rising from the ashes, as it were, I'm realizing that there are certain fittings that did not return to my custody after the fire. Today, I made up a bunch of T-nuts in both 1/4" and 3/8" for all of the necessary workholding tasks.

In the near future, I'll be making a pair of low-profile toe clamps and a clamping bar, as well as a replacement for my hot-wire attachment. I will likely use the attachment mainly for making forms to use in lost-foam casing.
Mike
If you can't get one, make one.
Hawkeye, proud to be a member of MetalworkingFun Forum since Jan 2013.
|

![[Image: P1140332_zps2qgcvhsk.jpg]](http://i1066.photobucket.com/albums/u410/RobWilson100/P1140332_zps2qgcvhsk.jpg)
![[Image: P1140343_zpsiciy8ny9.jpg]](http://i1066.photobucket.com/albums/u410/RobWilson100/P1140343_zpsiciy8ny9.jpg)
![[Image: P1140341_zpshwzkn2h4.jpg]](http://i1066.photobucket.com/albums/u410/RobWilson100/P1140341_zpshwzkn2h4.jpg)
![[Image: P1140344_zpstgdqk5jx.jpg]](http://i1066.photobucket.com/albums/u410/RobWilson100/P1140344_zpstgdqk5jx.jpg)


 I would rather be machining ,but needs must . My three phase DB arrived today and having no room to store it thought I may as well stick it up on the wall .
 ![[Image: P1140349_zpsdu7crc6a.jpg]](http://i1066.photobucket.com/albums/u410/RobWilson100/P1140349_zpsdu7crc6a.jpg)
![[Image: P1140351_zpszm8mif4a.jpg]](http://i1066.photobucket.com/albums/u410/RobWilson100/P1140351_zpszm8mif4a.jpg)
![[Image: P1140352_zpsbuzfukpu.jpg]](http://i1066.photobucket.com/albums/u410/RobWilson100/P1140352_zpsbuzfukpu.jpg)

