Posts: 4,493
Threads: 187
Joined: Feb 2012
Location: Missouri, USA
The following 2 users Like Highpower's post:
stevec (01-10-2015), EdK (01-10-2015)
Spent some more time working on my little Tecumseh. I wanted to adapt an electric starter to this engine, which meant I had to find a different flywheel with some teeth to it. 
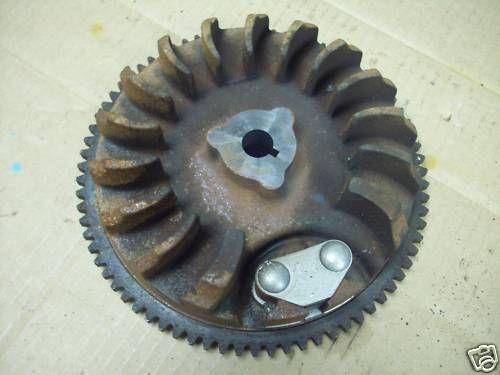
I found a few well used and rusted flywheels on evil-bay and ended up buying this one, as it looked the cleanest of all and was a decent price. Notice that there are no threaded holes around the crankshaft center hole.

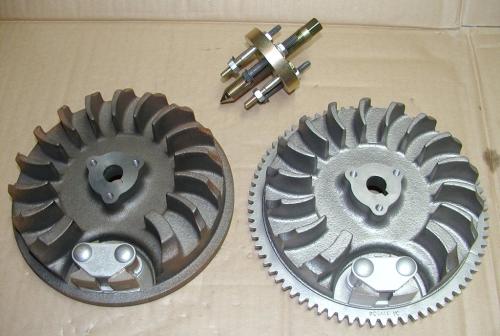
Of course this is what the guy actually sent me: 

After getting most of my money back  I went ahead and bead blasted the rust off of the part and cleaned it up. Then set it up on the mill to drill and tap the 3 holes needed to attach a Tecumseh flywheel puller. (A "just in case" removal is needed in the future.) I've got a feeling the magnet is still good. 

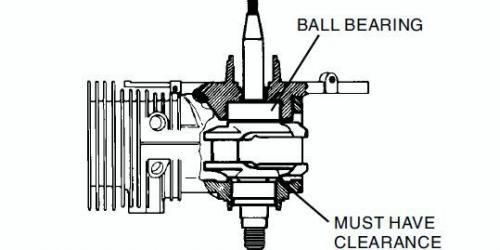
Some engines you can use a "knock off" tool on the end of the crankshaft to pop the flywheel loose. This one you can't as there is a good possibility of damaging some of the internals because of the slip fit bearings. It's all apart anyway, so now is the time to do it.
And a final look at the original flywheel I took off (no starter ring gear) and my heavily rusted ebay "prize" ready to be installed.

Willie
Posts: 2,344
Threads: 53
Joined: Feb 2012
Location: Spencer MA USA
It's been a LONG time since I got something off eBay that didn't match the description, so sorry that happened! Nice cleanup on it there. What method did you use?
What is under the covers that's riveted onto those flywheels? What "internals" exist on those which could be damaged?
Posts: 4,493
Threads: 187
Joined: Feb 2012
Location: Missouri, USA
I find it's typical of "power sellers" on ebay to put up a single picture of an item that they have multiples of to sell. That's fine for new items, but it's a pet peeve of mine that on "used" items they only picture their best looking one, then ship the ones sitting at the bottom of the pile. But I digress....
I used "medium" glass beads in my blasting cabinet for the cleanup. There is still some minor pitting in the gear teeth visible where the iron had been rusted away, but overall it's in good usable condition (now). The riveted cover retains the permanent magnet that excites the CDI ignition module. I vacuumed up the cast iron shavings after drilling and tapping the flywheel but you can see a lot of the shavings still stuck to the magnet in the 3rd pic. High pressure air gun removed those nicely.
Notes from the service manual:
Quote:NOTE: A KNOCK-OFF TOOL IS NOT RECOMMENDED
FOR ENGINES WITH A BALL BEARING ON THE
MAGNETO END OF THE CRANKSHAFT.
NOTE: If a knock-off tool is used, the pounding may
cause the ball bearing to dislodge from the shroud
base and force the lower thrust face of the crankshaft
against the cylinder thrust face.

The bearing race can be knocked further into the crankcase bore and wedge there, causing the crankshaft to rub directly against the opposite side of the aluminum crankcase housing. Another possible problem would be dislodging the governor flyweight balls (loose ball bearings) from the end of the crankshaft and falling down into the crankcase. Not a good thing to have aluminum shavings or hardened steel balls bouncing around inside a running engine obviously.
 Gov-Na.jpg
 (Size: 26.21 KB / Downloads: 170)
Willie
Posts: 642
Threads: 14
Joined: Oct 2013
Location: East Sussex, UK
My peeve is when they put up a picture then say' Picture for illustration only.' - what the heck else CAN it be for ????
Andrew Mawson, proud to be a member of MetalworkingFun Forum since Oct 2013.
Posts: 2,344
Threads: 53
Joined: Feb 2012
Location: Spencer MA USA
The following 3 users Like PixMan's post:
EdK (01-10-2015), Mayhem (01-10-2015), aRM (04-04-2015)
Today's project, another motorcycle part out of stainless steel. It's a special motor mount bolt that holds the motor in the frame of Neil's YSR50 project, don't know anymore than that about it. Here's the existing, perhaps 23 year old part. He wants all as-new shiny bits again.
![[Image: IMG_20150110_115313550_zpscqoa3dzr.jpg]](http://img.photobucket.com/albums/v466/kenm10759/Dads%20shop/IMG_20150110_115313550_zpscqoa3dzr.jpg)
First step was to take the 3/4" stock and turn for the square and for the M10x1,25 thread.
![[Image: IMG_20150110_115400737_zps8hnzdlmy.jpg]](http://img.photobucket.com/albums/v466/kenm10759/Dads%20shop/IMG_20150110_115400737_zps8hnzdlmy.jpg)
That done, remove the collet closer assembly from the back end of the spindle, change gears for metric threading. O had turned the OD to .394 (nominal), will let the full profile lay-down threading insert bring in the OD to final size as the pitch diameter is reached.
![[Image: IMG_20150110_121027005_HDR_zpsnuakzkls.jpg]](http://img.photobucket.com/albums/v466/kenm10759/Dads%20shop/IMG_20150110_121027005_HDR_zpsnuakzkls.jpg)
Good thread, right to size according to my thread pitch micrometer. Remove from lathe without cutting off from bar of stock.
Now over to the milling machine, remove the Walter dividing head, mount and indicate the Kurt vise. Using the square 5C collet block and a 3/8" solid carbide end mill, I milled the square to 10mm.
![[Image: IMG_20150110_133204611_zpslfshxaiz.jpg]](http://img.photobucket.com/albums/v466/kenm10759/Dads%20shop/IMG_20150110_133204611_zpslfshxaiz.jpg)
Back to the lathe, change the gears back for "inch" operation, remove 3-jaw chuck and reinstall the collet closer assembly. Plunge the cutoff tool 1/2 way in, radius the major OD of the part, file smooth and cutoff. Turn it around in a (snug) 15/32" collet and clean the face, polish. Done!
![[Image: IMG_20150110_141540377_zpsehcnptny.jpg]](http://img.photobucket.com/albums/v466/kenm10759/Dads%20shop/IMG_20150110_141540377_zpsehcnptny.jpg)
![[Image: IMG_20150110_141559157_zpsqiv0kkqn.jpg]](http://img.photobucket.com/albums/v466/kenm10759/Dads%20shop/IMG_20150110_141559157_zpsqiv0kkqn.jpg)
Now the painful part: I sent Neil a text with a photo of the finished piece, he replied back that he needs TWO of them. :(
Nuts.
Posts: 4,683
Threads: 93
Joined: Feb 2012
Location: Perth, Australia
The following 1 user Likes Mayhem's post:
rleete (01-11-2015)
(01-10-2015, 06:30 PM)PixMan Wrote: ...I sent Neil a text with a photo of the finished piece, he replied back that he needs TWO of them...
Simple, send him another photo 
Very nice part Ken. Why did you have to return the lathe to inch gearing before forming the head? Is it to do with the feed rates on your lathe or do you simply like to leave it set up as an inch lathe?
Hunting American dentists since 2015.
Posts: 2,344
Threads: 53
Joined: Feb 2012
Location: Spencer MA USA
The were three reasons I set it back to inch setting.
(1) When it's in metric gearing I have NO IDEA what feed rates I'm at.
(2) Because I had to put the collet closer back to hold the square part (no way to do it with the 3-jaw chuck.)
(3) I figured I was done with metric threading until I rough out and finish the diameters on two other long shafts, the axles for the bike..
Oh well. I'll be going back and forth again. Getting pretty fast at it now!
Posts: 8,890
Threads: 320
Joined: Feb 2012
Location: Arizona/Minnesota
What did I do today? I smashed my thumb between the elevator door and the side of a work bench at work while helping a colleague move a work bench from the second floor down to the first floor where the shipping dock is located. One more day at the Minnetonka building and then I'll be driving to Shakopee for work, something I'm not looking forward to. On a positive note, glasses of wine seem to be helping in easing the pain of the smashed thumb.
Ed
Posts: 3,799
Threads: 184
Joined: Jun 2012
Location: Farmington Hills, Michigan
The following 4 users Like TomG's post:
Highpower (01-15-2015), DaveH (01-15-2015), EdK (01-16-2015), Mayhem (01-16-2015)
Pictures or it never happened. 
Posts: 8,890
Threads: 320
Joined: Feb 2012
Location: Arizona/Minnesota
(01-15-2015, 09:21 PM)TomG Wrote: Pictures or it never happened. 

|


 I went ahead and bead blasted the rust off of the part and cleaned it up. Then set it up on the mill to drill and tap the 3 holes needed to attach a Tecumseh flywheel puller. (A "just in case" removal is needed in the future.) I've got a feeling the magnet is still good.


 I went ahead and bead blasted the rust off of the part and cleaned it up. Then set it up on the mill to drill and tap the 3 holes needed to attach a Tecumseh flywheel puller. (A "just in case" removal is needed in the future.) I've got a feeling the magnet is still good.


![[Image: IMG_20150110_115313550_zpscqoa3dzr.jpg]](http://img.photobucket.com/albums/v466/kenm10759/Dads%20shop/IMG_20150110_115313550_zpscqoa3dzr.jpg)
![[Image: IMG_20150110_115400737_zps8hnzdlmy.jpg]](http://img.photobucket.com/albums/v466/kenm10759/Dads%20shop/IMG_20150110_115400737_zps8hnzdlmy.jpg)
![[Image: IMG_20150110_121027005_HDR_zpsnuakzkls.jpg]](http://img.photobucket.com/albums/v466/kenm10759/Dads%20shop/IMG_20150110_121027005_HDR_zpsnuakzkls.jpg)
![[Image: IMG_20150110_133204611_zpslfshxaiz.jpg]](http://img.photobucket.com/albums/v466/kenm10759/Dads%20shop/IMG_20150110_133204611_zpslfshxaiz.jpg)
![[Image: IMG_20150110_141540377_zpsehcnptny.jpg]](http://img.photobucket.com/albums/v466/kenm10759/Dads%20shop/IMG_20150110_141540377_zpsehcnptny.jpg)
![[Image: IMG_20150110_141559157_zpsqiv0kkqn.jpg]](http://img.photobucket.com/albums/v466/kenm10759/Dads%20shop/IMG_20150110_141559157_zpsqiv0kkqn.jpg)

![[Image: TomsTechLogo-Profile.png]](http://tomstechniques.com/wp-content/uploads/2013/11/TomsTechLogo-Profile.png)
