Single point threading problem
#21
Thanks for sharing your confusion, Mayhem.Rant
Just what I need, more confusion. Slaphead
Busy Bee 12-36 lathe, Busy Bee Mill drill, Busy Bee 4x6 bandsaw, Homemade 9x17 bandsaw, Ad infinitum.
Reply
Thanks given by:
#22
(09-02-2012, 07:26 AM)stevec Wrote: Thanks for sharing your confusion, Mayhem.Rant
Just what I need, more confusion. Slaphead

Life without confusionRotflRotflRotflRotflRotfl
dallen, proud to be a member of MetalworkingFun Forum since Apr 2012.

If life seems normal, your not going fast enough! Tongue
Reply
Thanks given by:
#23
When threading to a shoulder next time, try running the spindle in reverse with the tool on the backside of the work. There's usually enough slop in the gear train to manually put that cutter tip exactly where you want it with the power off, then turn it on. Works great, even with a threaded spindle nose if the threads are a fine pitch (like, 10 tpi?). Maybe rig up an all-thread chuck binder through the spindle bore to keep things screwed on. A word caution: all this forwarding/reversing can get a guy to hit the wrong direction and instantly crash. Don't do that.

Yup, picking up a thread. All your settings are gone, you're in uncharted waters and will need to find and set a new zero for the cross feed. The second time will be a lot easier.

If the trailing side is rough, and remembering how to pick up a thread, you'll see that you can retract the compound to clear, and feed the cross slide a couple thou past zero. Start threading again and you'll be shaving the trailing side this time. Ditto on cleaning up the leading side, feed the cross slide a couple thou short of zero. The process goes pretty quick, larger feeds of the compound can be used. The technique is also handy for large threads, working the sides like that.
Reply
Thanks given by:
#24
f350ca Wrote:Self taught so this may not be the correct method to pick up a thread but it seams to work for my level of precision.
I just back the cross feed out, engage the half nuts and let the carriage travel till the tool is over the tread. Stop the lathe, now use a combination of compound and cross feed till your into the cut thread. Back out the cross feed and start the lathe, now slowly bring the cross feed back in till your cutting. That depth on the cross feed is your new setting as you back out and return for subsequent passes.

Yep, same method I've always used - even works for blind-hole Metric-fine internal threads on an Imperial lathe (eek!) - and a bit quicker and easier than stripping the forks off the bike (and stripping the fairing, brakes, mudguard and handlebars off too so I can get the forks off - Grrr...) so I can try the steerer thread in the new custom headstock-bearing top-nut while it's still in the lathe... If only I had a M22 x 1.0 tap, eh?

Dave H. (the other one)
Rules are for the obedience of fools, and the guidance of wise men...
(Douglas Bader)
Reply
Thanks given by:
#25
OK - well I had a win over the weekend and then a major balls up Smiley-signs139

Since I started this post, I haven't done any single point threading on my lathe, as I haven't really needed to and the few times I did, the job was small and better suited to the 10" lathe my friend has (conveniently) set up in my workshop.

I recently managed to acquire a free lump of metal from a friend, which was big enough to have the copy of the spindle nose of my lathe hiding within it. It came from a hydraulic shop and is an alloy of some sort, as it machines very nice and I actually had to use a slower speed on my lathe, as I was getting sparks dance off the insert I was using (one that Ken gave me but I forget the grade). I found that a 1mm DOC was best, with a steady hand feed and this produced a nice finish, as well as tightly curled chips that came off the work straw coloured and then turned a nice blue. The chips were about 30mm in length.

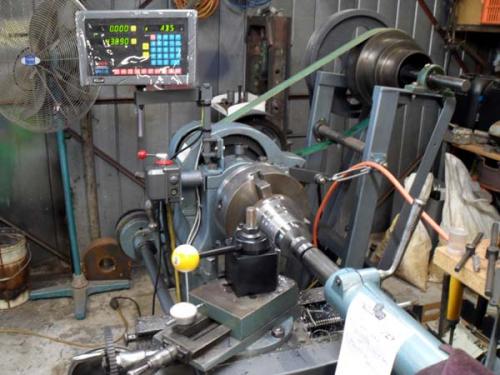
The newly installed DRO made life a lot easier, as I didn't have to mess about with a DI on the cross slide and also made longitudinal cuts easier (no dial!). So, all was good and the part was turned to size.
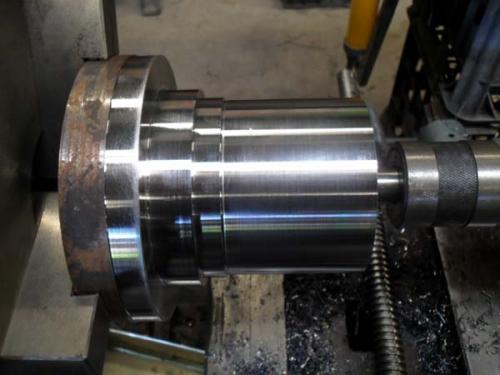
   

Next step was the threading, which had been an issue and was the basis for this thread (no pun intended). In setting everything up, I recall a comment made by Tom in one of his videos about the compound slide being parallel to the trailing edge of the threading tool, which in this case should be 30° from the perpendicular. I noticed that when I swung my compound slide into (what I thought was the correct) position, it wasn't parallel.

Now my compound slide has 45° - 90° - 45° graduations, so I had been setting it at the 60° mark (i.e. 30° from the centre). This was wrong (oh, so wrong). So, using a protractor, I set the compound slide the 30° and strangely enough, it all looked good. So my sincere apologies to those who asked if I had the compound set to the correct angle...

I also turned down a section at the front of the job that would be removed later but would allow me to move the tool past the work sufficiently enough to ensure any backlash was taken up. I then set the gears and did several scratch passes to ensure that I had the correct gears and that the tool was tracking the same path each time. All looked good and the thread took shape nicely. The 6 tpi insert used is in a borrowed top-lock tool holder and cut with minimal effort and left a good finish. I was threading at about 70 rpm, which is slow but the 2 tpi leadscrew does hurry things up a bit!
   

The crests are black, as I used a sharpie to colour the threaded section to better see the scratch passes.
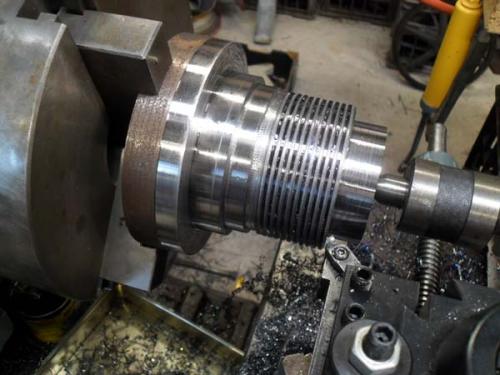
   

As the thread got deeper, I realised that I hadn't made the relief groove deep enough and with the mass of my lathe and the absence of a brake, I wanted some comfort. So, given that I have a QCTP, I decided to switch tools and make the groove deeper. With that done, I put the threading tool back in and put the cross slide back to the zero position (much easier to do with a DRO) and took a spring cut. Well, that spring cut produced a rather thick, hot chip and in the time it took me to react and withdraw the tool the thread was ruined. Instead of taking a spring cut, I took a large cut out of the crest of the thread - perfectly bisecting the existing thread. It took me a minute to figure out the very stupid mistake that I made. Yes - you guessed it, I had disengaged the leadscrew when increasing the thread relief groove, thus losing the relationship between the chuck and the change gears Bash Sorry - I couldn't bring myself to take pictures of the carnage Bawling

That is a lesson I'll not forget.
Hunting American dentists since 2015.
Reply
Thanks given by:
#26
I've done that Big Grin -so you are not special Darren Rotfl
Nice photos Thumbsup
Smiley-eatdrink004
DaveH
Reply
Thanks given by:
#27
Thanks Dave - I feel better knowing that.
Hunting American dentists since 2015.
Reply
Thanks given by:
#28
I always take a "dry run" pass whenever I make any changes to the set-up. I go through the motions of a thread cutting pass but with the tool almost touching the crest dia.
Of course all that to admit that I learned to do that procedure exactly the same way you just did.
Hard learned lessons are well remembered. Bash
Busy Bee 12-36 lathe, Busy Bee Mill drill, Busy Bee 4x6 bandsaw, Homemade 9x17 bandsaw, Ad infinitum.
Reply
Thanks given by:
#29
Anyone who hasn't made a mistake hasn't done anything !
Andrew Mawson, proud to be a member of MetalworkingFun Forum since Oct 2013.
Reply
Thanks given by:
#30
(08-05-2014, 07:31 AM)awemawson Wrote: Anyone who hasn't made a mistake hasn't done anything !

That is so true Thumbsup
Smiley-eatdrink004
DaveH
Reply
Thanks given by:


Users browsing this thread: 2 Guest(s)