Posts: 2,344
Threads: 53
Joined: Feb 2012
Location: Spencer MA USA
Built just like my 2 Kurt 6" Anglock vises from what I can see.
I had a Chinese made 6" copy that I took apart to look at and found they didn't bother to machine the reverse angle and put a hemispherical spot and half-ball piece in there. Another reason I had disassembled it was that I found it was .002" out of parallel on the sliding surfaces of the base when it was mounted on it's swivel base. I checked it again without the swivel base and it was within a 1/2 thousandth of an inch in the 5" sweep.
I had paid $60 for it and sold it off for the same after I got my second Kurt. One is a D675, the other a D60. Both are nearly dead flat. I have no swivel bases for them but don't need one because I can just use the Prototrak control to cut an angle.
Posts: 242
Threads: 30
Joined: Mar 2014
Location: Planeta Rica, Colombia
The following 3 users Like JScott's post:
EdK (11-10-2014), PixMan (11-10-2014), Highpower (11-11-2014)
11-10-2014, 01:48 PM
(This post was last modified: 11-10-2014, 01:51 PM by JScott.)
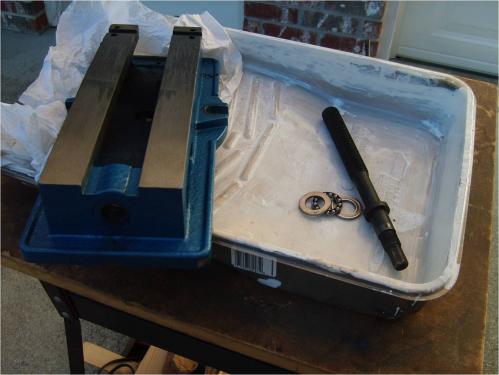
Saturday I got the chance to complete the disassembly of my vise. I pulled the screw and thrust bearing our completely and cleaned everything with mineral spirits. The thrust bearing had no lubrication in it at all and was somewhat contaminated with the same gray-black grinding dust as the rest of the vise.
The threaded collar that holds the main screw in place is secured with two pointed set screws or grub screws. The points of the screws were starting to damage the fine threads on the main screw shank. When I reassembled the threaded I put a small lead ball into the hole first so the set screw pushed on a piece of lead which in turn presses on the threads and prevents damage.
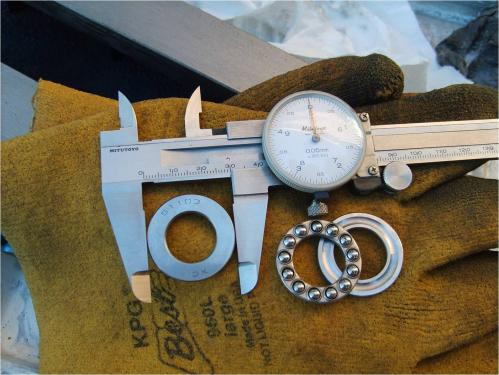
The thrust bearing is a ball bearing style rather than a needle bearing style. It did not have any lubricant in it at all. It is a 51103 XC that is 30mm in diameter and 9mm thick. This is not a high dollar bearing and I found one on fleabay for $2.00 with free shipping.
I reassembled everything with a generous quantity of white lithium grease and 30W oil. The key and slots for the fixed jaw were reassembled with plenty of anti-seize.


The vise looks much better now and it operates very smoothly. I will tram it this week and check it for square, etc.
JScott, proud to be a member of MetalworkingFun Forum since Mar 2014.
Posts: 2,344
Threads: 53
Joined: Feb 2012
Location: Spencer MA USA
Best of luck with it!
You may find that assembling it with "plenty of anti-seize" may affect the square and parallel readings. I might have suggested you just stone the keys and mating keyways a bit to get a less-than-tight fit while maintaining true metal-on-metal contact. If you do find it "out" at all, try taking that anti-seize compound out of there and recheck.
Oh yeah...a brass "shoe" might keep tension better than lead and still not damage the threads. It's the most commonly used method.
Posts: 313
Threads: 34
Joined: Nov 2013
Location: Kamloops, BC, Canada
Shawn, proud to be a member of MetalworkingFun Forum since Nov 2013.


![[Image: image.jpg]](http://s10.postimg.org/tpg1zugqd/image.jpg)
![[Image: image.jpg]](http://s10.postimg.org/w5hvdoyt1/image.jpg)
![[Image: image.jpg]](http://s10.postimg.org/yyb2xpz5h/image.jpg)