10-14-2017, 09:55 PM
I'm hesitant about posting this - there are so many clever ideas and so much fine workmanship. But maybe the idea will be helpful to someone so here goes -
Some years ago, I needed to tap a number of 5/8 – 11 holes in aluminum jig plate. I didn’t look forward to the physical effort so I spent a few hours fabricating a tool that would make the task easier.
The tool consists of a collar, bored to fit snugly over a drill chuck . Three equally spaced holes around the perimeter of the collar were drilled through to the bore and tapped 3/8 – 16.
Three ½ inch HRS rods, about ten inches long, were threaded 3/8 – 16 at one end and ¼ – 20 at the other end. The ¼ – 20 threaded ends were to accommodate small balls as shown in the photo below. The balls were not functionally required but I thought that they made the tool look more professional.
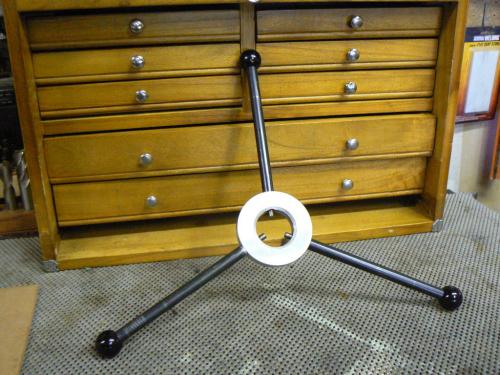
The 3/8 – 16 threads were turned back about ½ inch to a diameter that fit closely to the chuck key holes in the drill chuck. When the collar is slipped over the drill chuck and the steel rods threaded through the collar and into the holes in the chuck, the spindle of the drill press can be easily rotated with the steel arms.
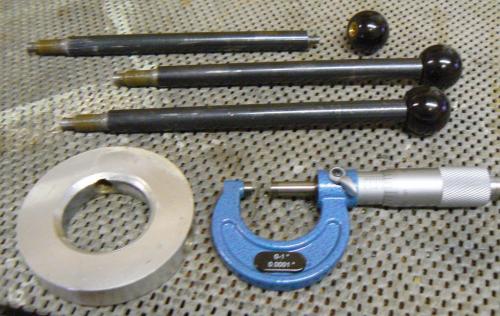
A large tap securely gripped in the drill chuck, can be rotated with a great deal of mechanical advantage by the leverage of the three arms.
Apologies for the photos, by the way. My small shop is cluttered with more machinery than it should accommodate which makes for poor clarity in the pictures.
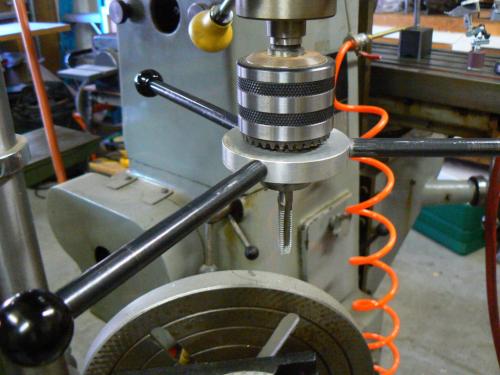
This tool is used fairly often now, usually for threads much smaller than the 5/8 – 11 variety for which it was built. However it is obvious that there is implicit danger in the setup !
Nobody would want to stand near those lever arms if the drill press was accidentally activated !!
So I’ve developed a simple safety routine consisting of first unplugging the drill press, then removing the drive belt and placing it somewhere that is easily visible. If I break for dinner, for example, when I return and see the belt, I can continue my work safely.
The arms and collar must be removed to change taps because the drill chuck gear and key holes are inaccessible otherwise. If one has to change taps often, although it doesn’t take a lot of time, the process is tiresome.
I started using the tool for smaller taps and wanted the convenience of changing them without having to loosen the arms and remove the collar so I modified a small tap holder . I discarded the handle and milled three equally spaced flats on the top of the holder.
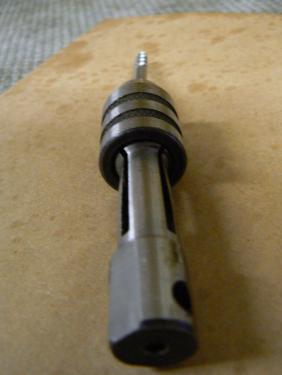
The tap holder is inserted into the 5/8 drill chuck and the three flats align with the chuck jaws, when tightened, preventing slippage. Taps can be changed easily and quickly without tools. I usually lightly bump the tap holder with a rubber hammer to align it with the spindle as it is tightened in the drill chuck. In the photo below, the tap holder can be seen installed in the drill chuck.
This simple device has been a real time saver as well as starting and tapping holes square and true, no matter the angle or position of the workpiece. The table on the drill press is a universal one. It can be cranked up and down on the column, swung to either side, adjusted to any angle, rotated around two different axes simultaneously and so forth.
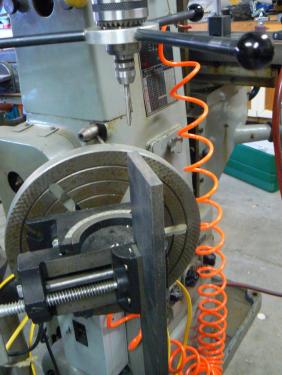
Usually there is a vise on the table for small parts. In this photo an awkward workpiece that needs tapped holes on the ends can be drilled and tapped in this simple setup.
Larger taps tend to slip in the drill chuck occasionally. A scrap of carbide paper wrapped around the shank before installing in the chuck was helpful in preventing slippage.
Some years ago, I needed to tap a number of 5/8 – 11 holes in aluminum jig plate. I didn’t look forward to the physical effort so I spent a few hours fabricating a tool that would make the task easier.
The tool consists of a collar, bored to fit snugly over a drill chuck . Three equally spaced holes around the perimeter of the collar were drilled through to the bore and tapped 3/8 – 16.
Three ½ inch HRS rods, about ten inches long, were threaded 3/8 – 16 at one end and ¼ – 20 at the other end. The ¼ – 20 threaded ends were to accommodate small balls as shown in the photo below. The balls were not functionally required but I thought that they made the tool look more professional.
The 3/8 – 16 threads were turned back about ½ inch to a diameter that fit closely to the chuck key holes in the drill chuck. When the collar is slipped over the drill chuck and the steel rods threaded through the collar and into the holes in the chuck, the spindle of the drill press can be easily rotated with the steel arms.
A large tap securely gripped in the drill chuck, can be rotated with a great deal of mechanical advantage by the leverage of the three arms.
Apologies for the photos, by the way. My small shop is cluttered with more machinery than it should accommodate which makes for poor clarity in the pictures.
This tool is used fairly often now, usually for threads much smaller than the 5/8 – 11 variety for which it was built. However it is obvious that there is implicit danger in the setup !
Nobody would want to stand near those lever arms if the drill press was accidentally activated !!
So I’ve developed a simple safety routine consisting of first unplugging the drill press, then removing the drive belt and placing it somewhere that is easily visible. If I break for dinner, for example, when I return and see the belt, I can continue my work safely.
The arms and collar must be removed to change taps because the drill chuck gear and key holes are inaccessible otherwise. If one has to change taps often, although it doesn’t take a lot of time, the process is tiresome.
I started using the tool for smaller taps and wanted the convenience of changing them without having to loosen the arms and remove the collar so I modified a small tap holder . I discarded the handle and milled three equally spaced flats on the top of the holder.
The tap holder is inserted into the 5/8 drill chuck and the three flats align with the chuck jaws, when tightened, preventing slippage. Taps can be changed easily and quickly without tools. I usually lightly bump the tap holder with a rubber hammer to align it with the spindle as it is tightened in the drill chuck. In the photo below, the tap holder can be seen installed in the drill chuck.
This simple device has been a real time saver as well as starting and tapping holes square and true, no matter the angle or position of the workpiece. The table on the drill press is a universal one. It can be cranked up and down on the column, swung to either side, adjusted to any angle, rotated around two different axes simultaneously and so forth.
Usually there is a vise on the table for small parts. In this photo an awkward workpiece that needs tapped holes on the ends can be drilled and tapped in this simple setup.
Larger taps tend to slip in the drill chuck occasionally. A scrap of carbide paper wrapped around the shank before installing in the chuck was helpful in preventing slippage.


