11-11-2024, 03:20 PM
I decided I was going to retire in May of 2024 so I had to use as much of my vacation as I could before I left (could not cash it out). I did something I seldom do ... took a trip. Flew to Denver to stay with my nephew and his family and attend the Rocky Mountain RepRap Festival. I had been thinking about getting\building a new printer to augment the trusty Prusa Mk3.5. The Voron 2.4 had caught my eye but I did not know anyone that actually had one to look at. The RMRRF seemed to be a good excuse to address several 'wants' so off I went.
I'm very glad I went as, after looking at the Voron's, I was underwhelmed by the lack of rigidity the 20x20 extrusions provided. However, the new RatRig Vcore 4, with 30x30 extrusions, was much more to my liking. They were not ready to take orders, but would be 'soon'.
Eventually I was able to order the Vcore 4. The size decision was based on ability to get it in the house. The smallest is 300x300x300, which is big, but the 400 and 500 versions were similar in size to washing machines. I went with the smallest.
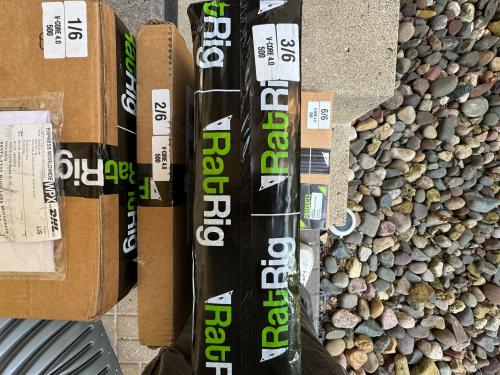
RatRig was totally unprepared for the number of orders they received. Chaos ensued but eventually, over the course of several days, DHL delivered all the boxes.

Step 01 was to put the frame together. Bigger that I had imagined. When done it will just barely fit in the final location.
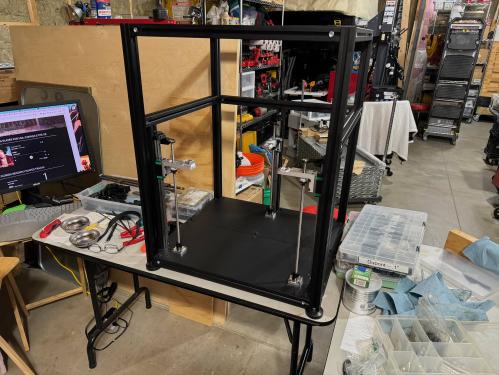
It is taking much longer to put together than I expected. This is as the end of Step 02 (of 15 steps) ...

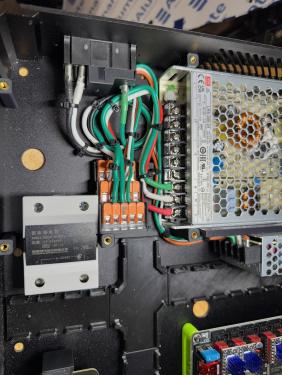
I skipped ahead to Step 12, the electronics enclosure, while I waited for some missing parts of the kit to be shipped from RatRig in Portugal. At least got the 120v wiring done. I following their wiring diagram but did not use any of their wire or connectors. The kit requires you to crimp everything (i.e. no pre-built wiring loom) so as long as I had to provide all of the labor I just said screw-it and went up one wire size, used the ultrafine core silicone wire I had on hand and used ferules and WAGO connectors (designed and printed the WAGO holder (guess that qualifies as the 'share your prints' part of the story)).

Eventually got the missing pieces from RatRig and am now on Step 05, plus continuing to work on the electronics wiring.
If I ever decide I need a new printer, it will be a 'take it out of the box and plug it in' version
I'm very glad I went as, after looking at the Voron's, I was underwhelmed by the lack of rigidity the 20x20 extrusions provided. However, the new RatRig Vcore 4, with 30x30 extrusions, was much more to my liking. They were not ready to take orders, but would be 'soon'.
Eventually I was able to order the Vcore 4. The size decision was based on ability to get it in the house. The smallest is 300x300x300, which is big, but the 400 and 500 versions were similar in size to washing machines. I went with the smallest.
RatRig was totally unprepared for the number of orders they received. Chaos ensued but eventually, over the course of several days, DHL delivered all the boxes.
Step 01 was to put the frame together. Bigger that I had imagined. When done it will just barely fit in the final location.
It is taking much longer to put together than I expected. This is as the end of Step 02 (of 15 steps) ...
I skipped ahead to Step 12, the electronics enclosure, while I waited for some missing parts of the kit to be shipped from RatRig in Portugal. At least got the 120v wiring done. I following their wiring diagram but did not use any of their wire or connectors. The kit requires you to crimp everything (i.e. no pre-built wiring loom) so as long as I had to provide all of the labor I just said screw-it and went up one wire size, used the ultrafine core silicone wire I had on hand and used ferules and WAGO connectors (designed and printed the WAGO holder (guess that qualifies as the 'share your prints' part of the story)).
Eventually got the missing pieces from RatRig and am now on Step 05, plus continuing to work on the electronics wiring.
If I ever decide I need a new printer, it will be a 'take it out of the box and plug it in' version


