11-29-2017, 06:51 PM
Weather lightened up a bit, the rainy season is here which usually suggests a temperature rise. So after a day of respite, I did get back to the project yesterday but ended the session without much joy. My intent was to rough out the three legs for the diamond grinder. I don’t remember why I chose it but I ordered several pieces of “Delrin” some for the legs and a large piece for the base of the work holder.
I’ve machined various “plastics” (or non-metallic materials) mostly PTFE (teflon) and “Rexolite”, materials often used in high-frequency applications (my professional specialization). For various other applications, “Bakelite”, FR-4, nylon, polypropylene and other materials have been machined. No real problems providing that the tool configuration is correct, and in the case of fiber-glass bearing materials like FR-4, correct tool composition.
Yesterday I had my butt whupped, rough-turning the three legs. Nothing special about the operations, start with 1-1/16 diameter kind of crummy looking stock, turn to 1 inch diameter, then part off 5 inch lengths.
Taper 3 inches of the rods 4 degrees, down to 1/2 diameter at the end of the rod. This was the setup:
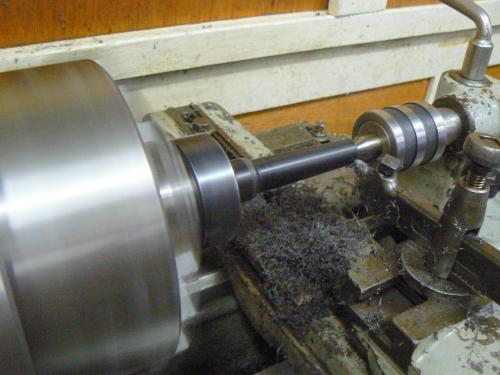
This all sounded simple to me - I presumed that Delrin would cut like most other non-metallic materials, right ? Nope. Imagine turning a piece of 1018 CRS with a tool that hasn't been sharpened in 20 hours of use. Well, heck, a little draw filing, some carbide paper, steel wool and Bob's yer uncle, right ?
Not with Delrin. Draw filing makes a slight improvement in finish but not in appearance. Sand paper, steel wool, scotch brite ? Fahgeddaboutit, makes things worse ! To make things worse, the material that is being cut “piles up” in front of the cutting tool rather than falling away from the cutting edge. This is presumably from melting part of the chip due to cutter-generated heat.
This obscures the cut and also affects the dimension/finish of the turned surface. When cutting to a shoulder or other feature requiring precision, the mass of material in front of the tool makes the exact location questionable !
Shining up delrin
Fortunately, after making the first tapering cut, I realized that I was in over my head with this material so I left about .150 on all three parts for finishing. My thought was that I’d put them aside until I thought – or was advised – of a better method to obtain a nice looking appearance.
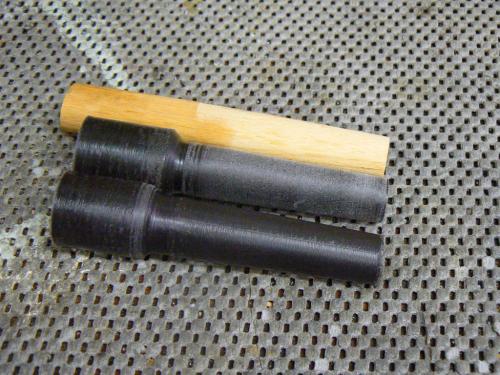
Tolerances on these parts are sloppy but I want them to have a somewhat professional appearance. BTW, I tried a “shear tool” also without success. Here is a photo of two of the parts showing the crude finish. The birch dowel that I used to check the taper angle actually has a better finish.
I thought that my cutting tool was correct for the material; as mentioned, I’ve often turned and milled non-metallic material. What had worked well previously was a cutting geometry similar to a round wood-worker’s lathe turning tool. But this wasn’t particularly successful.
I started a new thread on PM, also last night, although had I done so here, I’m sure that I would have received good advice. I just didn’t think of it. Speaking of not thinking, maybe if I’d been a little more analytical about the problem, I could have come up with a solution on my own but hindsight …. etcetera. Here’s what I think now:
The property (I think) of Delrin that gave me the most trouble is the toughness of the chip – I couldn't devise a chip breaker. In rod form, it's not real flexible but those long, stringy chips are not only tough but incredibly elastic ! I stretched several of the strings to twice their length before they broke !!! Other than rubber, I can't recall other material with this property - maybe nylon, polypropylene ? But I've turned those without drama, so ....
Cutting tools are chisels in one form or another and intuition suggests that a chisel, even with a very keen edge, is going to have a hard time with this stuff. Obviously the cutting process cannot easily shear, it tries to "push" the material off and it is reasonable to expect the material to tear plus generate heat. Recall that when turning metal, most of the heat generated is carried away by the chips. That cannot happen with plastics with low thermal conductivity !
At least that's the way I see it. I got a lot of suggestions on my PM thread. This morning, these are the ones that I followed:
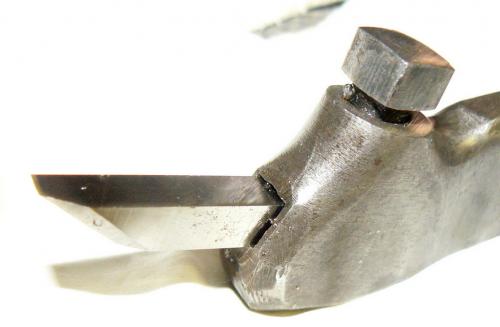
* Reground the front of the HSS tool flat and parallel to the (tapered) work, but with a chamfered leading edge, about 40-45 degrees and about .100 long. Lots of rake and relief, lots of honing. The front relief has to be greatly exaggerated because the Armstrong holder is tilted up to the work at about thirty degrees. The photo is magnified about ten times, BTW.
* Flooded the part with cutting oil to keep it cool (I usually turn plastics dry)
* Lowered speed from around 350-450 SFPM to 200-300 SFPM to keep it cool (part is tapered so SFPM varies)
* Increased my feed almost 8 times - from .0016 IPR to .012 IPR
* Roughing cut increased to .100, finish DOC about .030 (no sneaking up with light cuts)
Several of the changes were made concurrently so it's hard to tell if any single one of them was critical but my feeling is that increasing feed and DOC were the key, lowering the speed to reduce heat probably helped too - all this assumes correct cutting tool geometry and using coolant.
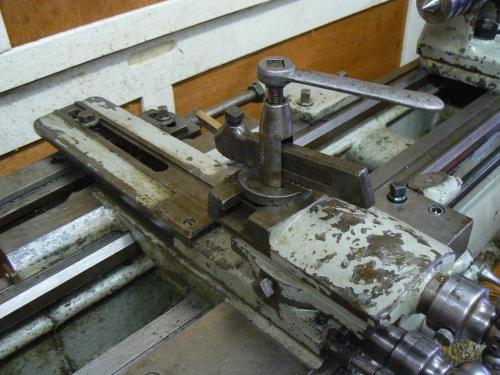
As can be seen, I removed the QCTP and used a lantern with an Armstrong tool holder. These provide lots of flexibility for adjusting angles (and deflection was not an issue). Also the working area was sort of confined with the distance from the face of the collet to the tailstock center being only four inches or so. The lantern was helpful to accommodate that envelope. Here's the setup again with a better view of the taper attachment:
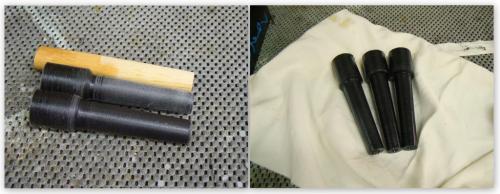
Here’s a comparison between the first parts and finish tapers. The parts need to be de-burred, the ends radiused and four more milling operations are required. I’m not looking forward to the milling operations but happily, none of the finished surfaces will be visible.
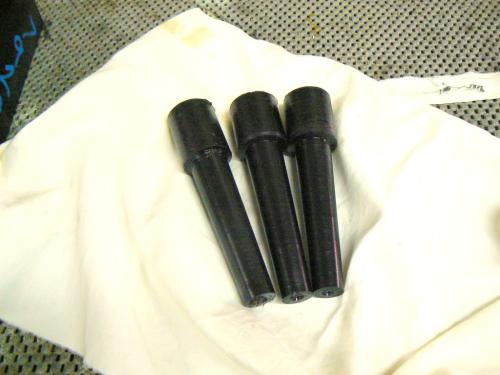
Sorry about the poor quality of some of the photos. Some pix were taken with the camera hand-held and my hands are VERY shaky. Here's a larger photo of the legs:
Because so many of you own machinery that I would love to have but can’t justify, I feel the need to speak up on behalf of my ratty-looking 1945 Sheldon lathe. When I bought it ($1000 plus free delivery from Grant’s Pass, Oregon to Eureka, California) I resolved that the old machine would bear it’s battle scars proudly, LOL.
It’s highly tempting to tear an old machine apart and restore it as much as possible to a like-new appearance. I’ve fought that temptation since obtaining the lathe. The trade-offs are:
http://www.jamesriser.com/Project/Sheldon.html
I’ve machined various “plastics” (or non-metallic materials) mostly PTFE (teflon) and “Rexolite”, materials often used in high-frequency applications (my professional specialization). For various other applications, “Bakelite”, FR-4, nylon, polypropylene and other materials have been machined. No real problems providing that the tool configuration is correct, and in the case of fiber-glass bearing materials like FR-4, correct tool composition.
Yesterday I had my butt whupped, rough-turning the three legs. Nothing special about the operations, start with 1-1/16 diameter kind of crummy looking stock, turn to 1 inch diameter, then part off 5 inch lengths.
Taper 3 inches of the rods 4 degrees, down to 1/2 diameter at the end of the rod. This was the setup:
This all sounded simple to me - I presumed that Delrin would cut like most other non-metallic materials, right ? Nope. Imagine turning a piece of 1018 CRS with a tool that hasn't been sharpened in 20 hours of use. Well, heck, a little draw filing, some carbide paper, steel wool and Bob's yer uncle, right ?
Not with Delrin. Draw filing makes a slight improvement in finish but not in appearance. Sand paper, steel wool, scotch brite ? Fahgeddaboutit, makes things worse ! To make things worse, the material that is being cut “piles up” in front of the cutting tool rather than falling away from the cutting edge. This is presumably from melting part of the chip due to cutter-generated heat.
This obscures the cut and also affects the dimension/finish of the turned surface. When cutting to a shoulder or other feature requiring precision, the mass of material in front of the tool makes the exact location questionable !
Last night I found a PM post on this topic and the majority consensus was that Delrin is not a good material to work and the finish obtained by initial turning cannot be improved, it is what it is. One guy claimed flaming the part would improve finish, another guy said flaming sucked, most recommended to do the best you can with the final finish turning operation and that's it. This is the thread:
Shining up delrin
Fortunately, after making the first tapering cut, I realized that I was in over my head with this material so I left about .150 on all three parts for finishing. My thought was that I’d put them aside until I thought – or was advised – of a better method to obtain a nice looking appearance.
Tolerances on these parts are sloppy but I want them to have a somewhat professional appearance. BTW, I tried a “shear tool” also without success. Here is a photo of two of the parts showing the crude finish. The birch dowel that I used to check the taper angle actually has a better finish.
I thought that my cutting tool was correct for the material; as mentioned, I’ve often turned and milled non-metallic material. What had worked well previously was a cutting geometry similar to a round wood-worker’s lathe turning tool. But this wasn’t particularly successful.
I started a new thread on PM, also last night, although had I done so here, I’m sure that I would have received good advice. I just didn’t think of it. Speaking of not thinking, maybe if I’d been a little more analytical about the problem, I could have come up with a solution on my own but hindsight …. etcetera. Here’s what I think now:
The property (I think) of Delrin that gave me the most trouble is the toughness of the chip – I couldn't devise a chip breaker. In rod form, it's not real flexible but those long, stringy chips are not only tough but incredibly elastic ! I stretched several of the strings to twice their length before they broke !!! Other than rubber, I can't recall other material with this property - maybe nylon, polypropylene ? But I've turned those without drama, so ....
Cutting tools are chisels in one form or another and intuition suggests that a chisel, even with a very keen edge, is going to have a hard time with this stuff. Obviously the cutting process cannot easily shear, it tries to "push" the material off and it is reasonable to expect the material to tear plus generate heat. Recall that when turning metal, most of the heat generated is carried away by the chips. That cannot happen with plastics with low thermal conductivity !
At least that's the way I see it. I got a lot of suggestions on my PM thread. This morning, these are the ones that I followed:
* Reground the front of the HSS tool flat and parallel to the (tapered) work, but with a chamfered leading edge, about 40-45 degrees and about .100 long. Lots of rake and relief, lots of honing. The front relief has to be greatly exaggerated because the Armstrong holder is tilted up to the work at about thirty degrees. The photo is magnified about ten times, BTW.
* Flooded the part with cutting oil to keep it cool (I usually turn plastics dry)
* Lowered speed from around 350-450 SFPM to 200-300 SFPM to keep it cool (part is tapered so SFPM varies)
* Increased my feed almost 8 times - from .0016 IPR to .012 IPR
* Roughing cut increased to .100, finish DOC about .030 (no sneaking up with light cuts)
Several of the changes were made concurrently so it's hard to tell if any single one of them was critical but my feeling is that increasing feed and DOC were the key, lowering the speed to reduce heat probably helped too - all this assumes correct cutting tool geometry and using coolant.
As can be seen, I removed the QCTP and used a lantern with an Armstrong tool holder. These provide lots of flexibility for adjusting angles (and deflection was not an issue). Also the working area was sort of confined with the distance from the face of the collet to the tailstock center being only four inches or so. The lantern was helpful to accommodate that envelope. Here's the setup again with a better view of the taper attachment:
Here’s a comparison between the first parts and finish tapers. The parts need to be de-burred, the ends radiused and four more milling operations are required. I’m not looking forward to the milling operations but happily, none of the finished surfaces will be visible.
Sorry about the poor quality of some of the photos. Some pix were taken with the camera hand-held and my hands are VERY shaky. Here's a larger photo of the legs:
Because so many of you own machinery that I would love to have but can’t justify, I feel the need to speak up on behalf of my ratty-looking 1945 Sheldon lathe. When I bought it ($1000 plus free delivery from Grant’s Pass, Oregon to Eureka, California) I resolved that the old machine would bear it’s battle scars proudly, LOL.
It’s highly tempting to tear an old machine apart and restore it as much as possible to a like-new appearance. I’ve fought that temptation since obtaining the lathe. The trade-offs are:
- Beautiful, factory-finish machine
- Possibility of ending up with worse performance after reassembly
http://www.jamesriser.com/Project/Sheldon.html


