Posts: 2,620
Threads: 100
Joined: Dec 2014
Location: Michigan
Welcome to the forum, Don!!!
Posts: 10
Threads: 2
Joined: Apr 2020
Location: USA
Thanks Guys for the welcome and advise. I would agree with Tom that I am having some wobble or vibration in my set-up. I have fabricated an outboard leg for my fixture and purchased a new 4 flute carbide end mill. Haven't had the time to try it out yet, because it's below freezing here in the Pgh. area. Buy the way, Tom. Using a pc. of brass stock clamped in my vise, I was able to produce a hole about .3135 dia. following the same sequence of cuts with the same tools. Primer is .317/.318 O.D so this would result in proper press fit, I believe. Obviously, my vise offers more support than my fixture.
Let me take a pix of the fixture and post it (if I can figure posting out?) No one ever accused me of being smart so hopefully that won't be a problem. heh, heh. With regards to other comments. My boring head ends up being to long with fixture holding approx. 6" long brass case upside down. Run out of "Z" axis travel. Reamer is great idea except primer is sort of like a miniature upside down measuring cup so it requires a sq. corner in the bottom of the .233 deep hole. All reamers I've ever seem have a substantial chamfer on the leading end of the flutes. Primer must set solidly on bottom of pocket to cause ignition when firing pin strikes it.
Thanks again guys. Let me get a pix of this fixture contraption so everyone can have a good laugh to brighten your day. Later.
Don
Posts: 10
Threads: 2
Joined: Apr 2020
Location: USA
05-09-2020, 01:15 PM
(This post was last modified: 05-09-2020, 01:19 PM by Don.
Edit Reason: Correct name
)


All right Guys,
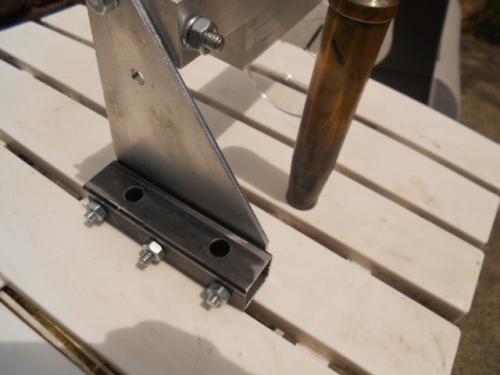
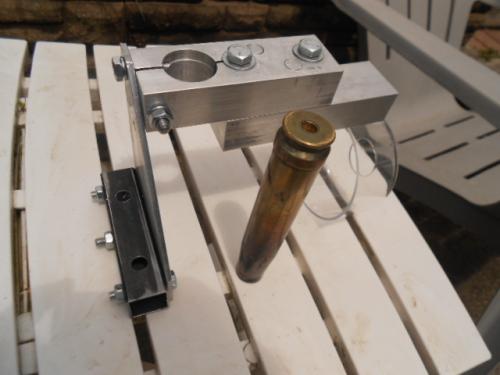
Hopefully I have the attachment(s) attached? What your seeing, I hope is the right hand 1" X 1 1/2" block of alum. clamps in my 3" vise. The triangle piece added to the left hand alum. pc. with the 1" sq. tube at the bottom is the "brace" I added to steady the case when it's dropped through the hole and clamped by the 1/4" stud with the nut positioned horizontally at the extreme left of the fixture. I also added (2) 3/8" pins in addition to the bolts that hold the blocks of alum. together. Necessary in order to achieve correct height of the fixture to clear the almost 6" long case. If this promotes any further ideas and your not giggling to hard at my PA redneck engineering, I'd appreciate any additional thoughts.
By the way, Ed. My Son (whose project this is) and I were suppose to go to Big Sandy, AZ for the machine gun shoot in Sept., but got rained out. He's been there at least twice before.
Thanks gentlemen,
Don
Posts: 8,860
Threads: 319
Joined: Feb 2012
Location: Arizona/Minnesota
(05-09-2020, 01:15 PM)Don Wrote: By the way, Ed. My Son (whose project this is) and I were suppose to go to Big Sandy, AZ for the machine gun shoot in Sept., but got rained out. He's been there at least twice before.
I'll have to check into that. It could be interesting.
Ed
Posts: 3,798
Threads: 184
Joined: Jun 2012
Location: Farmington Hills, Michigan
Don,
Your setup looks rigid enough. What are you using to hold the end mill, because if that isn't concentric, the hole the end mill produces will be oversize. Have you tried running an indicator on the end mill to see?
Tom


![[Image: TomsTechLogo-Profile.png]](http://tomstechniques.com/wp-content/uploads/2013/11/TomsTechLogo-Profile.png)
 to the forum Don.
