01-10-2018, 07:20 AM
I started this some months ago, it was put to one side due to other commitments but I stole some time today when I was supposed to be doing something else and instead brought this little project to the 'proof of concept' stage.
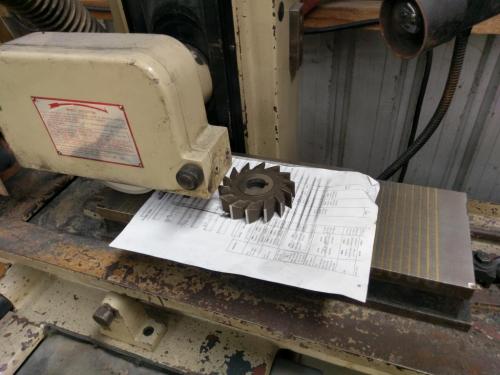
The general idea is to be able to sharpen horizontal milling cutters on the surface grinder. I set the jig up today to grind a 4" diameter x 1" wide 14-tooth cutter.
![Filename: IMAG1128[1].jpg
Size: 109.37 KB
01-10-2018, 06:31 AM](attachment.php?thumbnail=15444)
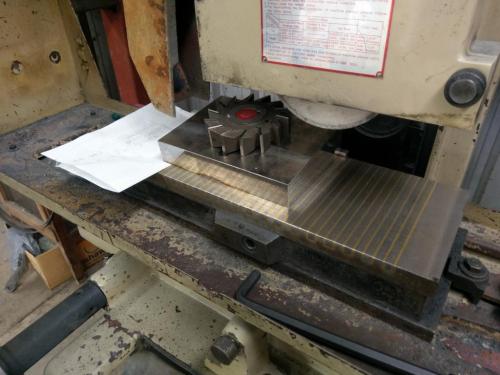
The aluminium plate is moved up or down to place the tooth at the appropriate angle, it is pivoted out to index to the next tooth and then locked back in position with the knobs. I forgot to take detail photos of the indexing business.
Primary and secondary angles are visible if you can see through the glare:
![Filename: IMAG1127[1].jpg
Size: 83.11 KB
01-10-2018, 06:35 AM](attachment.php?thumbnail=15445)
The corners of the teeth on one side were badly damaged; having sharpened the face teeth, I thicknessed the cutter flat on the mag chuck to get down below the damage- this took ages.

Having ground the cutter away to below where the tooth corners were damaged, it was time to grind the angles into the sides of the teeth.
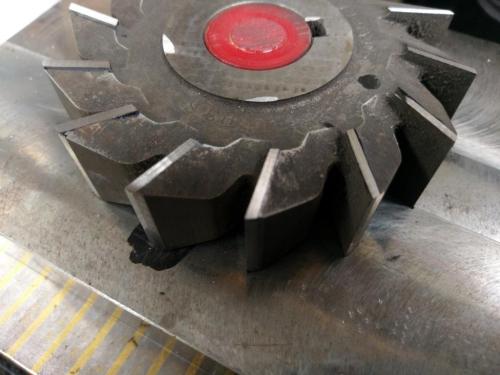
The sides of the teeth are ground on a different jig, simply a 7 degree wedge with a 1" spigot on which to rotate the cutter. The indexing business is yet to be added but I experimented with this cutter, indexing by eye to a scribed mark (I did say this was for proof of concept).
The 7-degree angle built into the jig gives the side clearance angle. As discussed on this forum a few months ago, the sides of the teeth also have a slight taper to prevent rubbing on the sides of the milled groove; the taper is only about a thou over the length of the tooth. I used a simple means to achieve this small taper.

The two thicknesses of copy paper under one end give the appropriate amount of tilt to get the taper angle. The paper is moved to the other end when the cutter is flipped over for the other sides, which are ground on the left side of the jig.
I was happy with the test results, miced the teeth and there is .002" taper from tip to root so the paper did it's job, the lands on the side that had the damaged corners ended up being very wide as due to the thicknessing, also obviously regrinding a cutter that has significant corner damage means the cutter is a lot narrower than it started out- this 1" cutter is now about 0.918" wide. It will be interesting to see how it cuts. I have the vertical attachment on the mill at present, will need to make sure there are no jobs for that before I remove it so I can do a test cut in horizontal mode as it is a pig to put on and off.
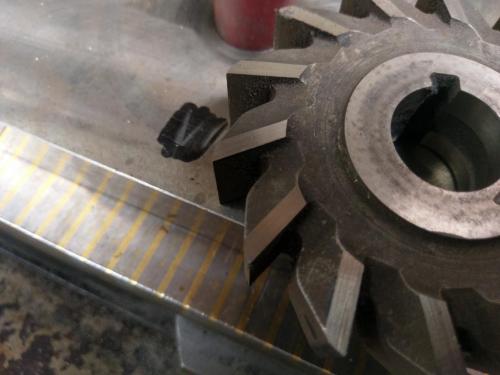
I also ground a few nicks in the hub as I sorted things out, as can be seen in the photos. First time for both myself and the jig so there was a bit to learn.


The general idea is to be able to sharpen horizontal milling cutters on the surface grinder. I set the jig up today to grind a 4" diameter x 1" wide 14-tooth cutter.
The aluminium plate is moved up or down to place the tooth at the appropriate angle, it is pivoted out to index to the next tooth and then locked back in position with the knobs. I forgot to take detail photos of the indexing business.
Primary and secondary angles are visible if you can see through the glare:
The corners of the teeth on one side were badly damaged; having sharpened the face teeth, I thicknessed the cutter flat on the mag chuck to get down below the damage- this took ages.
Having ground the cutter away to below where the tooth corners were damaged, it was time to grind the angles into the sides of the teeth.
The sides of the teeth are ground on a different jig, simply a 7 degree wedge with a 1" spigot on which to rotate the cutter. The indexing business is yet to be added but I experimented with this cutter, indexing by eye to a scribed mark (I did say this was for proof of concept).
The 7-degree angle built into the jig gives the side clearance angle. As discussed on this forum a few months ago, the sides of the teeth also have a slight taper to prevent rubbing on the sides of the milled groove; the taper is only about a thou over the length of the tooth. I used a simple means to achieve this small taper.
The two thicknesses of copy paper under one end give the appropriate amount of tilt to get the taper angle. The paper is moved to the other end when the cutter is flipped over for the other sides, which are ground on the left side of the jig.
I was happy with the test results, miced the teeth and there is .002" taper from tip to root so the paper did it's job, the lands on the side that had the damaged corners ended up being very wide as due to the thicknessing, also obviously regrinding a cutter that has significant corner damage means the cutter is a lot narrower than it started out- this 1" cutter is now about 0.918" wide. It will be interesting to see how it cuts. I have the vertical attachment on the mill at present, will need to make sure there are no jobs for that before I remove it so I can do a test cut in horizontal mode as it is a pig to put on and off.
I also ground a few nicks in the hub as I sorted things out, as can be seen in the photos. First time for both myself and the jig so there was a bit to learn.
Lathe (n); a machine tool used in the production of milling machine components.
Milling Machine (n); a machine tool used in the production of lathe components.
Milling Machine (n); a machine tool used in the production of lathe components.


![[Image: TomsTechLogo-Profile.png]](http://tomstechniques.com/wp-content/uploads/2013/11/TomsTechLogo-Profile.png)

 That was the motivation to come up with a sharpening jig. I have several dozen purchased as a job lot from a clearing sale and they almost all need sharpening.