Posts: 432
Threads: 27
Joined: Feb 2016
Location: Woodstock:GA
The following 1 user Likes pepi's post:
dixiethedog (12-04-2017)
12-04-2017, 07:30 AM
(This post was last modified: 12-04-2017, 07:57 AM by pepi.)
(12-03-2017, 09:10 PM)Highpower Wrote: (12-03-2017, 05:50 PM)TomG Wrote: I bought a couple to try out, but they weren't as bright a the T8's I just put in. What kind did you guys use?
Tom
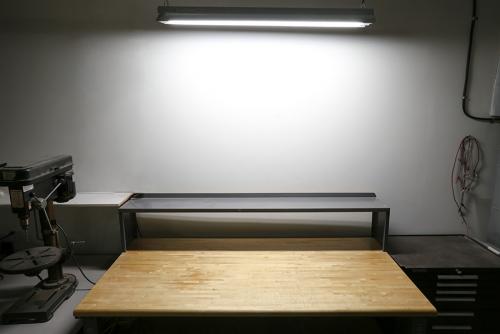
I got mine from the LED specialty place that is close to me. They occasionally run sales and I got a 25 pack of bulbs plus 15% off. We have two old T-12 (4 bulb) fixtures in our kitchen that I have already converted. I bought the 5000 K bulbs. It was TOO bright! I ended up leaving only 2 bulbs in each fixture and they are still brighter than the previous 8 T-12 florescent bulbs.
https://www.superbrightleds.com/moreinfo...mens/3685/
Seeing that I went back and bought some smaller enclosed fixtures also to add to the dark storage corners of my basement. I still need to replace the bulbs in my shop area fixtures though. I guess I should get that done before the 5 year warranty runs out... 
I also put up T8's, upgraded the tubes, have good bright coverage. As I know you must know the temp makes a differences in the brilliance.
Using
800 series tubes
F32T8/TL850
32w
Not on board with the led thing myself yet
@ highpower, I did save the bookmark thanks, might buy one and do a side by side. Looking at the pictures on the site I'm not seeing a difference than what I have at the moment.

Putting aside the dark colors that are absorbing the light. The reflective whites, the T8 look like its right there

Just saying
Magazines have issues, everything else has problems
Posts: 3,798
Threads: 184
Joined: Jun 2012
Location: Farmington Hills, Michigan
There is a 0 to 100 rating called the Color Rendering Index (CRI) that determines how bright a light looks to the human eye. The old T12 bulbs had a CRI in the range of 60, while the newer T8 bulbs have a CRI in the 90's. It is interesting that the CRI is unrelated to the temperature of the light source in degrees kelvin. Halogen bulbs for instance have a color temperature of 3200k, compared to 5000-6000k of sunlight, but they look so bright because they have a CRI of 90 (sunlight is 100 CRI). So if you want the most bang for your buck with any light source, look for a CRI rating of 93 or higher.
Tom
Posts: 5
Threads: 1
Joined: Dec 2017
Location: United Kingdom
(10-29-2017, 07:02 AM)Mayhem Wrote: The neighbour's son races bikes and asked me if I could make up something to adapt a quad piston Brembo caliper to a new rim and disc that he wants to run. I took the centre to centre bolt hole measurements and a picture of the forks, which I imported into Fusion 360. A bit of playing and I came up with this:
I'm a bit disappointed with the radius on the right hand end. My rotary table has 12mm T-slots but the base is too narrow, so the ones for my mill won't fit. I used some bolts and cobbled something together that I thought would work, only to have it slip and put a flat spot on there. Tried to blend it with a file but didn't want to take off too much. It is now happily deburring in the tumbler.
Other than that I'm happy. I've told the owner that I strongly advise they take it to an engineer to have it inspected before heading down the back straight, as I don't want to be responsible for him becoming a greasy spot on the armco barrier 
Before I signed up to join this is one post that really caught my attention.
It's exactly what Im wanting to make for a couple of my own bike's.
Would you have any hint's and tip's Mayhem please before I start on some block's of alloy? Having looked at some of the commercially available CNC'd adapter bracket's Id say your's look a lot chunkier and stronger than some Ive seen!
Do you know what grade of alloy you used. It's easier to type alloy rather than aluminum or the correct British way of aluminium. 
Incidentally Im wanting to buy and fit 2007/2008 Yamaha R1 6 pot radial's to fit to my Yam FJR1300 and some other radial caliper's to my Suzuki Bandit (turbo). As a bit of a sideline note to this, did you know it's cheaper for me to buy s/h brakes from the US auction site than what it is from the UK one. What a crazy old World!
Posts: 4,683
Threads: 93
Joined: Feb 2012
Location: Perth, Australia
Hi Brett,
I used a chunk of 6160 aluminium for the bracket. I actually printed up a round piece to match the diameter of the radius on the caliper, with an eccentric pin that was a press fit into the hollow rivets that fixed the disc to the hub. That allowed me to position the caliper correctly on the disc, so that I could take a picture. I then imported the picture into Fusion 360 (free 3D CAD) and resized the picture, so that the bolt hole centres on the fork mount were correctly spaced. From there it was a case of filling in the gaps.
I am lucky, as I recently purchased a 3D printer and was able to print several iterations until I got the one that fitted correctly and didn't have the caliper hitting the spokes. If I didn't have the printer I would have wasted a hell of a lot of aluminium.
Having said that, I could have made sections out of flat bar that lined up with the bolt holes and welded something up to base my measurements on but the printer was perfect and cheap to knock out the test pieces.
As for the cost of parts, I have no idea. I've just noticed that my location has vanished from my profile. I'm sure that I haven't been deported, so I'll have to go and sort that out...
Hunting American dentists since 2015.
Posts: 5
Threads: 1
Joined: Dec 2017
Location: United Kingdom
Thank you Mayhem for the reply.
I had not thought about 3D printing. A friend of mine who has been helping me get into CAD drawing own's a computer shop complete with a nice 3D printer. As part of my design process I could ask nicely if some printing could be done?
I had been tempted to try to make a template/ bolt spacing dimension piece from angle iron and work from there?
Ive been looking on line for idea's and saving picture's to help inspire me.
![[Image: imageproxy.jpg]](https://s20.postimg.org/916wbogul/imageproxy.jpg)
I enjoy seeing and hearing how other folk work out the design's as there's often more than one way to achieve a result.
Another option (the easy one) I have is to borrow the ready made CNC'd adapter bracket's my frind has fitted on his Suzuki TL1000. Once I have the basic measurement's I can drill and tap to suit the caliper's I'd like to use.
Thank you again for your input I really appreciate it.
Brett
Posts: 3,003
Threads: 51
Joined: Apr 2012
Location: Ontario
Started cleaning up the shaper vice. The bottom of the base was a little rusty, was going to try electrolysis but opted for scraping it and buffing with a scotch bright type disk. Cleaned up nice. Used blueing on a 9x12 surface plate to check for flatness, shows good contact around the bolt holes where it matters so thats good. Checked the surface where the vice goes for parallel, its within 1/2 a thou so its looking good.
![[Image: tVAf_CfmGQl3m8rO-cESjHNK3g4alm2Yu0sc15zz...45-h634-no]](https://lh3.googleusercontent.com/tVAf_CfmGQl3m8rO-cESjHNK3g4alm2Yu0sc15zzzrUEgoIN6chN18IcOj8qpb1dNZhxNIfdRFqyuM6GS6CU77QfQJdEZ_1ShHJsmvBZCAw0m1iEgfswswAydYiDliixOUf86HwUGOV1r7l2BPRWLozHuoPe9CEzJN4XC2N5sj3_UyXiEwbJB45SyuYqj9xqhnkf6QH63bodzCxsKon-yYXW8MVe6su0VEIjpYyqJAE5TJN-S0zHFkzPO8xmQxpo7eQQWS1zbVdhhx_3RTTrtP0NUPZh99EoipuUdS9V2fuQIc4FDaA1L-EdrpDRAxNlLHbPzXqaPm1XPhSVnSO0KVnxLdzDaEYPLdFe0TR1ewXWv-svEk1QjJd7FawP4ydmAJdlpAKDav8qbUvBcPMKIPzedevFtUppQZG20xWcZssE097UMo_TOUHZFYxrViqcOBlgq698frYXT103KAse1l_EzW_82a-s_pT43MvvJx8-ST-6mrNs5ILSD68ZJR2DBnYnEVFv9eJui4nRpUxCsejRH3yTJrrtCsosgOYr3vIG2hpFu2E7b9XYT0lG2FQZHdQ2JygQ2k7ENTUACvvNRJoPr8872aDz6lwqQTwS3g=w845-h634-no)
Once assembled and bolted to the table I can check the ways for parallel by moving the table sideways and the ram in and out. I can raise the table up and down to check if the vice jaw is square to the table, BUT how do I know the ways are square. Think I now need to make a cylindrical square to check that. With the square I could also be sure the slide the clapper is on is set square to the table then use it to check the jaw.
The more I do the more work I create.
Free advice is worth exactly what you payed for it.
Greg
Posts: 2,328
Threads: 271
Joined: Jun 2014
Location: La Libertad, Philippines
The following 3 users Like Dr Stan's post:
dixiethedog (12-06-2017), Mike E. (12-06-2017), EdK (12-06-2017)
12-05-2017, 10:18 PM
(This post was last modified: 12-05-2017, 10:34 PM by Dr Stan.)
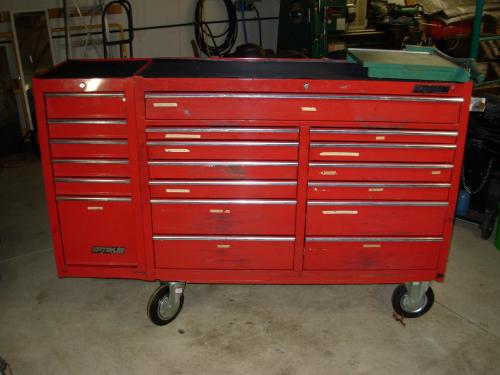
Combo project & delivery. Bought a 52" Waterloo base cabinet and a side cabinet for $250 originally priced at $325 for the two. It was missing its casters and has numerous scrapes, but no major dents, bends, etc. So after removing all the drawers and an inside & outside cleaning, installing new 8" casters (2 fixed and 2 swivel with brakes), lining the drawers and the tops with vinyl runner material, and making a new handle out of 1" pipe its ready to use.
Also lubed all the slides with white grease.


I was planning on getting a Horror Freight 44" unit, but this was a much better deal saving quite a bit of cash. It was also the first time I mounted an end cabinet. A real PITA by yourself even after I figured out its suppose to slide in from the rear.
For now it's empty and I may keep it that way and use it to hold '66 Plymouth Satellite parts.
Posts: 432
Threads: 27
Joined: Feb 2016
Location: Woodstock:GA
All ya need now is something to fill it with..
Magazines have issues, everything else has problems
Posts: 3,798
Threads: 184
Joined: Jun 2012
Location: Farmington Hills, Michigan
The following 1 user Likes TomG's post:
Dr Stan (12-06-2017)
Waterloo makes nice stuff, definitely better than Horror Freight. And you got it for a good price as well. 
Tom
Posts: 4,461
Threads: 184
Joined: Feb 2012
Location: Missouri, USA
(12-03-2017, 05:50 PM)TomG Wrote: I bought a couple to try out, but they weren't as bright a the T8's I just put in. What kind did you guys use?
Tom
15% off sale right now. Just saying...
https://www.superbrightleds.com/?utm_sou...0c70263219
Willie
|


![[Image: TomsTechLogo-Profile.png]](http://tomstechniques.com/wp-content/uploads/2013/11/TomsTechLogo-Profile.png)

![[Image: imageproxy.jpg]](https://s20.postimg.org/916wbogul/imageproxy.jpg)
