Fixing a Leaky RF-45 Mill Head - Grizzly G0519
#41
(05-09-2012, 06:40 PM)henryarnold Wrote: Does anyone else have any comments on my use of industrial oil base paint on the interior. If I made a mistake, it's not too late to fix it. You giys got me worried so I'm going to test it after it dries by filling one of the cavities with oil for a couple of days and make sure the finish doesn't soften.

Thanks for the warning.

Henry,

I suspect you'll be OK if you used an oil based paint made for machinery. The exterior of machinery gets all types of oil on it and it doesn't ruin the paint job.

Ed
Reply
Thanks given by:
#42
(05-09-2012, 06:35 PM)henryarnold Wrote:
(05-07-2012, 12:00 PM)EdAK Wrote: Henry,

Very nice documentary. Much better than mine. Smile

Maybe you should say something about how much you packed the bearings with grease for those that don't know you should not fully pack a tapered roller bearing with grease in certain situations.

Ed

Ed, I actually wasn't aware of this so I may have over-packed mine. I put on a pair of latex gloves and worked the grease into the bearings. I've done a similar packing of auto wheel bearings. How can I tell if I over packed them?

Henry Arnold

Hi Henry,
Like Ed said in certain situations, in this particular situation you can't over fill the taper bearings with grease.
It is only where the bearing has seals the overfilling applies and the grease and heat cannot escape. The extra friction caused by the grease being dragged around causes heat, this heat can cause the grease to degrade or even cause the oil part to run out. Thus the bearing has no proper lubrication once this happens.
Smiley-eatdrink004
DaveH
Reply
Thanks given by:
#43
Hi Henry and Ed Thumbsup

Thank you for the wonderful description that you make to solve the mill head leaks. The most milling machines type 45 have the same problem. This description will be very usefull and good manual for many users of a 45 mill to solve the leak problem.

In one of the articles I read that "the seals around the shaft that drives the spindle were installed upside down with the lip pointing away from the oil filled head." Because this error is probably not at all the machines I would like to ask whether it is possible to make a picture to show how the seals must be placed correctly.

Heve a nice day
Gerard
Reply
Thanks given by:
#44
Hi Gerard,

Ed placed a link in his post http://www.metalworkingfun.com/showthrea...94#pid3194

which may help.

Smiley-eatdrink004
Dave
Reply
Thanks given by:
#45
Gerard,

And this post also shows how to orient the seals.

http://www.metalworkingfun.com/showthrea...17#pid3217

Ed
Reply
Thanks given by:
#46
Hi

Thanks very much for the help.

Gerard
Reply
Thanks given by:
#47
(05-09-2012, 06:44 PM)EdAK Wrote:
(05-09-2012, 06:40 PM)henryarnold Wrote: Does anyone else have any comments on my use of industrial oil base paint on the interior. If I made a mistake, it's not too late to fix it. You guys got me worried so I'm going to test it after it dries by filling one of the cavities with oil for a couple of days and make sure the finish doesn't soften.

Thanks for the warning.

Henry,

I suspect you'll be OK if you used an oil based paint made for machinery. The exterior of machinery gets all types of oil on it and it doesn't ruin the paint job.

Ed

I ran a test on the interior finish. I filled a cavity in the lid with the oil and let it sit for 24 hours. There was no change in the paint. It did not soften or change in any way. I think I'm good to go.

Henry
henryarnold, proud to be a member of MetalworkingFun Forum since Apr 2012.
Reply
Thanks given by:
#48
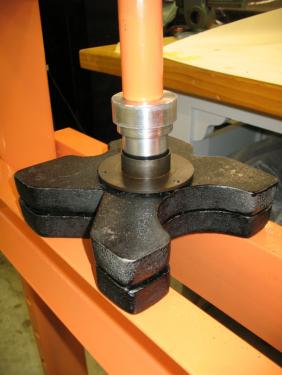
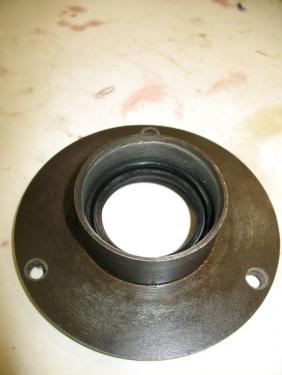
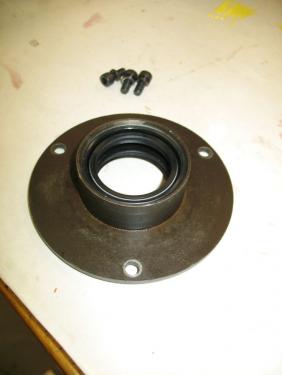
This post shows installation of the spindle drive shaft seals. The seals are pressed into a round plate that is mounted inside the head.

The first photo shows the a seal laying on top of the plate it will be installed in. There are 2 identical seals. They are both installed with the lips facing up and the solid side facing down. The first seal is pressed all the way down inside the plate using a tool I made to avoid damaging the seal.
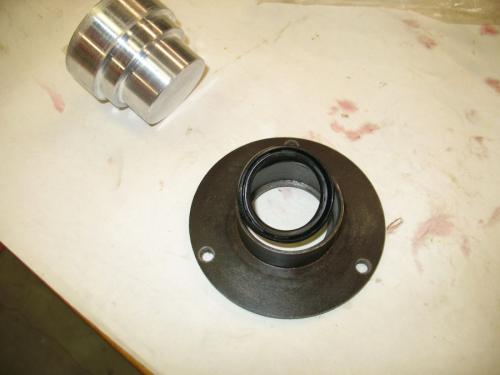
   
I used the shop press to install the seal. I could have installed it using a rubber mallet and the special tool.
   
This is the first seal installed.
   
This is the second seal installed. The second seal sits about 1/8" bellow the top of the plate. There is a about a 1/4" gap between the 2 seals. I'll show the installation of the seal plate later.
   
henryarnold, proud to be a member of MetalworkingFun Forum since Apr 2012.
Reply
Thanks given by:
#49
My mill head was only partially painted. Under the head where the drain plug is and behind the front panel were not painted. I primed these areas and painted them with Rustoleum Hammered Green. This color is a surprisingly good match for Grizzly Green. It even matches the textured look.


henryarnold, proud to be a member of MetalworkingFun Forum since Apr 2012.
Reply
Thanks given by:
#50
The brown sludge that was inside my gearbox left deposits on my gear shafts. I clean them up with engine cleaner and a stainless steel brush.
   
   
This is the sight glass which Ed found after market. It is much nicer than the original plastic sight glass. It is made from glass and aluminum and has a rubber gasket. To make sure I don't have any leaks I also used white Teflon plumber's tape on the threads.
   
   
henryarnold, proud to be a member of MetalworkingFun Forum since Apr 2012.
Reply
Thanks given by:


Users browsing this thread: 1 Guest(s)