Posts: 215
Threads: 22
Joined: Jul 2017
Location: Eureka, CA, USA
The following 2 users Like randyc's post:
f350ca (11-27-2017), EdK (11-27-2017)
11-26-2017, 11:25 PM
(This post was last modified: 11-26-2017, 11:58 PM by randyc.)
I've not been in the shop for several weeks, it's been rainy/cold and my shop is unheated. There has been little progress on my diamond grinder although some needed Delrin material has arrived.
As I have written previously, I’d like for this thing to be sorta’ designed rather than just cobbled away from any material that comes to hand, as is my usual practice. I cannot say that I’ve succeeded at that, ha-ha-ha, but I’ve made an attempt.
This (created in my warm living room) is a layout of the grinder, minus the tool holder.
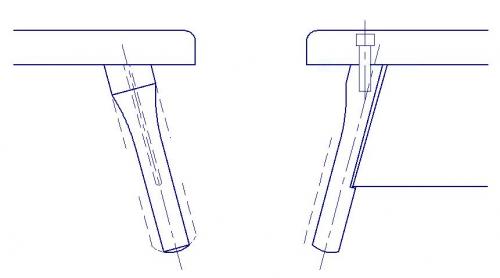
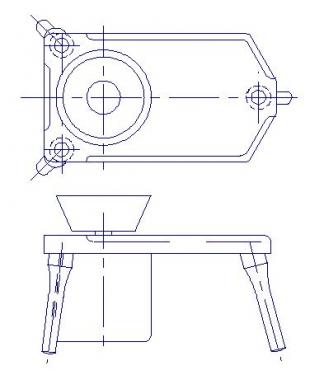 I fiddled around with various contours for the three legs that support the baseplate of the grinder. The idea of three stubby uncontoured legs seemed unattractive, no reason not to make them look nice, right ?
This sketch also depicts the mounting of legs to grinder table and part of the sheet metal panel that will include a socket for the power cord, enabling switch and a (mostly unnecessary) circuit breaker.
 Although preliminary, here’s a working sketch for the base of the tool holder:
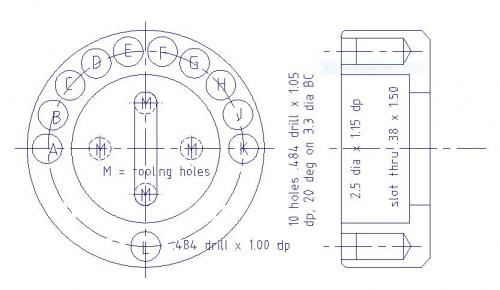 I don’t know when I’ll attempt to convert the sketches into parts, it’s likely to be damp and chilly out there for a while !
Considering that, it is annual practice, prior to the rainy season, to protect exposed surfaces of wood-working and sheet metal machinery and any hand tools that are not already protected *. Not much care is required for the metal-working machines due to the near-constant application of cutting oil and lubricants.
(*I use a weird mixture of turpentine, beeswax and furniture oil. I read about this in a “Fine Woodworking” issue about two decades ago. I compounded the mixture from curiosity, but it seems to work well. I believe that the author especially recommended using it on plane knives. I stick my chisels, woodworking drill bits, plane knives - anything sharp - into the stuff before the rainy season.)
Meanwhile on another topic – well actually the one that started this post – I made a slight modification to the sliding tool sharpener that I use for grinding lathe tools I was embarrassed about revealing my crude means of adjusting the height of the slide (using the bulldog clamp).
I drilled/tapped a couple of #6-32 holes in the corners of the slide. This enables angular adjustments for various cutting tool angles. Both of the screws/nuts in the photo are not required for the actual grinding process. Only one adjustment screw is actually used, opposite the side where grinding takes place. (If both screws were installed, the workpiece might be blocked from and unable to reach the grinding wheel.)
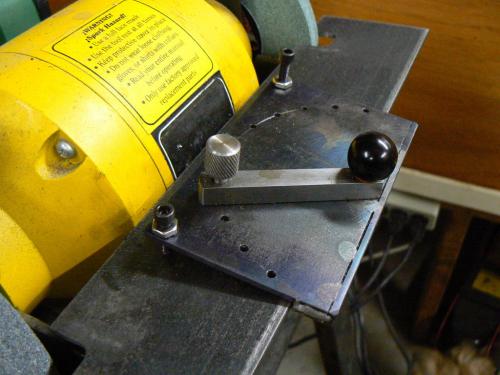 One of these days I’ll make a knurled thumbscrew and nut :o) But NOT #7-32 !!!
Posts: 215
Threads: 22
Joined: Jul 2017
Location: Eureka, CA, USA
The following 1 user Likes randyc's post:
f350ca (11-29-2017)
Weather lightened up a bit, the rainy season is here which usually suggests a temperature rise. So after a day of respite, I did get back to the project yesterday but ended the session without much joy. My intent was to rough out the three legs for the diamond grinder. I don’t remember why I chose it but I ordered several pieces of “Delrin” some for the legs and a large piece for the base of the work holder.
I’ve machined various “plastics” (or non-metallic materials) mostly PTFE (teflon) and “Rexolite”, materials often used in high-frequency applications (my professional specialization). For various other applications, “Bakelite”, FR-4, nylon, polypropylene and other materials have been machined. No real problems providing that the tool configuration is correct, and in the case of fiber-glass bearing materials like FR-4, correct tool composition.
Yesterday I had my butt whupped, rough-turning the three legs. Nothing special about the operations, start with 1-1/16 diameter kind of crummy looking stock, turn to 1 inch diameter, then part off 5 inch lengths.
Taper 3 inches of the rods 4 degrees, down to 1/2 diameter at the end of the rod. This was the setup:
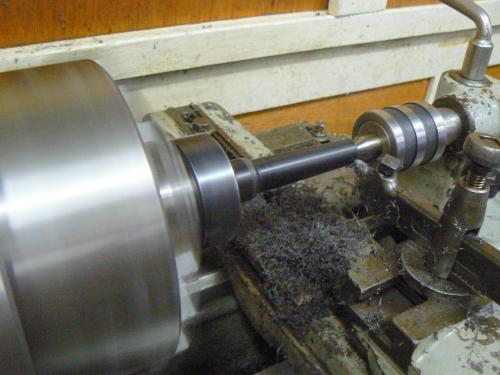 This all sounded simple to me - I presumed that Delrin would cut like most other non-metallic materials, right ? Nope. Imagine turning a piece of 1018 CRS with a tool that hasn't been sharpened in 20 hours of use. Well, heck, a little draw filing, some carbide paper, steel wool and Bob's yer uncle, right ?
Not with Delrin. Draw filing makes a slight improvement in finish but not in appearance. Sand paper, steel wool, scotch brite ? Fahgeddaboutit, makes things worse ! To make things worse, the material that is being cut “piles up” in front of the cutting tool rather than falling away from the cutting edge. This is presumably from melting part of the chip due to cutter-generated heat.
This obscures the cut and also affects the dimension/finish of the turned surface. When cutting to a shoulder or other feature requiring precision, the mass of material in front of the tool makes the exact location questionable !
Last night I found a PM post on this topic and the majority consensus was that Delrin is not a good material to work and the finish obtained by initial turning cannot be improved, it is what it is. One guy claimed flaming the part would improve finish, another guy said flaming sucked, most recommended to do the best you can with the final finish turning operation and that's it. This is the thread:
Shining up delrin
Fortunately, after making the first tapering cut, I realized that I was in over my head with this material so I left about .150 on all three parts for finishing. My thought was that I’d put them aside until I thought – or was advised – of a better method to obtain a nice looking appearance.
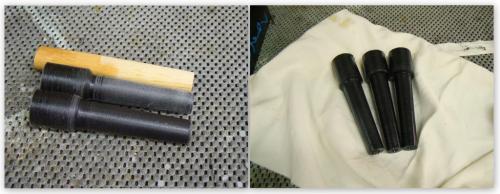
Tolerances on these parts are sloppy but I want them to have a somewhat professional appearance. BTW, I tried a “shear tool” also without success. Here is a photo of two of the parts showing the crude finish. The birch dowel that I used to check the taper angle actually has a better finish.
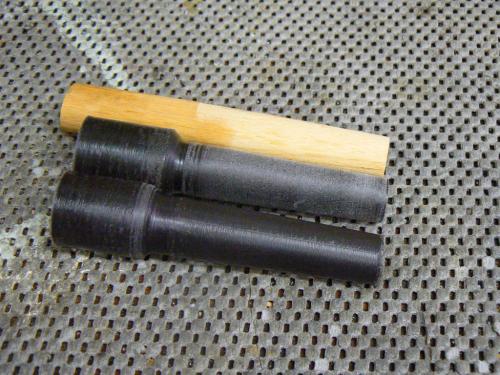 I thought that my cutting tool was correct for the material; as mentioned, I’ve often turned and milled non-metallic material. What had worked well previously was a cutting geometry similar to a round wood-worker’s lathe turning tool. But this wasn’t particularly successful.
I started a new thread on PM, also last night, although had I done so here, I’m sure that I would have received good advice. I just didn’t think of it. Speaking of not thinking, maybe if I’d been a little more analytical about the problem, I could have come up with a solution on my own but hindsight …. etcetera. Here’s what I think now:
The property (I think) of Delrin that gave me the most trouble is the toughness of the chip – I couldn't devise a chip breaker. In rod form, it's not real flexible but those long, stringy chips are not only tough but incredibly elastic ! I stretched several of the strings to twice their length before they broke !!! Other than rubber, I can't recall other material with this property - maybe nylon, polypropylene ? But I've turned those without drama, so ....
Cutting tools are chisels in one form or another and intuition suggests that a chisel, even with a very keen edge, is going to have a hard time with this stuff. Obviously the cutting process cannot easily shear, it tries to "push" the material off and it is reasonable to expect the material to tear plus generate heat. Recall that when turning metal, most of the heat generated is carried away by the chips. That cannot happen with plastics with low thermal conductivity !
At least that's the way I see it. I got a lot of suggestions on my PM thread. This morning, these are the ones that I followed:
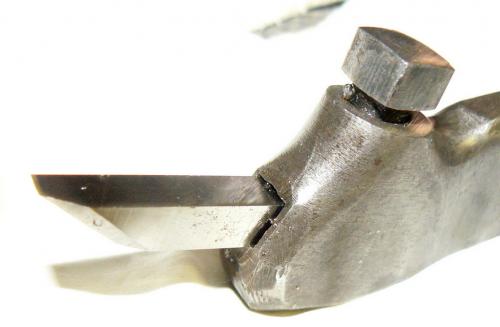
* Reground the front of the HSS tool flat and parallel to the (tapered) work, but with a chamfered leading edge, about 40-45 degrees and about .100 long. Lots of rake and relief, lots of honing. The front relief has to be greatly exaggerated because the Armstrong holder is tilted up to the work at about thirty degrees. The photo is magnified about ten times, BTW.
* Flooded the part with cutting oil to keep it cool (I usually turn plastics dry)
* Lowered speed from around 350-450 SFPM to 200-300 SFPM to keep it cool (part is tapered so SFPM varies)
* Increased my feed almost 8 times - from .0016 IPR to .012 IPR
* Roughing cut increased to .100, finish DOC about .030 (no sneaking up with light cuts)
Several of the changes were made concurrently so it's hard to tell if any single one of them was critical but my feeling is that increasing feed and DOC were the key, lowering the speed to reduce heat probably helped too - all this assumes correct cutting tool geometry and using coolant.
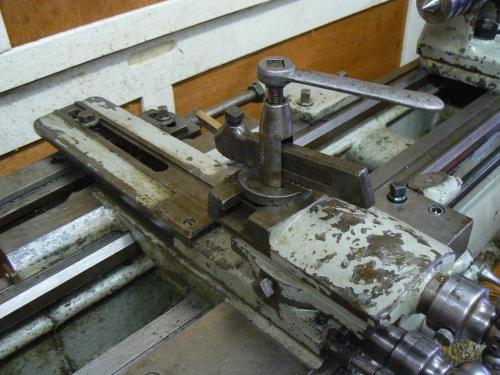
As can be seen, I removed the QCTP and used a lantern with an Armstrong tool holder. These provide lots of flexibility for adjusting angles (and deflection was not an issue). Also the working area was sort of confined with the distance from the face of the collet to the tailstock center being only four inches or so. The lantern was helpful to accommodate that envelope. Here's the setup again with a better view of the taper attachment:
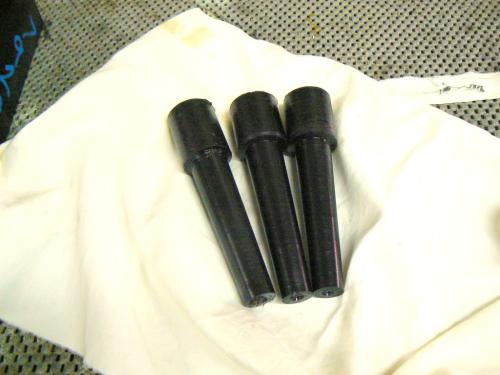
 Here’s a comparison between the first parts and finish tapers. The parts need to be de-burred, the ends radiused and four more milling operations are required. I’m not looking forward to the milling operations but happily, none of the finished surfaces will be visible.
 Sorry about the poor quality of some of the photos. Some pix were taken with the camera hand-held and my hands are VERY shaky. Here's a larger photo of the legs:
 Because so many of you own machinery that I would love to have but can’t justify, I feel the need to speak up on behalf of my ratty-looking 1945 Sheldon lathe. When I bought it ($1000 plus free delivery from Grant’s Pass, Oregon to Eureka, California) I resolved that the old machine would bear it’s battle scars proudly, LOL.
It’s highly tempting to tear an old machine apart and restore it as much as possible to a like-new appearance. I’ve fought that temptation since obtaining the lathe. The trade-offs are:
- Beautiful, factory-finish machine
- Possibility of ending up with worse performance after reassembly
But when I see this refurbished Sheldon, I do get very itchy, ha-ha-ha.
http://www.jamesriser.com/Project/Sheldon.html
Posts: 215
Threads: 22
Joined: Jul 2017
Location: Eureka, CA, USA
11-29-2017, 09:22 PM
(This post was last modified: 11-29-2017, 09:30 PM by randyc.)
P.S. A suggestion was made that the material was NOT "Delrin" (which many assert to be good for producing a mirror finish). That thought is beginning to resonate with me ..... I bought the stuff from eBay so no certs.
OTOH a Google for "problems with getting a good finish on Delrin" or something similar will pop up a lot of responses.
This should have been easy 
Posts: 794
Threads: 52
Joined: Mar 2012
Location: Rochester, NY
The following 2 users Like rleete's post:
randyc (11-30-2017), Highpower (11-30-2017)
I make a lot of stuff from delrin. It's just one of those things where the finish isn't going to be as nice as you'd like, no matter what.
But to get it close, your cutting tools have to be razor sharp. And by that I mean actually shave your hair with it sharp.
You can get it better by sanding VERY lightly with fine (800 grit and up) emery paper.
Full of ideas, but slow to produce parts
Posts: 215
Threads: 22
Joined: Jul 2017
Location: Eureka, CA, USA
I apologize for the wide divergence from the original topic. I became so frustrated with the above turning process that I just couldn't continue without chasing down this nasty problem. This is what I've learned today, starting with personal observations.
The characteristics of the material:
- Purchased on eBay from two different sellers
- Bought 1-1/16 dia x 2 ft rod and 8 x 8 x 2 inch plate, both are black
- Rod is a dull finish, the slab is a mirror finish on both sides (saw cut on edges).
- 8 inch square plate has "72399" hand-written on one edge in blue letters
- 1-1/16 rod has no marking but at one end the remains of a torn away white label
- The rod is not truly round or straight, it has some “knobby” areas along the length
- As noted, turning produces long, tough very elastic strings
- Curly strings of the material burn readily with black, sooty smoke and mild melted plastic smell
This is what I’ve learned from various sources, some anecdotal:
- Nylon comes in both white and black
- Nylon has the turning characteristics described: rough surface finish when turning, stringy, elastic chips
- Delrin does not produce tough, elastic chips that will stretch nearly twice their length before breaking
- Delrin burns but with an odor that will knock you off your feet
- Delrin is always marked (in whatever code) with BLUE letters
From the above, my material would not seem to be Delrin - maybe Nylon. The icing on the cake would be to know for sure that the material is Nylon (so that I can avoid it in future). I have a piece left if anyone can suggest a means to evaluate it –
I hope that this has been put bed, I thought that I was working in The Twilight Zone ! Trying every conventional trick learned over a l-o-n-g time produced no improvement (some trials were worse than when I started). I eventually obtained acceptable results but with methods and configurations that should not have been required ! I’ve probably turned a quarter mile of Teflon rod over the years and it was a piece of cake compared to this nasty stuff, LOL.
Rleete: since you have a lot of experience with Delrin, and if you're reading this, can you please do a sanity check on the above and let me know your opinion ? Thanks -
Posts: 4,493
Threads: 187
Joined: Feb 2012
Location: Missouri, USA
The following 1 user Likes Highpower's post:
randyc (11-30-2017)
(11-30-2017, 06:37 PM)randyc Wrote: From the above, my material would not seem to be Delrin - maybe Nylon. The icing on the cake would be to know for sure that the material is Nylon (so that I can avoid it in future). I have a piece left if anyone can suggest a means to evaluate it –
Try this: How to Identify Plastics
Willie
Posts: 215
Threads: 22
Joined: Jul 2017
Location: Eureka, CA, USA
11-30-2017, 10:02 PM
(This post was last modified: 11-30-2017, 10:07 PM by randyc.)
(11-30-2017, 09:55 PM)Highpower Wrote: (11-30-2017, 06:37 PM)randyc Wrote: From the above, my material would not seem to be Delrin - maybe Nylon. The icing on the cake would be to know for sure that the material is Nylon (so that I can avoid it in future). I have a piece left if anyone can suggest a means to evaluate it –
Try this: How to Identify Plastics
You DA' MAN, Highpower !
That is an excellent summary and I've bookmarked it, thank you, buddy. The "black soot in the air" point mentioned is a dead certainty that I was NOT working with Delrin !!!
I also found the following and it was all troublingly familiar, LOL, describing the problems I'd experienced and some of the steps I took (at the suggestions of others) to get 'er done.
http://www.practicalmachinist.com/vb/cnc...lp-155035/
Posts: 4,493
Threads: 187
Joined: Feb 2012
Location: Missouri, USA
Lucky for me I haven't had to deal with Nylon much. Delrin is my plastic of choice. If using HSS, I agree it needs to be dead sharp. My normal "go-to" tool for finishing Delrin is a small 80° diamond carbide insert tool. Get the speed and feed right and it comes out glossy and smooth as glass. Get out of the sweet spot and it turns into a corn cob. 
I know if I push the speed too far the cut turns "muddy" after awhile when it starts to melt.
I don't know if you have ever watched any of "AvE"s videos on YouTube, but he has a knack for identifying types of plastic with a soldering iron based on the temperature that it melts at, and can identify reinforcement materials added (glass filled etc.) by the feel of the tip of the iron scraping across the surface. Not very family friendly, but he is entertaining once you get to know his "style".
Willie
Posts: 215
Threads: 22
Joined: Jul 2017
Location: Eureka, CA, USA
11-30-2017, 10:53 PM
(This post was last modified: 11-30-2017, 10:55 PM by randyc.)
Not family-friendly ? Oh well, that immediately rules that process out, LOL.
Just kidding, of course. His soldering iron method is an interesting one and since my family consists of two little dogs, I get to determine what is "friendly" most of the time ! I'll check it out, for sure.
I gotta' thank you again for that reference. This problem was driving me nuts, I've never had so much trouble before. Getting a good finish on the nastiest piece of CRS - or running an 1/8 inch drill, dry, into 304 - is easy compared to this stuff. I actually woke up in the night thinking about it. (Yeah, I know, extreme OCD.)
The value of forums like this is incredible - the ability to draw on a century (or more) of experience !!!
Posts: 215
Threads: 22
Joined: Jul 2017
Location: Eureka, CA, USA
Oops, I meant ONE inch drill
|


