Heat treat furnace
#31
It looks like I'm not such a pioneer after all.   Rotfl   Rotfl   Rotfl

Today I found a reference to an archived post on another forum from about 8 years ago, where someone else has already done this conversion on the same furnace. The only difference I can see here is that he made a new front face plate from some sheet aluminum, and was using the face plate itself as a heat sink for the SSR.
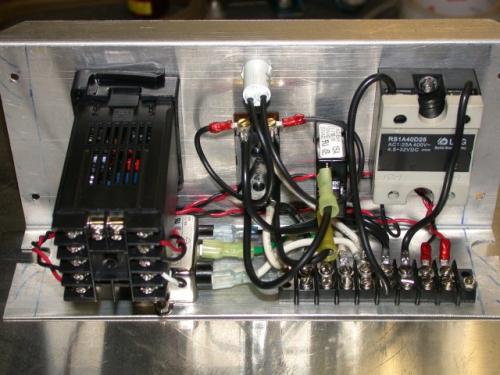
   

I don't know that I would want to do that - dumping the heat into the control panel where you are operating the furnace from.   Chin

I want to stick with using a heat sink AWAY from the front panel. But that's just me. It may be perfectly fine to do that, I don't know...   Blush
It looks like there will be plenty of space in the enclosure though after the original controls are removed.
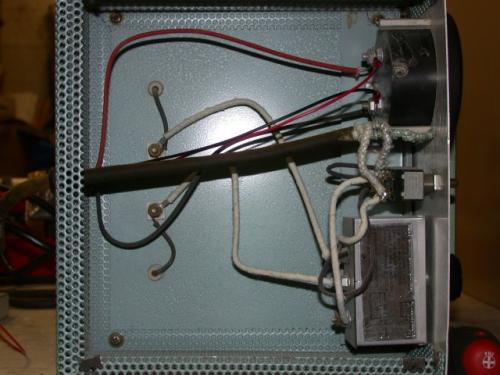
   

I measured mine and think the 18" long thermocouple will be the perfect length. I hope so anyway because I just ordered it along with some misc hardware for putting this all together.   Drool
Willie
Reply
Thanks given by:
#32
you still have to mount the heatsink to something, and the SSR shouldn't put out enough heat to hurt the panel
dallen, proud to be a member of MetalworkingFun Forum since Apr 2012.

If life seems normal, your not going fast enough! Tongue
Reply
Thanks given by:
#33
Hey Willie,

I'm a big advocate of form follows function. Get yourself a finned heatsink and mount it on the front of the panel opposite from the SSR. Then it will do an excellent job of cooling the SSR and look "cool" at the same time. Just remember to orient the fins on the heatsink vertically to get the most out of it. Power amplifiers often have their heatsinks mounted to the outside of the chassis.

Tom
[Image: TomsTechLogo-Profile.png]
Reply
Thanks given by:
#34
I feel what you are saying Tom, but there are a couple of reasons I don't want to do that myself.

#1) The thermocouple runs down the back of the furnace on the outside of the case. Sometimes I might have to MOVE this furnace on occasion. The original thermocouple was broken off and missing...  Chin
Even "I" can do that level of math!   Big Grin
(That reminds me - I need to make a cover for that.)

#2) Sharp "pokey bits" hanging on the outside of the case? Did I mention I'm on blood thinners???    Rotfl

The heat sink I ordered is also pre-drilled for mounting a CPU fan to it if I really wanted to!   Tongue  
Nah...

I need to stop researching though. I've been reading WAY too many posts (and seen the pictures) about these cheap Chinese SSR's blowing up and starting fires. Like everything else it seems to be about a 50 - 50 ratio. Some people never have a problem with them, others say if they aren't DOA, they melt down in short order. (No pun intended.) I've also seen a letter from UL showing the difference between the import relays that have an actual UL rating and the fake clones that are  sporting a pirated logo.

I've already ordered a SSR from Lightobject, but chickened out and ordered another US made relay from McMaster last night. (At 5 times the cost.) But after reading about all those instances of failed relays and fires, I'd rather not chance it. ESPECIALLY since I've read it can take up to 24 hours of continuous operation before the PID completes it's "autotune" program.  Somehow the idea of leaving a 2000° furnace running overnight - unattended - while we sleep doesn't appeal to me.   Sadno
Willie
Reply
Thanks given by:
#35
(12-06-2015, 11:52 AM)Highpower Wrote: ...
I need to stop researching though. I've been reading WAY too many posts (and seen the pictures) about these cheap Chinese SSR's blowing up and starting fires. Like everything else it seems to be about a 50 - 50 ratio. Some people never have a problem with them, others say if they aren't DOA, they melt down in short order. (No pun intended.) I've also seen a letter from UL showing the difference between the import relays that have an actual UL rating and the fake clones that are  sporting a pirated logo.

I've already ordered a SSR from Lightobject, but chickened out and ordered another US made relay from McMaster last night. (At 5 times the cost.) But after reading about all those instances of failed relays and fires, I'd rather not chance it. ESPECIALLY since I've read it can take up to 24 hours of continuous operation before the PID completes it's "autotune" program.  Somehow the idea of leaving a 2000° furnace running overnight - unattended - while we sleep doesn't appeal to me.   Sadno

Willie,

I could have sent you one of these for the cost of shipping. I got a few from work that were going to be thrown out during the move to the new location.

http://www.digikey.com/product-detail/en...-ND/139480

We've used those in our products at work for decades and have never had one go bad.

Ed
Reply
Thanks given by:
#36
Yikes Yikes Yikes

Oh well, I done already ordered the 45A from McMaster. Blink

But thank you for the offer Ed! Worthy
Willie
Reply
Thanks given by:
#37
OK, more questions...   Blush

I've been looking through a copy of the "manual" for the PID I'm waiting for. I've found at least one error that I know of. The first one is pretty obvious. Relay J2: #8, #9 should read normally "closed". Easy enough.


One I'm not sure about concerns the operation of the alarm relays.


Alarm 1 makes sense to me if I think of AL1 as 'alarm low limit' and AH1 as 'alarm high limit'.

But Alarm 2 is throwing me.  17428
It seems to me that they have the temperature settings for AL2 and AH2 reversed.  17428
So is that true and it's just another typo, or am I making incorrect assumptions?   Chin

Also... would I have to run the 'autotune' routine EVERY time I were to change the alarm relay settings?
I've never used one of these controllers before.   Blush

Smiley-signs028

Edit to add:
Disregard the above. Got it figured out now with some outside help. Seems I skipped over a couple of things in the instructions too. Bash
Willie
Reply
Thanks given by:
#38
It's always something. I started taking the furnace apart today and found a crack in the "hearth collar" at the front of the chamber that I hadn't noticed before.  Chin

The "crack" actually turned out to be one of the fire bricks had broken in two. Of course I can't leave well enough alone, and decided to fix it. I got all the brick out and cemented the broken one back together. It's in a clamp now while the adhesive sets up. In every parts list I have been able to find it looks like the hearth collar is one single piece. This one is 4 separate pieces. (Now 5 actually...)   Big Grin

I'm wondering if I should just cement them all together as well?   17428
Fewer joints = less heat loss? Or leave it "as is" for expansion/contraction during heating/cooling cycles?   Confused

   
Willie
Reply
Thanks given by:
#39
Bloody hell Willie  Yikes

That was a canny looking furnace a few posts back .now look at the poor thing ha ha ha . Big Grin

I would just leave well alone and don't cement the bricks .it will just cause more cracking problems . 

I think every furnace has at least one crack in the lining somewhere. 

Rob
Reply
Thanks given by: Highpower
#40
OK Rob. I'll heed your advice since you know 10,000 times more about this stuff than I do. Blush

Too late for the one broken brick though because I've already glued her back together. I'm glad I pulled it all apart though because I also found that the heat had turned the insulation on the heating element wires into powder. It disintegrated from the wires just blowing the dust and crumbs out of the shell. Just two bare wires (240V) sitting real close to a metal case. Yikes

I'll get everything cleaned up and replace the insulation on the wires, and feel better about not finding it later the hard way in the form of a short circuit. No worries - it will go back together and look proper again. I hope... Big Grin
Willie
Reply
Thanks given by:


Users browsing this thread: 21 Guest(s)