Posts: 1,827
Threads: 51
Joined: Apr 2012
Location: Oklahoma
if the guy using it isn't smart enough to count the gards he doesn't need to be using it.
Man that's one piece of beautiful machine work.
DA
dallen, proud to be a member of MetalworkingFun Forum since Apr 2012.
If life seems normal, your not going fast enough! 
Posts: 2,344
Threads: 53
Joined: Feb 2012
Location: Spencer MA USA
(12-14-2014, 05:30 PM)DaveH Wrote: First class job Ken  

DaveH
(12-14-2014, 05:50 PM)dallen Wrote: if the guy using it isn't smart enough to count the gards he doesn't need to be using it.
Man that's one piece of beautiful machine work.
DA
Dave & David,
Thanks for the kind thoughts, but it's not quite true. In all honesty, I had a brain fart along about the 2.200" inch mark and went beyond .050" long. I would shoot myself if David would send that completed firearm.
You can see it in this photo with adjusted contrast and a bit closer.
![[Image: DSC_0511-r_zps7e1a389d.jpg]](http://img.photobucket.com/albums/v466/kenm10759/Dads%20shop/DSC_0511-r_zps7e1a389d.jpg)
Posts: 1,827
Threads: 51
Joined: Apr 2012
Location: Oklahoma
dallen, proud to be a member of MetalworkingFun Forum since Apr 2012.
If life seems normal, your not going fast enough! 
Posts: 4,683
Threads: 93
Joined: Feb 2012
Location: Perth, Australia
(12-14-2014, 06:48 PM)PixMan Wrote: ...I had a brain fart along about the 2.200" inch mark and went beyond .050" long...
I would say that particular mark is a specific hold off for an unspecified load at a distance that is yet to be determined 
I didn't do much this weekend. I tried to do some clean up and organisation, and that started with gathering together all my taper and reduced shank drills. Some I have by the lathe, others are in wooden blocks and the rest are just laying about. These include ones I have bought new or second hand, and those given to me by Russ.
Some had surface rust on them, so as I cleaned and oiled them I also wrote down manufacturer name, drill size and any specific details and took a photo of each. Then I added them into my tool log. I only catalogue drills that are larger than 1/2" or 13mm (i.e. those not in standard garden variety drill indexes), as I know I have sets of them. Larger drills however are somewhat different and as I haven't yet figured out how to store them other than putting them in a drawer, the tool log means I can tell with a few mouse clicks if I have a drill of a specific size. Much quicker than sorting through a drawer!
Hunting American dentists since 2015.
Posts: 240
Threads: 30
Joined: Mar 2014
Location: Planeta Rica, Colombia
The following 2 users Like JScott's post:
schor (12-15-2014), PixMan (12-16-2014)
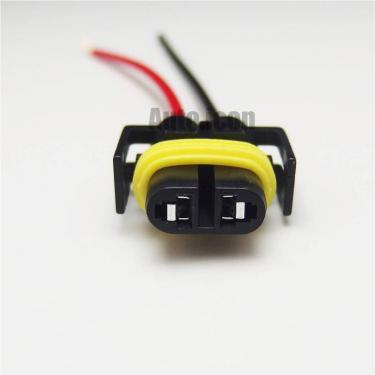
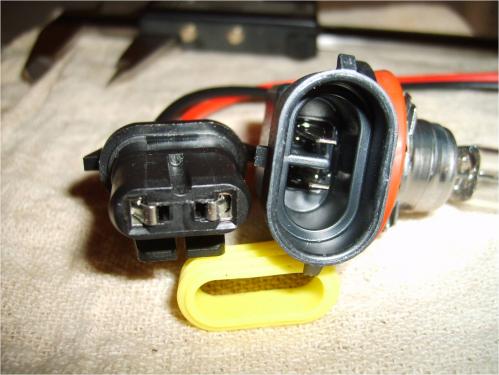
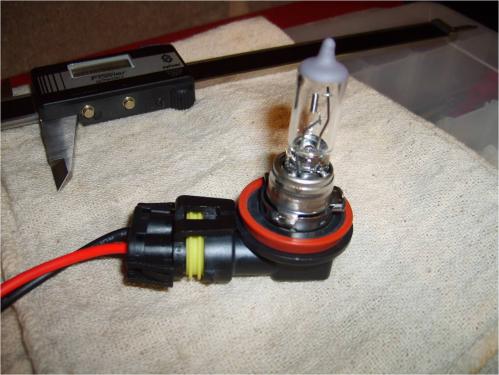
The low beam headlight socket on my Ford Fusion melted last week. I couldn't find a replacement H11 socket at the auto parts stores so I ordered one from eBay. When it arrived I tried it with my bulb and found a small discrepancy. The socket was missing a slot to accept the internal tab in the bulb. For the price of a return I decided to just modify the one I had. I used a 3/32" endmill to open a slot for the 0.625" tab. The pictures tell the tale.
This is what I thought I had ordered.
The part on the left is what I received. You can see the tab in the bulb base on the right and no corresponding slot in the socket on the left.
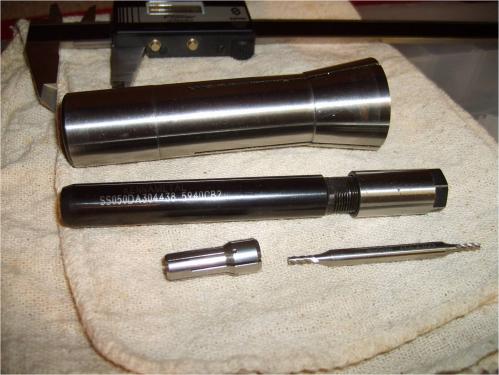
Here is the 1/2" collet I used to hold the ?0.1875 endmill. This is a case of using an R8 collet to hold a smaller bar which in turn holds smaller collets. This one is made by Kennametal.
I used a parallel to hold the socket in the vise. It was not terribly sturdy but I was just milling nylon and it held. As my mentor tells me, "If it works it isn't wrong."
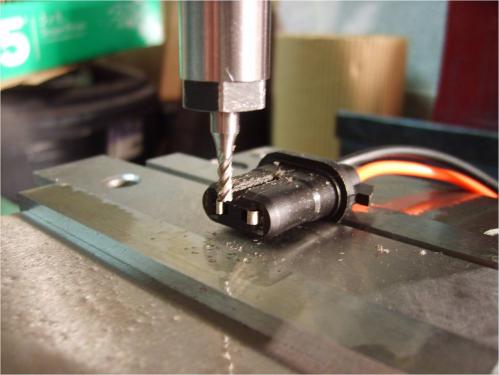
Here we see the finished slot. It is well centered which is lucky because I just set the position by eye.
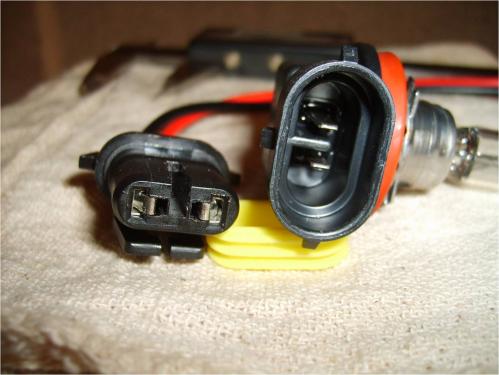
And lastly we have the assembly with socket and bulb. It fit pretty well.
JScott, proud to be a member of MetalworkingFun Forum since Mar 2014.
Posts: 741
Threads: 35
Joined: Feb 2012
Location: Minneapolis, MN
The following 2 users Like arvidj's post:
EdK (12-15-2014), PixMan (12-15-2014)
Nice work on the socket.
If I were faced with this problem I would have broken it into two parts. The first would be to locate the Dremel. The second would be to locate the socket after I had tried to do it quick and dirty free-hand and the Dremel would catch and fling the socket half way across the shop. 
Posts: 8,891
Threads: 320
Joined: Feb 2012
Location: Arizona/Minnesota
(12-15-2014, 02:23 PM)JScott Wrote: ...
And lastly we have the assembly with socket and bulb. It fit pretty well.
Nice save JS. 
Ed
Posts: 190
Threads: 17
Joined: Aug 2014
Location: Ajax Ontario Canada
Nice job on the fix. Always nice when you have the tools to do a job.
Posts: 2,344
Threads: 53
Joined: Feb 2012
Location: Spencer MA USA
Nice work there JScott.
I'm curious about the Ford. What model year is that? I'm asking because I'm buying out my company car coming off lease today and it's a 2013 Ford Fusion. It's been very good, but if there's something I need to be wary of....
I just hope it's a little better for servicing headlamps than the previous one I bought, a 2009 Chevrolet Malibu. One that one, you have to remove the entire front bumper cover to remove the headlamp housings...just to change the light bulbs! Is that car a bit easier to service?
No complaints about the '13 I've been driving for about 20 months. I took it into the Ford dealer to see if I could get the company to put new brakes on it before I bought it. They told me it still has 70% of the pads remaining. And the car has 85,300 miles on it! It's a keeper IMHO.
Posts: 240
Threads: 30
Joined: Mar 2014
Location: Planeta Rica, Colombia
(12-16-2014, 07:34 AM)PixMan Wrote: I'm curious about the Ford. What model year is that? I'm asking because I'm buying out my company car coming off lease today and it's a 2013 Ford Fusion. It's been very good, but if there's something I need to be wary of....
It is a 2009. Sent you a PM with more details.
JScott, proud to be a member of MetalworkingFun Forum since Mar 2014.
|


![[Image: DSC_0511-r_zps7e1a389d.jpg]](http://img.photobucket.com/albums/v466/kenm10759/Dads%20shop/DSC_0511-r_zps7e1a389d.jpg)
